background image

Page | 1  


Introduction 

 
Congratulations  on  your  purchase  of  the  CD450  Center  Drive  Elliptical.  This  product  has  been 
designed and manufactured to meet the needs and requirements of domestic use.  
 
By  Choosing  your  CD450  Elliptical,  you  have  made  a  wise  decision  that  will  improve  the  health  of 
you and your family. Being fit and healthy will improve your energy level and your quality of life. 
 
Cardiovascular  training  is  vital  for  all  ages  and  the  CD450  Elliptical  provides  a  more  effective 
workout, producing better results, and will encourage you to reach your fitness goals and maintain 
the body you have always wanted. 
 
In  order  to  make  your  experience  with  LifeCORE  the  best  it  can  be,  please  review  the  enclosed 
user’s manual prior to assembly and first use. Be sure to keep the instructions for reference and/or 
maintenance. 
 
We  also  offer  a  complete  line  of  fitness  equipment;  please  take  a  moment  to  review  our  other 
excellent products at www.LifeCOREfitness.com. Should you have any questions, please contact us. 
Your feedback and ideas about your experience with LifeCORE are also very important to us. Write 
to us at: 
 

LifeCORE Fitness Inc. 

2575 Pioneer Ave. Suite 101 
Vista, CA 92081 
 
 
We wish you lots of success and fun while training! 
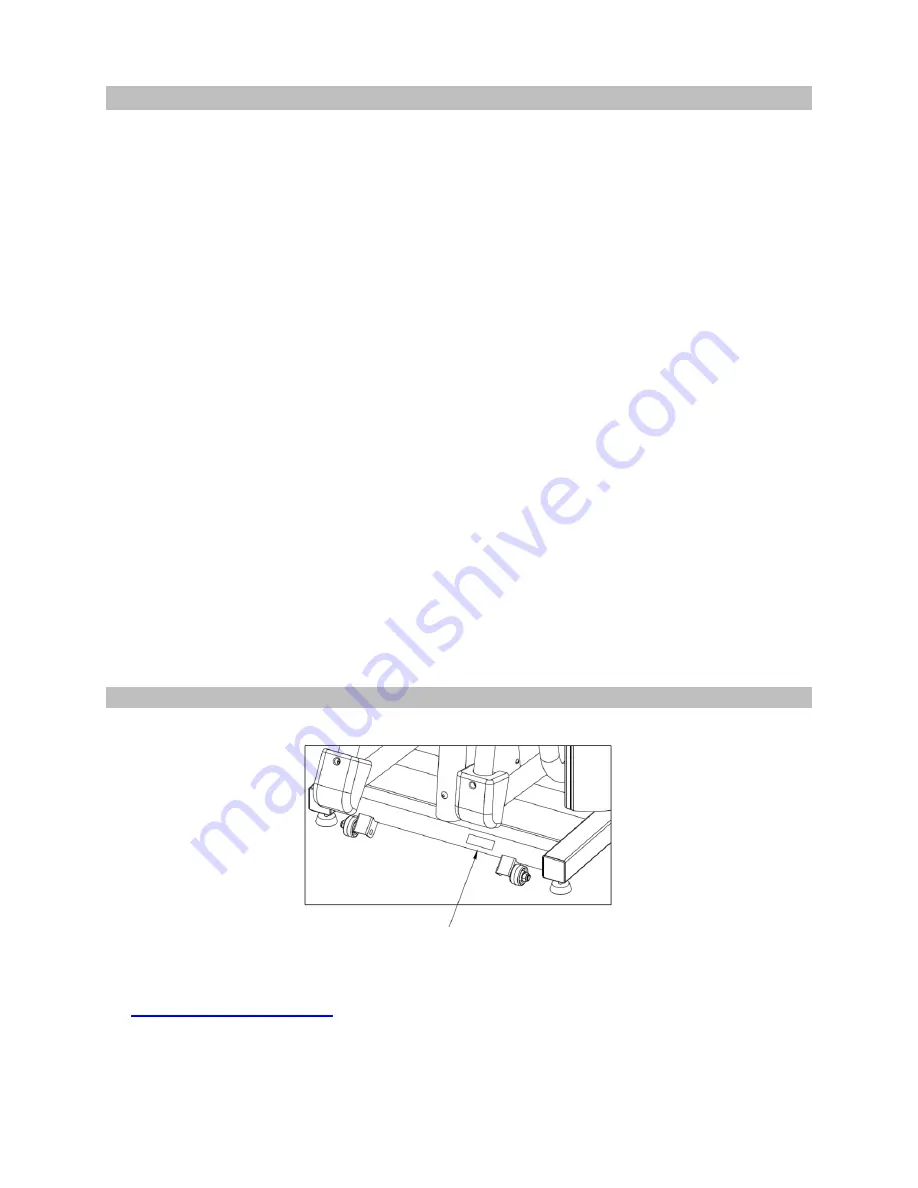


Purchaser

’s Reference Information 


Serial Number

 is located on the frame 


Please send in the attached warranty card and a copy of the original receipt or register online 
at 

www.LifeCOREfitness.com

  within  (10)  days  of  purchase  to  register  your  product  with 

LifeCORE Fitness.  


Summary of Contents for LC-CD450

Page 1: ...User s Product Manual LifeCORE LC CD450 Center Drive Elliptical...

Page 2: ...th LifeCORE the best it can be please review the enclosed user s manual prior to assembly and first use Be sure to keep the instructions for reference and or maintenance We also offer a complete line...

Page 3: ...of Contents Safety instructions and Warnings Assembly Instructions Console Operation Instructions English and Metric Setting Touch Screen Adjusting Steps Monitoring Your Heart Rate Heart Rate Monitor...

Page 4: ...times Product safety instructions 1 Start your exercise program gradually Exercise only for a few minutes the first day to let your body adjust to the new exercise 2 Slowly increase your exercise tim...

Page 5: ...ut on the floor Double check all packaging material for missing pieces do not dispose of any packing material until assembly is complete and unit is working properly The final location of the machine...

Page 6: ...res Additional help maybe needed to help line up holes to frame Note Do not tighten screws until you have fully completed Step 2 1 Locate bag labeled Figure 1 2 Locate console tube 3 Slide console tub...

Page 7: ...rews 4 Tighten all hardware from Step 1 Step 3 Tools Needed 17 mm socket wrench 2JAX Tube of grease 2K81 Note Arms are labeled Right and Left Note Apply about a finger tips worth of assembly grease on...

Page 8: ...JAX 17 mm wrench 2JAW Tube of grease 2K81 Note It is recommended that two adults help align and secure the pedal tube assemblies to the handrail assemblies Note Apply about a finger tips worth of asse...

Page 9: ...ail assembly by lining up the hole and using a Philips screw driver to tighten Qty one M5X0 8 12 screw into handrail assembly Repeat for other side Step 7 Tools Needed 6mm Allen wrench 2JC7 1 Locate b...

Page 10: ...e way 1 Locate bag labeled Figure 8 2 Locate computer console 3 Connect the computer cable wire into the connector on the board 4 Place the computer console on the console mast Make sure the wires fit...

Page 11: ...rom the console tube 3 Secure the pulse handlebar assembly to the console tube by screwing Qty six M6x10 hex socket head bolts into frame Using a 4mm Allen Wrench tighten bolts Step 10 Tools Needed Ph...

Page 12: ...to tighten Plug the AC adaptor into a power outlet and into the machine The AC inlet is located on the user left side of the machine Only a DC 9V 1000mA that comes with the unit should ever be used t...

Page 13: ...tart in order to get a better understanding of the functions Below is the console layout and detailed operation instructions Make sure the console is powered up before you start using this console Thi...

Page 14: ...you are currently in and show your workout progress Classic programs There are also 10 rows representing 20 levels of resistance Each row represents 2 levels of resistance The appropriated row will li...

Page 15: ...isplays from upper row to lower row or vice versa by pressing the DISPLAY key next to it g Segment time window Note Display sleep mode If there is no RPM the display will shut down and enter sleep mod...

Page 16: ...ifferent program You can always press START key anytime to start the program right away C User keys User 1 User 2 There are 2 User programs for you to save the favorite workouts If you wish to save a...

Page 17: ...mply press the START key once and all data will start counting Pressing START key once during Pause will resume the program Pressing START key at program ending will re start the same program again an...

Page 18: ...o adjust HR anytime during Target HR and HR interval program execution When program time is up and the program ends the message display will scroll thru the workout totals for your review At this time...

Page 19: ...t interval The default work interval is 80 and rest interval is 65 and can be adjusted to low at 60 and high at 90 by pressing HR Up Down keys during program Note During program execution if there is...

Page 20: ...play accuracy 1 When the console is ON the message display shows SELECT A PROGRAM at this time press QUICK START HR PROGRAM keys at the same time to start the display adjusting sequences 2 The LCD wil...

Page 21: ...your neck or against your wrist over the main artery After finding your pulse count the number of beats in 10 seconds Multiply the number of beats by six to determine your resting pulse rate per minut...

Page 22: ...of the hands are touching the contact area of each hand pulse grip Maintain an even pressure on the grips Do not hold the hand pulse grips too tightly Chest Strap Optional The CD450 is equipped with a...

Page 23: ...d cleaner such as Windex to remove dirt The purpose of cleaning the unit is to remove body sweat which contains salt Salt is the number one factor that will cause the unit to rust and the electronics...

Page 24: ...than LifeCORE or an authorized LifeCORE service provider This Limited Warranty is void if the Product serial number has been defaced or removed Should any Product be submitted for warranty service be...

Page 25: ...nged frames and parts replaced under this warranty will at the time of service become the property of LifeCORE LifeCORE reserves the right to change manufacturers of any parts to cover any existing wa...

Page 26: ...omer Service Toll Free 888 815 5559 Mon Friday 7 30 5 30 PT Service LifeCOREfitness com LifeCORE Fitness Inc 2575 Pioneer Ave Suite 101 Vista CA 92081 Visit our website for assembly videos www LifeCOR...

Reviews: