background image

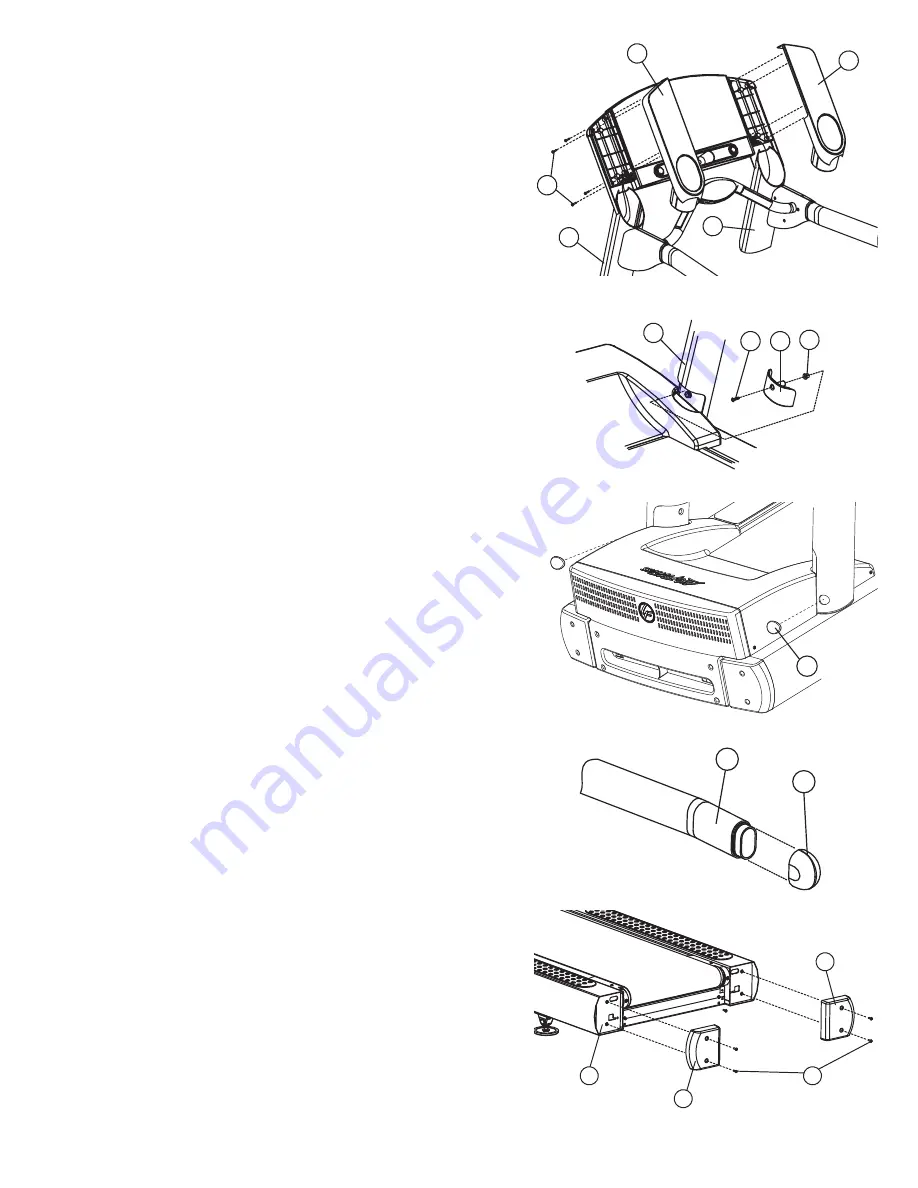
15. Locate the L

EFT

A

CCESSORY

T

RAY

(11). Carefully slide the tray into 

the top of the L

EFT

U

PRIGHT

(1) as shown until fully seated. 

Secure the accessory tray to the L

EFT

T

OP

M

OUNTING

P

LATE

(H) 

using four S

CREWS

(21). Repeat the procedure for the R

IGHT

A

CCESSORY

T

RAY

(12) and R

IGHT

T

OP

M

OUNTING

P

LATE

(J).

16. Tighten all U

PRIGHT

B

OLTS

securely.

17. Replace the M

OTOR

C

OVER

(E) and secure the M

OTOR

C

OVER

to the F

RAME

(C) using the four previously removed S

CREWS

(D). Tighten the S

CREWS

securely. Do not overtighten the S

CREWS

.

18. Replace the F

RONT

G

RILL

(B) and secure the F

RONT

G

RILL

to the 

F

RAME

(C) using the four previously removed S

CREWS

(A). 

Tighten the S

CREWS

securely. Do not overtighten the S

CREWS

.

19. Locate one S

CREW

G

ROMMET

(18). Insert the S

CREW

G

ROMMET

into the square hole located above the top inside mounting bolt 
of the R

IGHT

U

PRIGHT

(2). Repeat for the remaining S

CREW

G

ROMMET

and L

EFT

U

PRIGHT

(1).

20. Locate one L

OWER

U

PRIGHT

C

OVER

(10). Position the L

OWER

U

PRIGHT

C

OVER

at the bottom notch of the R

IGHT

U

PRIGHT

(2) 

making sure the top lip of the U

PRIGHT

C

OVER

is engaged under 

the outside notch of the R

IGHT

U

PRIGHT

. Secure the U

PRIGHT

C

OVER

to the R

IGHT

U

PRIGHT

using one S

CREW

(16). Tighten the 

S

CREW

securely. Do not overtighten the S

CREW

. Repeat the pro-

cedure for the L

EFT

U

PRIGHT

(1) and remaining U

PRIGHT

C

OVER

.

21. Locate the U

PRIGHT

P

LUGS

(25). Insert one U

PRIGHT

P

LUG

into 

each of the two access holes located on the lower outside of the 
L

EFT

and R

IGHT

U

PRIGHTS

(1 & 2).

22. Locate and press the H

ANDLEBAR

C

APS

(13) over the ends of the 

H

ANDLEBARS

(3). Be sure the H

ANDLEBAR

C

APS

are fully seated.

23. Using two S

CREWS

(16) each, attach the two R

EAR

F

RAME

E

ND

C

APS

(14) to the F

RAME

(C) as shown. Tighten the S

CREWS

securely. Do not overtighten the S

CREWS

.

24.

The treadmill striding belt must be “walked-in” for five 
minutes after assembly is complete.

Plug the treadmill into an appropriate outlet. Turn the treadmill 
on at the on/off switch. Select QUICK START from the console. 
Increase the speed to 3 mph (4.8 km/h). Start walking in the 
front left corner of the walking surface and drift to the back, 
move to the center of the deck and walk towards the front, and 
finally walking to the right corner and drifting to the back. 
Continue pattern for five minutes.

25. Refer to the specific treadmill’s Operation Manual for power 

requirements, proper line cord routing, and other critical product
information before connecting the treadmill to a power source.

3

13

C

14

14

16

7

2

16

10 18

25

1

2

12

11

21

Summary of Contents for 97TI

Page 1: ...INTEGRITY AND CLUB SERIES TREADMILLS CST CLST 97TI ASSEMBLY INSTRUCTIONS M051 00K58 0379 REV E ...

Page 2: ...listed on the back page of this assembly instruction booklet Save the shipping cartons in case of return l DO read the entire Operation Manual prior to attempting to operate this machine as this is essential for proper use The Manual explains how to properly use the treadmill and helps you to train your staff effectively l NE placez PAS l arrière du tapis roulant dans un rayon de 2 m 6 pi de l obs...

Page 3: ...12 Right accessory tray 1 13 Handlebar cap 2 14 Rear frame endcap 2 15 Handlebar shroud screw 0017 00101 1770 6 16 Endcap Upright cover screw 0017 00101 1772 6 17 Display console Handlebar support screw 0017 00101 1773 6 18 Screw grommet 0017 00042 0326 2 19 Front crossbar screw 0017 00101 1774 4 20 Upright mounting bolt 0017 00101 1778 4 21 Accessory tray screw 0017 00101 1780 8 22 Front crossbar...

Page 4: ...NDCAP UPRIGHT COVER SCREW 16 SCREW GROMMET 18 LINECORD CLIP 23 FRONT CROSSBAR SCREW 19 UPRIGHT MOUNTING BOLT 20 ACCESSORY TRAY SCREW 21 FRONT CROSSBAR NUT 22 UPRIGHT WASHER 24 DISPLAY CONSOLE HANDLEBAR SUPPORT SCREW 17 HARDWARE 3 ...

Page 5: ...n the bottom of each UPRIGHT The GASKET must be fully seated With the LEFT TOP MOUNTING PLATE H directed forward slide the LEFT UPRIGHT down over the LEFT UPRIGHT MOUNTING BRACKET and pre installed BOLT and WASHER until it rests on the FRAME C Secure the LEFT UPRIGHT to the LEFT UPRIGHT MOUNTING BRACKET using two BOLTS and WASHERS 20 24 Use one BOLT and WASHER on the inside of the LEFT UPRIGHT and...

Page 6: ...4 near the large access hole on the inside of the RIGHT UPRIGHT HANDLEBAR BRACKET L Align the ERGO FRONT CROSSBAR MOUNTING HOLES with those in the RIGHT UPRIGHT HANDLEBAR BRACKET and secure using two BOLTS 19 from the inside of the treadmill and NUTS 22 Tighten the BOLTS securely Insert one SCREW 17 from under the RIGHT UPRIGHT HANDLEBAR BRACKET Tighten the SCREW securely 10 Position the left end ...

Page 7: ...urely Do not overtighten the SCREWS 13 Position and rest the FRONT CONSOLE R face down across the HANDLEBARS 3 Connect all CONNECTORS leading from the LEFT if equipped and RIGHT UPRIGHTS 1 2 to the corresponding CONNECTORS located on the FRONT CONSOLE Feed any excess WIRE HARNESS into the UPRIGHTS Carefully route all WIRE HARNESSES through the WIRE HARNESS GUIDES S located at the lower left of the...

Page 8: ...he RIGHT UPRIGHT using one SCREW 16 Tighten the SCREW securely Do not overtighten the SCREW Repeat the pro cedure for the LEFT UPRIGHT 1 and remaining UPRIGHT COVER 21 Locate the UPRIGHT PLUGS 25 Insert one UPRIGHT PLUG into each of the two access holes located on the lower outside of the LEFT and RIGHT UPRIGHTS 1 2 22 Locate and press the HANDLEBAR CAPS 13 over the ends of the HANDLEBARS 3 Be sur...

Page 9: ...iez le cf Manuel de l utilisateur 4 Vérifiez si la console d affichage est sur le système métrique ou anglais Référez vous aux réglages facultatifs relatifs aux systèmes de mesure dans le Manuel de l utilisateur 4 Consultez le Manuel de l utilisateur pour le réglage de l horloge en temps réel 4 Lisez le Manuel de l utilisateur dans son intégralité avant d utiliser le tapis roulant Before attemptin...

Reviews: