31
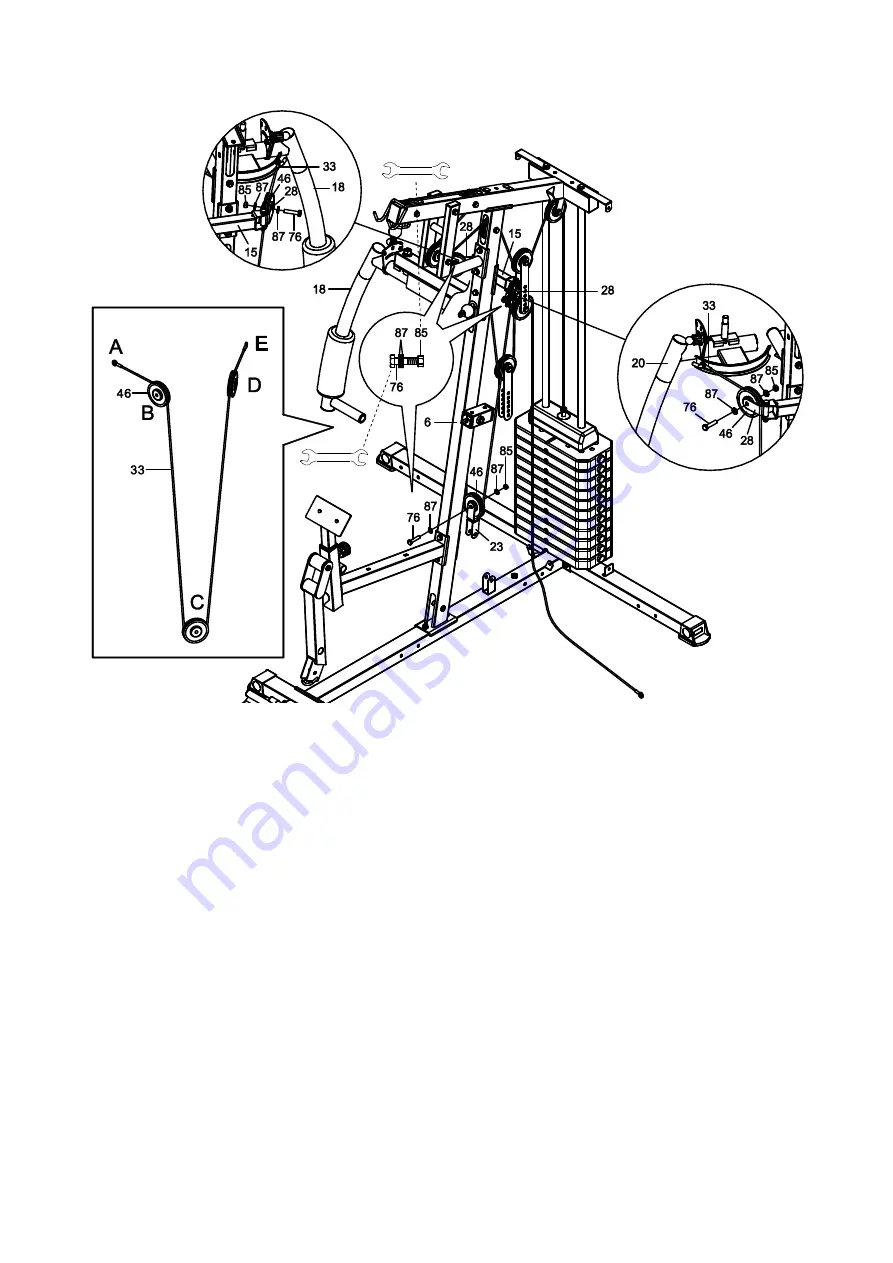
STEP 10-1
A. Fix one end of the Arm Cable (33) to the Left Arm (20).
B. Pull the Arm Cable (33) forwards to the U-shaped Pulley Bracket (28). Slot the
Pulley (46) in the U-shaped Pulley Bracket (28) and pull the Arm Cable (33) through
over the Pulley (46). Then secure the Pulley (46) in the U-shaped Pulley Bracket (28)
with one Hexagon Head Bolt (76), one Nylon Nut (85), and two Flat Washers (87).
Tighten bolt and nylon nut with two Double Open End Wrenches provided.
C. Pull the Arm Cable (33) downwards to the Crossed Double Floating Pulley Bracket (23).
Slot the Pulley (46) in the Crossed Double Floating Pulley Bracket (23) and pull the Arm
Cable (33) through underneath the Pulley (46). Then secure the Pulley (46) in the
Crossed Double Floating Pulley Bracket (23) with one Hexagon Head Bolt (76), one
Nylon Nut (85), and two Flat Washers (87). Tighten bolt and nylon nut with two Double
Open End Wrenches provided.
D. Pull the Arm Cable (33) upwards to the U-shaped Pulley Bracket (28). Slot the
Pulley (46) in the U-shaped Pulley Bracket (28) and pull the Arm Cable (33) through
over the Pulley (46). Then secure the Pulley (46) in the U-shaped Pulley Bracket (28)
with one Hexagon Head Bolt (76), one Nylon Nut (85), and two Flat Washers (87).
Tighten bolt and nylon nut with two Double Open End Wrenches provided.
Summary of Contents for 63145
Page 2: ... FOR HOME GYM OWNER S MANUAL A ...
Page 10: ...8 EXPLODED VIEW ...
Page 26: ...24 CABLE ASSEMBLY STEP 8 Routing the Cable 32 from A to G 32 Cable 1 PC ...
Page 29: ...27 STEP 9 Routing the Leg Press Cable 37 from A to D 37 Leg Press Cable 1 PC ...
Page 32: ...30 STEP 10 Routing the Cable 32 from A to E 33 Arm Cable 1 PC ...
Page 35: ...33 STEP 11 Routing the Cable 32 from A to F 32 Cable 1 PC ...
Page 47: ... FOR VKR SIT UP BENCH OWNER S MANUAL B ...
Page 51: ...4 EXPLODED VIEW ...
Page 63: ... FOR LEG PRESS OWNER S MANUAL C ...
Page 67: ...4 EXPLODED VIEW ...
Page 74: ...11 STEP 4 Routing the Leg Press Cable A 37 from A to F ...


