background image


EXPLODED VIEW 


Summary of Contents for 76503

Page 1: ...MANUAL IMPORTANT Read all instructions carefully before using this product Retain this owner s manual for future reference The specifications of this product may vary from this photo and are subject to change without prior notice 2020 Dec ...

Page 2: ...NTENTS WARRANTY 2 IMPORTANT SAFETY INSTRUCTIONS 3 PARTS LIST 4 HARDWARE PACK 5 EXPLODED VIEW 6 ASSEMBLY INSTRUCTIONS 7 HOW TO MOVE THE INCLINE BENCH 15 ADJUSTMENTS 16 MAINTENANCE 18 WARM UP AND COOL DOWN ROUTINE 19 ...

Page 3: ...r repairing free of charge any parts which may prove to be defective under normal home use This warranty does not include any damage caused by improper operation misuse or commercial application From the date of purchase the frame is warranted to be free from defects for 1 one year This warranty is offered only to the original owner and is not transferable Proof of purchase is required When orderi...

Page 4: ...xercises with a slow and controlled movement 10 This equipment is for household use only It is not a commercial model 11 Only one person at a time should use this equipment 12 Be careful to maintain your balance while using mounting dismounting folding unfolding or assembling the equipment loss of balance may result in a fall and serious bodily injury 13 If you feel any chest pains nausea dizzines...

Page 5: ... Bolt M10x20 2 012 Holder Tube Ø25xT1 5x390 3 037 Hexagon Socket Pan Head Cap Bolt M10x55 4 013 Backrest Adjustment Plate 500x45xT3 0 2 038 Hexagon Socket Pan Head Cap Bolt M10x65 1 014 Seat 1 039 Hexagon Socket Pan Head Cap Bolt M10x95 6 015 Backrest 1 040 Hexagon Socket Pan Head Cap Bolt M10x150 3 016 Arm Curl Pad 1 041 Hexagon Socket Pan Head Cap Bolt M8x40 8 017 Foam Roller Ø23xØ90x170 6 042 H...

Page 6: ...4 Flat Washer 8 PCS 47 Nylon Nut 2 PCS STEP 2 36 Hexagon Socket Pan Head Cap Bolt 2 PCS 44 Flat Washer 2 PCS 49 Axle 1 PC STEP 3 41 Hexagon Socket Pan Head Cap Bolt 8 PCS 42 Hexagon Socket Pan Head Cap Bolt 2 PCS 45 Flat Washer 10 PCS Allen Wrench 5 mm 1 PC Allen Wrench 6 mm 1 PC Double Open End Wrench 13 mm 17 mm 1 PC 13 mm 17 mm ...

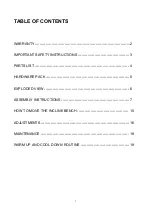
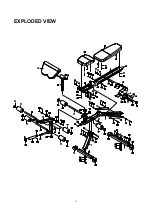
Page 7: ...6 EXPLODED VIEW ...

Page 8: ...tabilizer 1 with two Hexagon Socket Pan Head Cap Bolts 37 two Spring Washers 43 and two Flat Washers 44 Tighten bolt with the 6 mm Allen Wrench provided Hardware STEP 1 37 Hexagon Socket Pan Head Cap Bolt 2 PCS 43 Spring Washer 2 PCS 44 Flat Washer 2 PCS 6 mm Allen Wrench ...

Page 9: ...4 with two Hexagon Socket Pan Head Cap Bolts 37 two Spring Washers 43 and two Flat Washers 44 Tighten bolt with the 6 mm Allen Wrench provided Hardware STEP 1 37 Hexagon Socket Pan Head Cap Bolt 2 PCS 43 Spring Washer 2 PCS 44 Flat Washer 2 PCS 6 mm Allen Wrench ...

Page 10: ... Tighten bolt and nylon nut with the 6 mm Allen Wrench and the Double Open End Wrench provided Insert the Lock Pin 32 into the holes on the Adjustable Seat Bracket 9 and Main Frame 4 to lock the Adjustable Seat Bracket 9 in place Hardware 6 mm Allen Wrench STEP 1 39 Hexagon Socket Pan Head Cap Bolt 2 PCS 43 Spring Washer 2 PCS 44 Flat Washer 4 PCS 47 Nylon Nut 2 PCS ...

Page 11: ... into the u shaped bracket of the Main Frame 1 and align bolt holes Attach the Leg Developer 10 with two Hexagon Socket Pan Head Cap Bolts 36 and two Flat Washers 44 that were removed Tighten bolt with the 6 mm Allen Wrench provided Hardware STEP 2 36 Hexagon Socket Pan Head Cap Bolt 2 PCS 44 Flat Washer 2 PCS 49 Axle 1 PC 6 mm Allen Wrench 6 mm Allen Wrench STEP 2 36 Hexagon Socket Pan Head Cap B...

Page 12: ... 45 Tighten bolt with the 5 mm Allen Wrench provided Attach the Backrest 15 onto the Backrest Support Tubes 65 with four Hexagon Socket Pan Head Cap Bolts 41 and four Flat Washers 45 Tighten bolt with the 5 mm Allen Wrench provided Hardware STEP 3 41 Hexagon Socket Pan Head Cap Bolt 8 PCS 45 Flat Washer 8 PCS 5 mm Allen Wrench ...

Page 13: ...nob 18 and then insert the Arm Curl Tube 11 into the square hole of the Main Frame 4 Slide the Arm Curl Tube 11 up or down direction to the suitable position Lock the Arm Curl Tube 11 in place by releasing the Adjustment Knob 18 and sliding the Arm Curl Tube 11 up or down slightly until the Adjustment Knob 18 pops down into the locked position For added safety tighten the Adjustment Knob 18 in a c...

Page 14: ... end of the Holder Tube 12 Insert the Holder Tube 12 into the top hole in the Leg Developer 10 Slide the other Foam Roller 7 onto the other end of the Holder Tube 12 Press both Round End Caps 28 into both ends of the Holder Tube 12 Slide a Foam Roller 17 onto one end of the Holder Tube 12 Insert the Holder Tube 12 into the bottom hole in the Leg Developer 10 Slide the other Foam Roller 7 onto the ...

Page 15: ...9 Remove screw with the Allen Wrench provided Slide the Weight Holder Sleeve 29 onto the Leg Developer 10 and secure with one Hexagon Socket Set Screw 20 that was removed Tighten screw with the Allen Wrench provided Attach the Big Spring Clip 31 to the Weight Holder Sleeve 29 Use the U shaped Pin 50 to lock the Leg Developer 10 in place ...

Page 16: ...ls for easy moving and storage To move the bench firmly grasp the Leg Developer with both hands and the Leg Developer must be locked by U shaped Pin Next carefully pull the bench up until it rolls freely on the Transport Wheels CAUTION It is suggested you always use the aid of a second person when moving the bench Transport Wheel Leg Developer U shaped Pin ...

Page 17: ...justment knob in a counterclockwise direction until it can be pulled out Pull out the adjustment knob and then raise or lower the backrest to the suitable position Lock the backrest in place by releasing the adjustment knob and raise or lower the backrest slightly until the adjustment knob pops down into the locked position For added safety tighten the adjustment knob in a clockwise direction Adju...

Page 18: ...tion Lock the arm curl pad in place by releasing the adjustment knob and sliding the arm curl pad up or down slightly until the adjustment knob pops down into the locked position For added safety tighten the adjustment knob in a clockwise direction Adjusting the Seat Height The seat can be adjusted according to your own training needs Pull out the lock pin and then adjust the seat to the desired h...

Page 19: ... doing leg developer exercises MAINTENANCE The equipment can be cleaned using a clean and dry cloth after each use Upholstery can be cleaned with a mild detergent or spray cleaner Please inspect all assembly bolts and nuts on the equipment for proper tightness and frame of the equipment for any sign of cracking or permanent bending If you find this situation do not use this equipment and contact l...

Page 20: ... state at the end of each exercise session A proper cool down slowly lowers your heart rate and allows blood to return to the heart HEAD ROLLS Rotate your head to the right for one count you should feel a stretching sensation up the left side of your neck Then rotate your head back for one count stretching your chin to the ceiling and letting your mouth open Rotate your head to the left for one co...

Page 21: ...ean against a wall with your right leg in front of the left and your arms forward Keep your left leg straight and the right foot on the floor then bend the right leg and lean forward by moving your hips toward the wall Hold then repeat on the other side for 15 counts TOE TOUCHES Slowly bend forward from your waist letting your back and shoulders relax as you stretch toward your toes Reach as far a...

Reviews: