background image


7

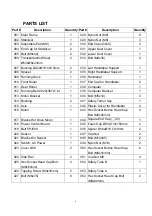
PARTS LIST 

Part # 

Description 

Quantity Part #

Description 

Quantity

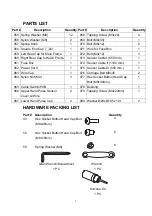
055  Spring Washer (M8) 

12 

068 Tapping Screw (M3x20) 

056  Nylon Washer (M8) 

069 Bolt (M8x35) 

057  Spring Knob 

070 Bolt (M8x12) 

058  Square End Cap (

20) 

071 Wire for Fuse Box   

059  Left Rear Cap for Main Frame 

072 Bolt (M4x12) 

060  Right Rear Cap for Main Frame

073 Sensor Cable I (650 mm.) 

061  Fuse Box   

074 Sensor Cable II (1100 mm.) 

062  Power Cord 

075 Sensor Cable III (550 mm.) 

063  Wire Cap 

076 Carriage Bolt M8x45 

064  Nylon Nut (M4) 

077 Hex Socket Button Head Cap 

Bolt (M8x40mm) 

065  Cable Switch/PCB  

078 Bushing  

066  Upper Hand Pulse Sensor 

Cover w/Wire 

079 Tapping Screw (M4x23mm) 

067  Lower Hand Pulse Cap 

080 Washer Ø20xØ10.5x1.0t 

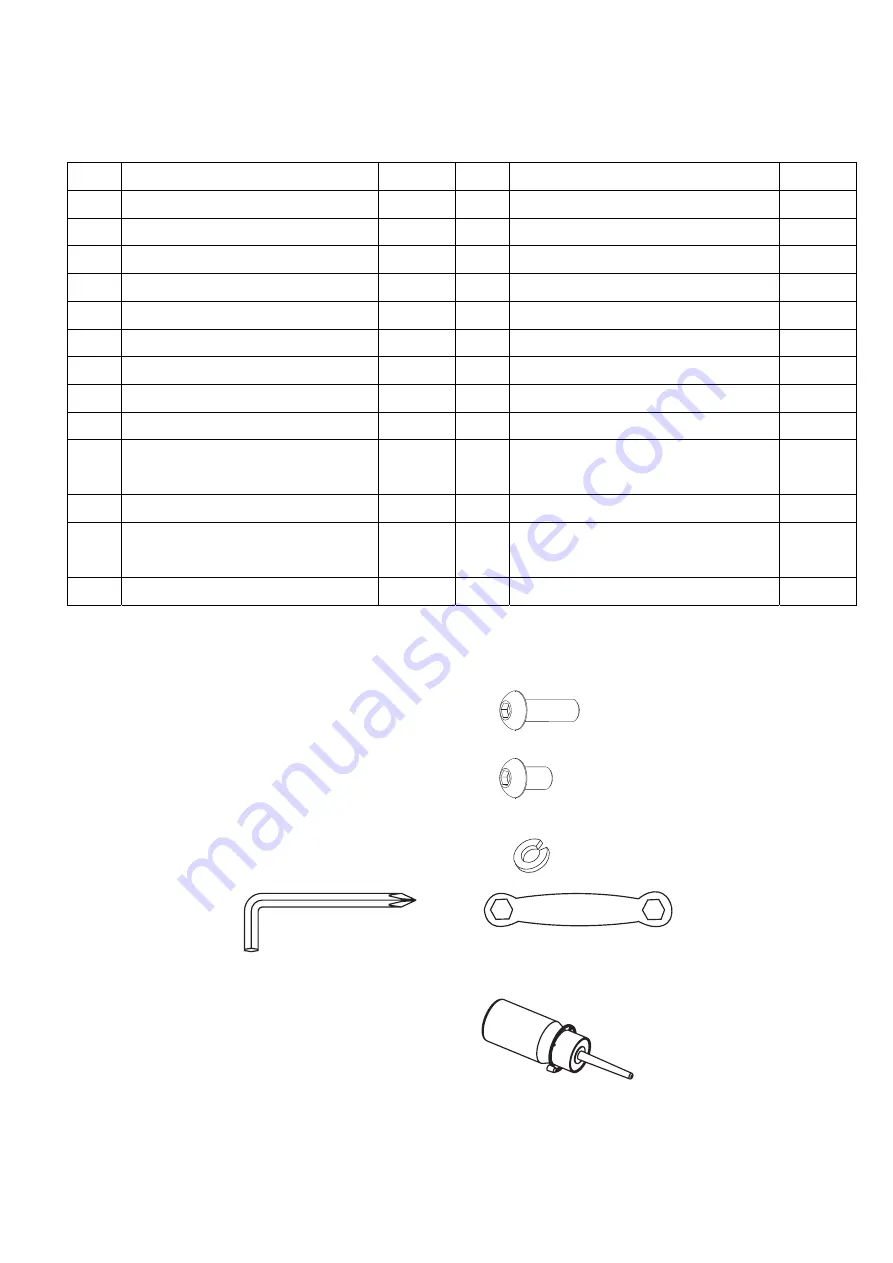
HARDWARE PACKING LIST 

Part #  Description      


            Quantity


43 

Hex Socket Button Head Cap Bolt   

(M8x45mm) 


50 

Hex Socket Button Head Cap Bolt   

(M8x16mm) 


55   

Spring Washer (M8) 


Allen Wrench/Screwdriver

1 PC 

Wrench 

1 PC 

Silicone Oil 

1 PC 


Summary of Contents for 97288HP

Page 1: ...MOTORIZED TREADMILL OWNER S MANUAL MODEL 97288HP The specifications of this product may vary from this photo and are subject to change without notice 2008 April WALKEASE ...

Page 2: ...ns that it has been installed and operated in accordance with LifeGear s Owner s Manual LifeGear s obligation under this warranty is limited to replacing or repairing free of charge any parts which may prove to be defective under normal home use This warranty does not include any damage caused by improper operation misuse or commercial application From the date of purchase the frame is warranted t...

Page 3: ...manual Do not use attachments not recommended by the manufacturer z Never operate this treadmill if it has a damaged cord or plug or if it is not working properly If it has been dropped or damaged or been exposed to water return the appliance to a service center for examination and repair z Do not attempt any maintenance or adjustments other than those described in this manual Should any problems ...

Page 4: ...he storage latch is in place when folding and moving the treadmill z Do not leave children who are under 12 year old unsupervised near or on the treadmill z This appliance is not intended for use by persons including children with reduced physical sensory or mental capabilities or lack of experience and knowledge unless they have been given supervision or instruction concerning use of the applianc...

Page 5: ...plugged into a nominal 220 volt 50 60 hz which has a grounding z Keep hands clear of all moving parts Never place hands feet under the treadmill z Do not use the treadmill on a carpet that is greater than 1 2 inch in height z Before using the treadmill check that the running belt is aligned and centered on the treadmill bed and all visible fasteners on the treadmill are sufficiently tightened and ...

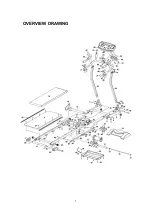
Page 6: ...5 OVERVIEW DRAWING ...
Page 7: ...nning Belt 2220x367x1 6t 1 039 Computer Bracket 1 013 Motor Bracket 1 040 Bolt M5x10 4 014 Bushing 2 041 Safety Tether Key 1 015 Axis 1 042 Plastic Cover for Handlebar 2 016 Motor 1 043 Hex Socket Button Head Cap Bolt M8x45mm 4 017 Bracket for Drive Motor 1 044 Square End Cap 25 1 018 Power Control Board 1 045 Foam Grip Ø30x3 5tx150mm 2 019 Belt 5PJ508 1 046 Spacer Ø16xØ10 5x19mm 2 020 Sensor 1 04...

Page 8: ...1 074 Sensor Cable II 1100 mm 1 062 Power Cord 1 075 Sensor Cable III 550 mm 1 063 Wire Cap 1 076 Carriage Bolt M8x45 2 064 Nylon Nut M4 3 077 Hex Socket Button Head Cap Bolt M8x40mm 1 065 Cable Switch PCB 1 078 Bushing 1 066 Upper Hand Pulse Sensor Cover w Wire 2 079 Tapping Screw M4x23mm 1 067 Lower Hand Pulse Cap 2 080 Washer Ø20xØ10 5x1 0t 2 HARDWARE PACKING LIST Part Description Quantity 43 H...

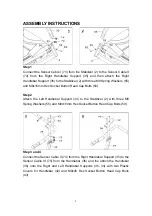
Page 9: ...tton Head Cap Bolts 50 Step 2 Attach the Left Handlebar Support 34 to the Stabilizer 2 with three M8 Spring Washers 55 and M8x16mm Hex Socket Button Head Cap Bolts 50 Step 3 and 4 Connect the Sensor Cable II 74 from the Right Handlebar Support 35 to the Sensor Cable III 75 from the Handlebar 36 and the attach the Handlebar 36 onto the Right and Left Handlebar Supports 35 34 with two Plastic Covers...

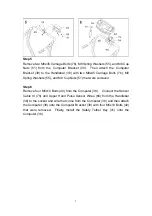
Page 10: ...shers 55 and M8 Cup Nuts 51 that were removed Step 6 Remove four M5x10 Bolts 40 from the Computer 38 Connect the Sensor Cable III 75 and Upper Hand Pulse Sensor Wires 66 from the Handlebar 36 to the socket and wire that come from the Computer 38 and then attach the Computer 38 onto the Computer Bracket 39 with four M5x10 Bolts 40 that were removed Finally install the Safety Tether Key 41 onto the ...

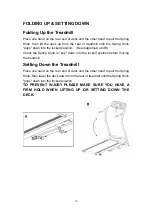
Page 11: ...osition See diagrams A and B Check the Spring Knob is pop down into the locked position before moving the treadmill Setting Down the Treadmill Place one hand on the rear end of deck and the other hand to pull the Spring Knob then lower the deck down from the rear of treadmill until the Spring Knob pops down into the locked position TO PREVENT INJURY PLEASE MAKE SURE YOU HAVE A FIRM HOLD WHEN LIFTI...

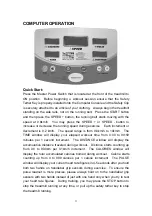
Page 12: ...ndow will display your elapsed workout time from 0 00 to 99 59 minutes per 1 second increment The DISTANCE window will display the accumulative distance traveled during workout Distance starts counting up from 0 0 to 99 9km per 0 1km h increment The CALORIES window will display the total accumulated calories burned during workout Calorie starts counting up from 0 to 999 calories per 1 calorie incr...

Page 13: ... Each increment is 1 minute Press the MODE button for 3 seconds will reset the target values of time to zero The preset target time range is from 0 00 to 99 00 minutes Once you preset target time press the START button and then press the SPEED button the running belt starts moving with the speed at 0 8km h You may press the SPEED or SPEED button to increase or decrease the running speed during exe...

Page 14: ...ring workout Press the START button and then press the SPEED button the running belt starts moving with the speed at 0 8km h You may press the SPEED or SPEED button to increase or decrease the running speed during exercise Calorie starts counting up from 0 to 999 calories per 1 calorie increment You may also preset target calories before training Press the MODE button to select CALORIES mode when ...

Page 15: ... is from 40 to 240 bpm Once you preset target heart rate press the START button and then press the SPEED button the running belt starts moving with the speed at 0 8km h You may press the SPEED or SPEED button to increase or decrease the running speed during exercise Hold both two hands on handlebar grip sensors as soon as your current heart rate is exceed your preset heart rate target the computer...

Page 16: ...he power plug is un plugged from the electrical wall outlet TROUBLE SHOOTING GUIDE 1 Apply silicone lubricant 2 Adjust running belt tension Adjust running belt tension 1 Put the power plug into the electrical wall outlet 2 Install the safety tether key 3 Reset or have an electrician replace the breaker in home 4 Wait five minutes and then press the switch back in Center the running belt Problem Tr...

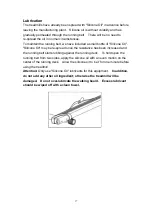
Page 17: ...g to the right turn on the main power switch of treadmill and let the running belt run at the speed of 2 3 km h Using the hex key provided turn the right rear roller adjustment bolt 1 4 turn in the clockwise direction You should see the belt start to correct itself by moving back toward the center Repeat the above procedure until the running belt is centered If the running belt is slipping during ...

Page 18: ...ne Oil may be re spread once the resistance has been increased and the running belt starts rubbing against the running deck To hold open the running belt from two sides apply the silicone oil with an even motion on the center of the running deck Allow the silicone oil to set for one minute before using the treadmill Attention Only use Silicone Oil lubricants for this equipment In addition do not a...

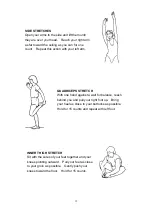
Page 19: ... of your entire exercise routine The WARM UP is an important part of any workout It should begin every session to prepare your body for more strenuous exercise by heating up and stretching your muscles increasing your circulation and pulse rate and delivering more oxygen to your muscles COOL DOWN at the end of your workout repeat these exercises to reduce soreness in tired muscles HEAD ROLLS Rotat...

Page 20: ...ADRICEPS STRETCH With one hand against a wall for balance reach behind you and pull your right foot up Bring your heel as close to your buttocks as possible Hold for 15 counts and repeat with left foot INNER THIGH STRETCH Sit with the soles of your feet together and your knees pointing outward Pull your feet as close to your groin as possible Gently push your knees toward the floor Hold for 15 cou...

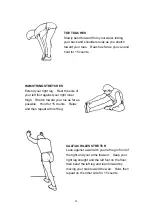
Page 21: ...ean against a wall with your left leg in front of the right and your arms forward Keep your right leg straight and the left foot on the floor then bend the left leg and lean forward by moving your hips toward the wall Hold then repeat on the other side for 15 counts TOE TOUCHES Slowly bend forward from your waist letting your back and shoulders relax as you stretch toward your toes Reach as far as...

Reviews: