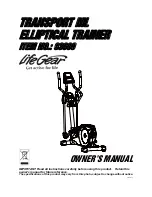
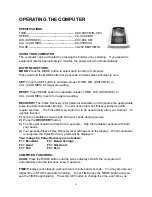
background image

TRANSPORT ML 

ELLIPTICAL TRAINER 

ITEM NO.: 93680 


OWNER’S MANUAL


IMPORTANT: Read all instructions carefully before using this product.    Retain this 
owner’s manual for future reference. 

The specifications of this product may vary from this photo, subject to change without notice. 

2013, Aug.


Summary of Contents for TRANSPORT ML 93680

Page 1: ...93680 OWNER S MANUAL IMPORTANT Read all instructions carefully before using this product Retain this owner s manual for future reference The specifications of this product may vary from this photo su...

Page 2: ...2 IMPORTANT SAFETY INSTRUCTIONS 3 PARTS LIST 4 HARDWARE PACKING LIST 6 TOOLS 6 OVERVIEW DRAWING 7 ASSEMBLY INSTRUCTIONS 8 OPERATING THE COMPUTER 15 ADJUSTMENTS 17 MAINTENANCE 18 TROUBLESHOOTING 18 WAR...

Page 3: ...repairing free of charge any parts which may prove to be defective under normal home use This warranty does not include any damage caused by improper operation misuse or commercial application From t...

Page 4: ...al When using please hold the handlebar by hands make the pedals running smoothly by push or pull handlebars then run the equipment regularly by cooperation of hands and feet After exercise please als...

Page 5: ...t 1 008 Screw ST2 9x16mm 20 033 Tension Control Knob 660L 1 009 Screw ST4 2x20mm 8 034 Right Handrail Arm Cover A 1 010 Nylon Nut M6 16 035 Right Handrail Arm Cover B 1 011 Curve Washer 6 4 036 Sensor...

Page 6: ...5t 4 076 Phillips Self Tapping Screw ST4 2x25mm 4 055 Rear Stabilizer 76 1 077 Screw ST4 2x15mm 16 056 Front Post Cover 1 078 Crank 2 057 Plastic Cover 1 079 Crank Cover 2 058 Spring Clip 17 2 080 Nut...

Page 7: ...4 S15 1 PC 8 Screw ST2 9x16mm 20 PCS 10 Nylon Nut M6 10 PCS 9 Screw ST4 2x20mm 4 PCS 11 Curve Washer 6 4 PCS 12 Carriage Bolt M6x35mm 4 PCS 40 Big Washer 6 6 PCS 50 Bolt M8x90mm 4 PCS 47 Hexagon Head...

Page 8: ...1 11 12 12 15 15 14 14 13 13 24 24 89 89 22 22 9 23 23 27 27 27 27 86 86 83 83 82 82 71 71 78 78 79 79 34 34 27 27 68 68 63 63 40 40 65 65 66 66 64 64 72 72 67 67 70 70 76 76 75R 75R 77 77 41 41 69 69...

Page 9: ...d curve washers with an Allen Wrench provided Position the Rear Stabilizer 55 behind the Main Frame 60 and align bolt holes Attach the Rear Stabilizer 55 onto the rear curve of the Main Frame 60 with...

Page 10: ...Tension Control Knob 33 into the spring hook of Tension Cable 39 as shown in drawing A of figure 2 Pull the resistance cable of Tension Control Knob 33 up and force it into the gap of metal bracket o...

Page 11: ...hers with an Allen Wrench provided Then attach the left Foot Bar Bracket 85 to the left Crank 78 with one M8x20mm Bolt 13 one 8 Spring Washer 14 and one 38x3 Washer 15 that were removed Tighten bolt a...

Page 12: ...ith a Multi Hex Tool with Phillips Screwdriver provided Use the same procedure to attach the Right Foot Pedal 88R onto the Right Foot Bar 53R and the Front Left Right Foot Bar Covers 45L 45R onto the...

Page 13: ...and two ST4 2x20mm Phillips Self Tapping Screws 27 Tighten screws with a Multi Hex Tool with Phillips Screwdriver provided Attach the Right Handrail Arm Cover A 34 and Right Handrail Arm Cover B 35 on...

Page 14: ...s for Front Post 5 6 7 onto the Front Post 32 with six ST2 9x16mm Screws 8 and two ST4 2x20mm Screws 9 Tighten screws with a Multi Hex Tool with Phillips Screwdriver provided Hardware Multi Hex Tool w...

Page 15: ...and two M8x20mm Bolts 89 that were removed Tighten bolts and curve washers with an Allen Wrench provided Connect the Sensor Wire II 36 and Hand Pulse Sensor Wires 21 from the Handlebar 23 to the wire...

Page 16: ...efore and after training You will notice that your fitness will improve with regular exercise The Pulse Recovery feature is to be used directly after your workout To use this function 1 Grip the handl...

Page 17: ...rkout You May also pre set target calories in STOP mode before training To set CALORIES press The MODE button until you see the CALORIES begin blinking Press the SET button to change the calories each...

Page 18: ...control knob in a clockwise direction To decrease the tension turn the tension control knob in a counterclockwise direction Adjusting the Adjustable Leveler Turn the adjustable leveler on the rear st...

Page 19: ...r There is no display on the computer console 1 Remove the computer console and verify the wires that come from the computer console are properly connected to the wires that come from the front post 2...

Page 20: ...state at the end of each exercise session A proper cool down slowly lowers your heart rate and allows blood to return to the heart HEAD ROLLS Rotate your head to the right for one count you should fee...

Page 21: ...ean against a wall with your left leg in front of the right and your arms forward Keep your right leg straight and the left foot on the floor then bend the left leg and lean forward by moving your hip...

Reviews: