background image

2

Sea Horse Pump Installation and User’s Guide

4. Provide space and lighting for routine maintenance access. Do not mount electrical controls directly

over pump.

5. The pump should be installed as near to the pool or spa as practical. Avoid installing the pump more

than a few feet above the water level. Suction lifts of more than five feet will cause very long priming
times. Pump will not lift more than 8 feet.

6. The location should provide for adequate floor drainage to prevent flooding.

7. Provide for the need to remove the pump for potential service by providing valves or other means to

disconnect the pump suction and discharge.

8. Never store pool chemicals within 10 ft. of your pool filter and pump. Pool chemicals are corrosive and

should always be stored in a cool, dry, well ventilated area.

WARNING

Chemical fumes and/or spills can cause severe corrosive attack to the filter and pump structural components. Structurally

weakened filter or pump components can cause filter, pump or valve attachments to separate and could cause severe

bodily injury or property damage.

9. Assemble piping and pipe fittings to pump and valve. All piping must conform to local and state

plumbing and sanitary codes.

10. Use threaded seal tape or pipe sealants on all male connections of pipe and fittings. Use only pipe

sealant compounds suited for plastic pipe. Support pipe to prevent strains on  filter, pump or valve. DO
NOT USE PETROLEUM BASED PRODUCTS.

11. Avoid over tightening the pipe threads when connecting fittings to the pump. Proper procedure is to

apply a pipe sealant to the thread and then install hand tight plus 1-1/2 turns. DO NOT OVER
TIGHTEN.

12. Long piping runs and elbows restrict flow. For best efficiency, use the fewest possible fittings, large

diameter pipe (at least 1-1/2") and locate equipment as close to the pool as possible. The pump suction
line should not be smaller than the pipe size on the inlet of the pump.

Installation

1. Check carton for any evidence of damage due to rough handling in shipment. If carton or any pump

components are damaged, notify freight carrier immediately.

2. After inspection, carefully remove pump from carton.

3. The pump should be secured to


a flat solid foundation, high enough to prevent flooding of the motor. A

sheltered location is best, being sure to allow for adequate ventilation.

Summary of Contents for Sea Horse

Page 1: ...IMPORTANT SAFETY INSTRUCTIONS READ AND FOLLOW ALL INSTRUCTIONS SAVE THESE INSTRUCTIONS Installation and User s Guide Sea Horse Centrifugal Pump ...

Page 2: ...credit will be issued prior to inspection of product Please contact us first for warranty assistance Many times the product can be repaired without the cost and time involved in sending it back If absolutely necessary return product FREIGHTPREPAID for warranty evaluation and processing Call or email our office to obtain RMA numberandshippingaddress LifegardAquatics Tel 562 404 4129 Fax 562 404 415...

Page 3: ... Requirements 4 Electrical Requirements and Wiring 4 Grounding 5 Bonding 5 Initial Start up 6 Maintenance 7 Cleaning the Pump Strainer Basket 7 Winterizing 8 Electric Motor Care 8 Servicing 9 Pump Disassembly 9 Pump Reassembly Seal Replacement 10 The Shaft Seal 10 Restart Instructions 11 Priming the Pump 11 Troubleshooting 12 Technical Data 13 Illustrated Parts List 13 ...

Page 4: ...ER SUCTION ENTRAPMENT HAZARD STAY OFF THE MAIN DRAINANDAWAYFROMALLSUCTION OUTLETS THE USE OF UNAPPROVED COVERS OR ALLOWING USE OF THE POOLOR SPAWHEN COVERSARE MISSING CRACKED OR BROKEN CAN RESULT IN BODY OR LIMB ENTRAPMENT HAIR ENTANGLE MENT BODY ENTRAPMENT EVISCERATION AND OR DEATH The suction at a drain or outlet can cause Limb Entrapment When a limb is sucked or inserted into an opening resulti...

Page 5: ...ool applications The pump will function correctly only if it is properly sized to the specific application and properly installed Pumps improperly sized or installed or used in applications other than for which the pump was intended can result in severe personal injury or death These risks may include but not be limited to electric shock fire flooding suction entrapment or severe injury or propert...

Page 6: ...Sea Horse Pump Installation and User s Guide Blank Page ...

Page 7: ...peed the pump will produce one half the flow and 1 4 the pressure of high speed However the pressure required by the filter and pool plumbing at half flow will also be greatly reduced due to much lower system friction These lower friction losses result in great energy savings At one half flow low speed the electrical energy savings are 60 for equal amounts of circulated water Turn motor to low spe...

Page 8: ... property damage 9 Assemble piping and pipe fittings to pump and valve All piping must conform to local and state plumbing and sanitary codes 10 Use threaded seal tape or pipe sealants on all male connections of pipe and fittings Use only pipe sealant compounds suited for plastic pipe Support pipe to prevent strains on filter pump or valve DO NOT USE PETROLEUM BASED PRODUCTS 11 Avoid over tighteni...

Page 9: ...er is still connected hazardous voltage can cause severe or fatal injury A suitable ground fault interrupter should always be installed at the power supply source of the unit WARNING Ground motor before connecting to electrical power supply Failure to ground motor can cause severe or fatal electrical shock hazard Do not ground to a gas supply line 17 The pump motor must be wired for the proper vol...

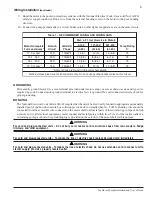
Page 10: ...ke sure that the wiring voltage matches the motor voltage 230 VAC or 115 VAC If they do not match permanent damage to the motor will occur 3 Choose a wire size from the Table 1 page 5 When in doubt use a heavier gauge larger diameter wire Heavier gauge will allow the motor to run cooler and more efficiently 4 Make sure all electrical connections are clean and tight 5 Cut wires to the appropriate l...

Page 11: ...u P r o f e r a n e v i g s e u l a V e c i t o N GROUNDING Permanently ground motor Use green terminal provided under motor canopy or access plate use size and type wire required by code Connect motor ground terminal to electrical service ground On cord connected circuits check for proper grounding BONDING The National Electrical CodeArticle 680 22 requires that the motor be electrically bonded t...

Page 12: ...should be filled with water up to suction opening on the pump 6 It is good practice to lubricate the lid o ring with silicone lubricant each time the lid is removed The o ring should be cleaned and inspected every time the strainer pot is opened 7 The lid should be replaced on the pot by aligning the lid ears with the slots on the strainer pot Press the lid down and twist the lid clockwise to enga...

Page 13: ...locking ring in a counter clockwise direction and remove them from the pump 5 Remove the debris from the basket and rinse out the basket Replace the basket if it is cracked 6 Replace the basket 7 Fill the pump pot and volute up to the inlet port with water 8 Clean the lid and locking ring O ring and sealing surface of the pump pot NOTE It is important that the O ring be kept clean and well lubrica...

Page 14: ...a 40 propylene glycol 60 water solution will protect to 50 F NOTICE Do not use anti freeze solutions except propylene glycol as other anti freeze is highly toxic and will damage the pump Electric Motor Care 1 Protect from heat a Shade the motor from the sun b Any enclosure must be well ventilated to prevent overheating c Provide ample cross ventilation 2 Protect against dirt a Protect from any for...

Page 15: ...n open with extreme caution Pump Disassembly 1 All moving parts are located in the rear subassembly of this pump Toolsrequired a Adjustable wrench b Flat blade screw driver c 3 4 inch socket wrench d 5 16 inch open end wrench e 1 4 inch open end wrench 2 To remove and repair the motor subassembly perform the following procedures a Turn off the pump circuit breaker at the main panel Close suction a...

Page 16: ...withnewrotatingsealontothemotorshaft Rotatethemotorshafttomakesuretheimpeller is not touching the bracket diffuser 3 Clean the bracket diffuser o ring and check to make sure it is in position Replace the motor and bracket diffuser on the front pump housing body and bolt into position with six 6 bolts Gradually bring bolts up to final tightness by moving across diametrically and in a criss cross pa...

Page 17: ...loss of pressure resulting in damage to the pump case impeller and seal and may cause property damage and personal injury Priming the Pump 1 Thepumpstrainerpotmustbefilledwithwaterbeforethepumpisinitiallystarted Followthesestepstoprime the pump a Remove the pump lid and locking ring b Fill the pump strainer pot with water c Reassemble the pump lid and locking ring onto the strainer pot The pump is...

Page 18: ... Strainer basket or skimmer basket is clogged Clear basket 6 Closed valve in piping system Check all valves and open all necessary valves 7 Pump is on low speed two speed units only Adjust to high speed 8 Air leak in suction line Find fix leak Low Flow High Filter Pressure 1 Filter is dirty Clean filter 2 Restriction in return line Open return line restriction Low Flow Low Filter Pressure 1 Strain...

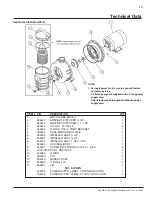
Page 19: ...CKET DIFFUSER HP 1 2 354633 BRACKET DIFFUSER 1 1 HP 1 3 354542 SQ NUT 10 24 s s 6 4 354634 O RING 3 16 in PUMP BRACKET 1 5 354545 SEAL MECHANICAL 5 8 in 1 6 353002 IMPELLER ASSY HP 1 6 354552 IMPELLER ASSY HP 1 6 355122 IMPELLER ASSY 1 HP 1 HP 1 7 354630 HOUSING BODY 1 8 354541 SCREW SLOTTED HEX 10 24 1 3 8 in 6 9 U178 920P PLUG DRAIN in 2 10 273062 O RING 1 11 354530 POT 1 12 354548 BASKET ASSY 1...

Page 20: ... Tel 562 404 4129 FAX 562 404 4159 Email info lifegardaquatics com visit www lifegardaquatics com Sea Horse is a registered trademark of Lifegard Aquatics Inc and or its affiliated companies in the United States and or other counties P N 354544 Rev C 7 12 ...

Reviews: