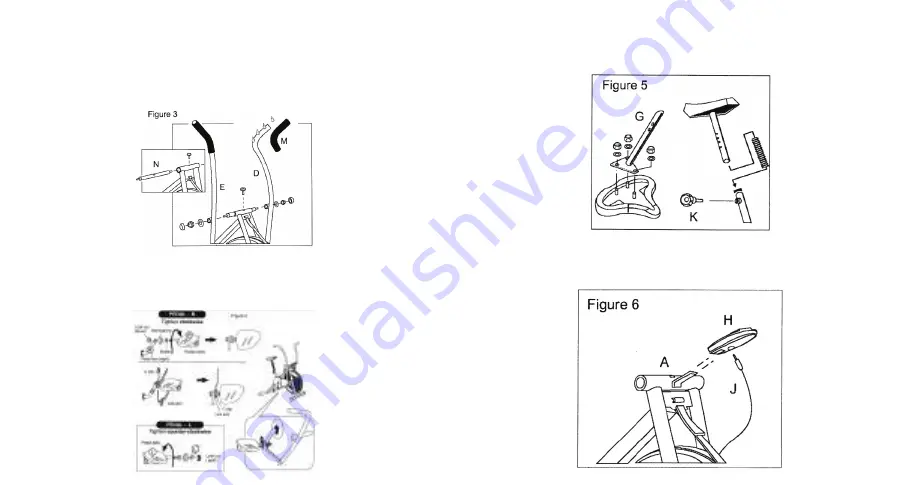
STEP 3: Attach the handlebars.Remove the screw, nuts and washers from the rotation rod (part N). Slide
handlebar rotation rod through the linkage tube at the top of main frame. The rod may need a lithe lubricant to
easy slide through the bushings at either end of the linkage tube. Center the rod and rotate it until the set hole
in (the rod aligns with the hole in the center of the linkage tube. Screw the fixing screw into the aligned hole and
secure it. Remove the parts and bike from the carton and identify them using the expanded illustration. Attach the
left handle (D), the left handle is marked with an "L". Put the handlebar pivot housing on the left side of the
rotation rod. Slide the rotation rod's thread stem through pivot housing bushings. Place a washer on stem and
screw on nut. Place the plastic end cap you can find it in the screw pack onto nut after final tightening. Attach the
right handle (E) in the same manner. Slide the foam grips (M) on to the handlebars. A small amount of liquid soap
will ease installation.
STEP 4: Install the pedals.The right pedal (part R) is marked with an ‘R". The left pedal (part L) is marked with
an "L". It is important that each pedal goes on the proper side. Select the right pedal. Slide a two step pedal
bushing on to pedal first then slide a ball bearing next to the bushing. Now screw the pedal stem into the right
pedal arm. Right pedal lightens clockwise. You must secure it tightly. Screw on to the pedal's stem the lock nut
(SILVER) until tight. Rotate the handlebar's link arm to meet the pedal. Bring the " C ” slot on the link arm up from
the bottom to hock on the bearing on the pedal stem. Now place the " C " clip locking the link arm on the bearing.
STEP 5: Mount seat (part F). Remove nuts and washers from studs on bottom of seat (F). Place seat onto seat post (G)
and replace washers and nuts. Secure tightly. Select seat height adjust knob (K), slide the seat post bellow onto the seat
post first then slide the seat post into main frame aligning a set of holes in the seat post with the seat height screw hole.
Screw in seat post knob. Secure tightly.
STEP 6: Mount monitor (part H). Insert batteries into battery holder being sure to follow battery diagram. Check to be sure
monitor shows a display. If it does not, check batteries and battery installation. Plug monitor cable (part J) coming from main
frame into back of monitor. Slide monitor on to the main frame.
6
7
Summary of Contents for FIT LITE
Page 7: ...12 WEIGHT LOSS 13...
Page 9: ......


