background image

service@lifepluspro.com

service@lifepluspro.com

- 9 -

- 10 -

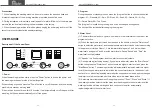
PREPARATION BEFORE WASHING

1. Connect the water inlet pipe and open the faucet valve. 


2. Fasten the buttons and pull the zippers. 


3. Do not wash too much, jeans and bulky clothes should be loosely placed.

Precaution

• Check whether the clothes are suitable for washing in the washing machine; 


• Separate clothes that are easy to fade;  


• Please put the clothes that are not easy to absorb water into the water by hand;  


• For clothes with more mud and dust, please remove the dirt first, especially the dirty 
  parts, you can dip detergent in advance, so that it is easier to remove the dirt on the part; 


• Turn over and throw in the clothes that are easy to pilling and long pile;   


• Do not put clothes contaminated by chemicals directly into the washing machine; 


• Please put small items, easy-entangled clothing, worn clothing and plush into a net bag 
  for washing.

Clean out your pockets

and take out coins,

hairpins, etc.

Fasten the buttons and

pull the zippers.

DO NOT wash too much. 

Jeans and bulky clothes

should be loosely placed.

Gound

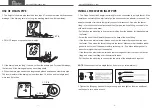
When you fasten the fittings, do not fasten them too tightly or apply 
tape or seal to the faucets or water supply intakes. This can damage 
the fittings. After you have connected the water supply hoses to the 
faucet, ensure that they are connected securely by pulling the water 
supply hoses downwards.

4. 

Place the unconnected ends of the hoses into a bucket and open the faucets connected 

to the two water supply hoses for 10 or 15 seconds to remove any substances from the 
hoses. Close the faucets before continuing.
5. Connect the ends of the water supply to the water supply intake connections at the top 
of the washer.

The water hose connected to the COLD faucet must be connected to the cold water 
supply intake.

6. Tighten the fittings by hand until they are snug, and then tighten them an additional 
two-thirds of a turn with a wrench.

Ensure that the water supply hoses are not twisted or bent. If the hoses are twisted 
or bent, the hoses can leak and cause electric shock due to the water leakage. To 
ensure the correct water usage, connect to the COLD water faucet.

7. Turn on the COLD water supplies and check all the water supply intake connections 
and the faucets for water leaks.

NOTE

: After the connection is completed, if there is water leakage, please connect 

again according to the above steps. Please use the water inlet pipe provided by the 
manufacturer. The old water inlet pipe cannot be reused and do not use other 
self-provided water inlet pipes to avoid water leakage.

Summary of Contents for T663

Page 1: ...If you have any questions please contact us service lifepluspro com WASHING MACHINE PRODUCT USE GUIDE T663...

Page 2: ...NTRODUCTION SECTION 1 PRODUCT INTRODUCTION PAGES 5 PACKAGE INCLUDE PAGES 5 INSTALLATION AND ADJUSTMENT PAGES 6 SECTION 2 USE OF DRAIN PIPE PAGES 7 INSTALL THE WATER INLET PIPE PAGES 8 9 SECTION 3 PREP...

Page 3: ...solvents other flammable or explosive substances as they give off vapors that could ignite or explode Keep the area underneath and around your appliances free of combustible materials lint paper rags...

Page 4: ...ater into the tub to just below the pulsator level 3 If the washer is leveled the pulsator is positioned at the center of the washer as shown in the figure If not level your washer by turning the fron...

Page 5: ...or connection to the faucet and the other part the hose fitting connects to the cold water hose of the washer Pull back on the white ring to free the faucet fitting from the adaptor for installation i...

Page 6: ...upply intakes This can damage the fittings After you have connected the water supply hoses to the faucet ensure that they are connected securely by pulling the water supply hoses downwards 4 Place the...

Page 7: ...patterned clothes are easy to fade so avoid using bleach 3 The bleaching agent should not directly contact the laundry 4 The usage method and dosage of bleaching agent are in accordance with the inst...

Page 8: ...he water level is not adjustable 4 During washing including rinsing if you want to add water press the Start Pause button then press the Water Level button to select a higher water level and press the...

Page 9: ...han the set water level after filling or for 20 minutes After draining for more than 5 minutes it still cannot drop to the set water level The lid is opened during spin Dehydration imbalance alarm The...

Page 10: ...ter a long time of use the filter of the inlet valve port is easily blocked by debris which will hinder the water inlet Please clean it up as follows 1 Turn off the faucet and turn on the power supply...

Page 11: ...laced When spin starts it occurs intermittently The washing machine program sets the drain time and the dehydration starts after a period of time When you press the Process button and select Spin the...

Page 12: ...roblems happen in guarantee period our company will maintain for free or provide replacement Additionally our company provides technical support and fittings for life After sales service isn t restric...

Reviews: