Endurance Training Collection
11
10
Dash X User Manual Lifepro
Endurance Training Collection
11
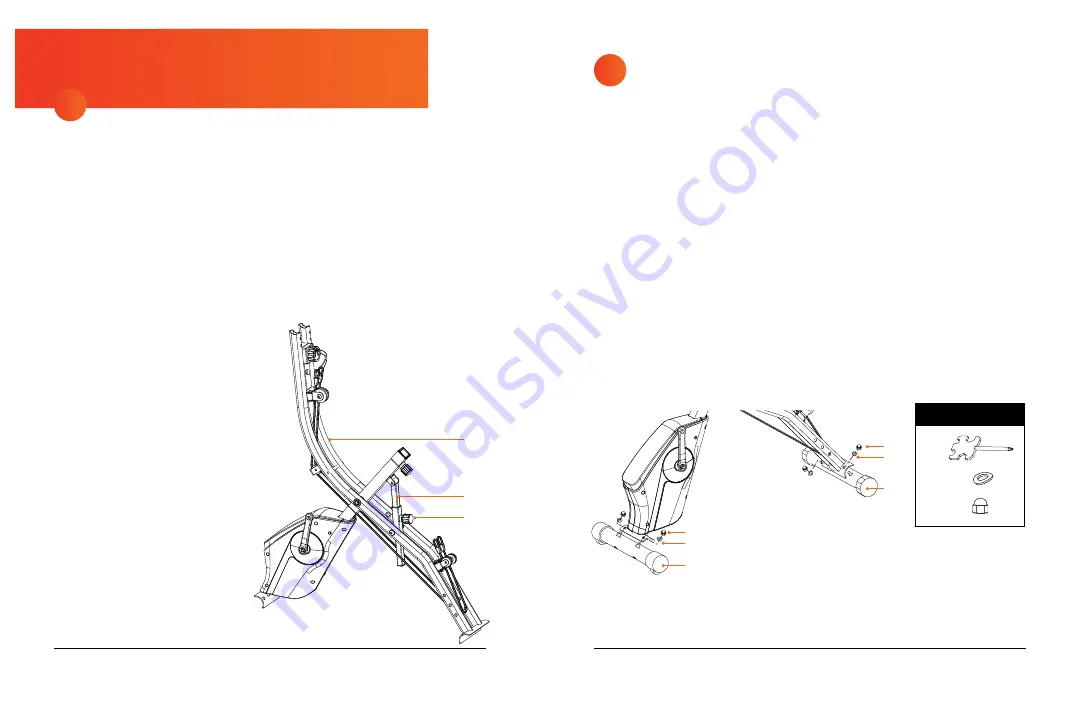
LOOSEN THE LOCK KNOB
TO OPEN THE BIKE FRAME
CAUTION:
Use caution when opening the bike frame as it could accidentally
fall over. You may find it easier to lay the bike frame on its side for this step.
CAUTION:
Always ensure the lock knob is properly secured before using,
lifting, or moving the bike.
1. Locate the lock knob
(4)
on the recline post
(3)
at the rear of the bike
frame
(1)
.
2. Loosen the knob (but do not remove it) by turning it counter-clockwise.
3. Pull the knob head out and pull the bike frame open. Release the knob
and continue to pull the bike frame open until you hear a "click." The
click indicates that the knob has
snapped into one of the four
available adjustment holes
in the recline post.
NOTE:
The bike frame uses the fifth
(bottom) adjustment hole when in its
folded configuration for shipping,
moving, or storage.
4. Ensure the knob is securely
inserted into one of the
adjustment holes by trying to
pull the frame open further
(it should not move).
5. Tighten the knob by turning
it clockwise.
NOTE:
You can adjust the recline
angle or fold the bike for storage.
See
on page 30 for
instructions.
ATTACH THE FRONT AND
REAR STABILIZERS
CAUTION:
Use caution when attaching the stabilizers, as the bike frame
could accidentally fall over. You may find it easier to lay the bike frame on
its side for this step.
1. Locate the multi-tool
(34)
in the tool/accessory bag.
2. Remove the two curved washers
(7)
and two cap nuts
(8)
from the
front stabilizer
(5)
.
3. Insert the two bolts integrated in the front stabilizer through the bolt
holes in the curved metal attachment point on the front of the bike. Make
sure the wheels on the front stabilizer are facing out.
4. Place a curved washer
(7)
onto each integrated bolt.
5. Screw a cap nut
(8)
onto the end of each bolt.
6. Repeat steps 3–5 to attach the rear stabilizer
(6)
.
7. Use the multi-tool to tighten all four cap nuts.
8. Ensure the bike frame is stable when upright. You may need to rotate
the octagonal rubber end caps on either end of the rear stabilizer to
ensure complete stability.
2
8
7
6
Front of
Bike
8
7
5
1
4
3
1
(8)
(34)
x4
x4
(7)
TOOLS & HARDWARE


