Re Fitness Collection
11
1
10
X-FlexCycle Pro User Manual Lifepro
Re Fitness Collection
11
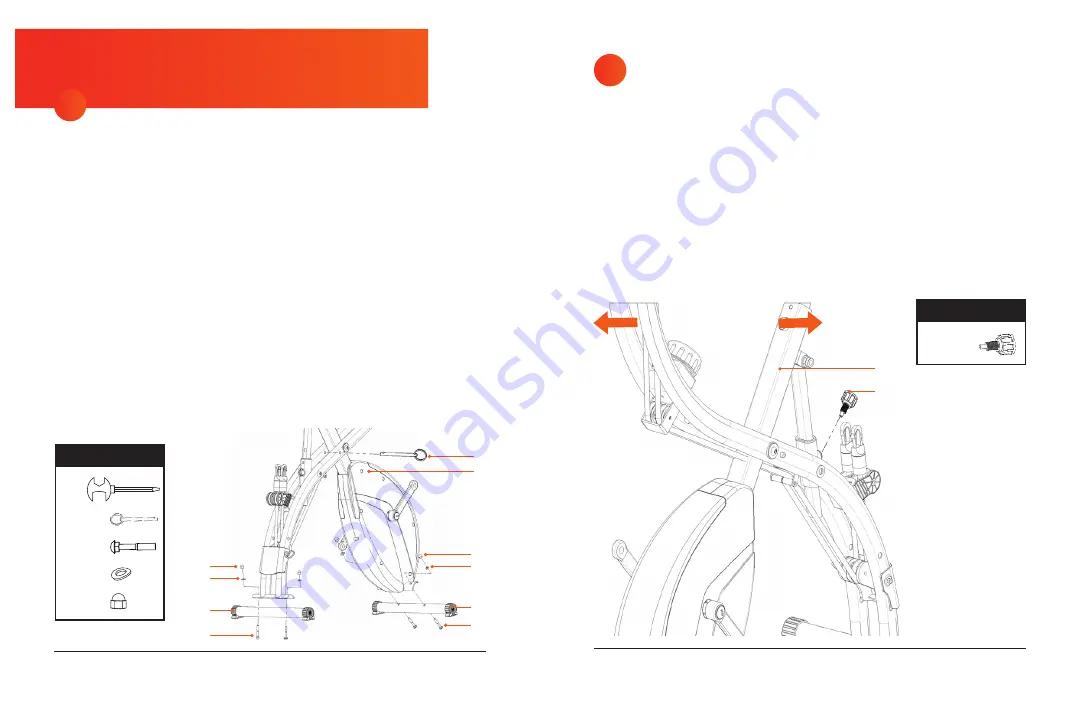
INSERT THE RECLINE
ADJUSTMENT KNOB
The recline adjustment knob
(34)
allows you to adjust the angle of the
bike frame to recumbent, semi-recumbent, or upright. See
on page 28 for instructions.
1. Locate an adjustment knob in the hardware bag (the two adjustment
knobs are interchangeable).
2. Screw the recline adjustment knob
(34)
into the large threaded screw
hole near the two plastic resistance band clips at the back of the bike
body
(1)
.
3. Grasp the top of the bike with both hands and slowly push together or
pull apart the frame until you hear the knob click into place.
4. Tighten the knob to secure the bike frame.
2
ATTACH FRONT AND
REAR STABILIZERS
NOTE:
You may find it easier to attach the stabilizers with the body of the
bike laid on its side on the floor.
1. Locate the locking pin
(3)
and multi-tool
(35)
in the hardware bag.
2. Unfold the bike body
(1)
slightly and insert the locking pin as shown in
the figure below.
3. Remove the hardware from the front stabilizer
(7)
.
4. Align the front stabilizer, wheels facing out, with the curved metal
attachment point at the front of the bike. Ensure the bolt holes line up.
5. Insert two M8×50mm bolts
(8)
, through the square bolt holes in the
bottom of the stabilizer and through the attachment point. Ensure the
square necks of the bolts are fully seated in the square bolt holes.
6. Place a curved washers
(9)
onto each bolt.
7. Screw a cap nut
(10)
on the end of each bolt.
8. Repeat steps 2–5 to attach the rear stabilizer
(7)
.
9. Use the multi-tool
to fully tighten the cap nuts. Hold each bolt head in
place with one hand as you tighten the cap nut to ensure the square
neck of the bolt stays in place.
10
3
1
9
10
9
7
7
8
8
Front of
Bike
(8)
(10)
(3)
(35)
x1
(34)
x1
x4
x4
x4
(9)
TOOLS & HARDWARE
TOOLS & HARDWARE
34
1


