background image

20

SPA MAINTENANCE

SURFAcE cARE

Do not use solvents or abrasive cleaners to clean the spa. Typically, a mild detergent and water 

will resolve cleaning issues.

cOVER cARE

Please keep your cover free from dirt at all times.  Use a cover cleaner or a warm mild soapy 

water to clean the surface.  Do not use any silicone-based products, as it will dry and may 

eventually crack the vinyl.

NOTE: Do not stand on the cover at any time. Remove the cover when adding chemicals to your 

spa. This will extend the life of your cover. The gases from burned off chemicals will be trapped 

under the cover, if not removed. These gases will eat away at the protective lining of the foam 

inserts. This will not be covered under warranty. 

cAbiNET cARE 

Little maintenance is required to keep your spa cabinet looking good

Spa cabinet product should be cleaned as needed to remove dirt and debris.

• 

NO abrasive or harsh chemicals should be used on your Spa's cabinet.

• 

NO solvents or cleaners containing aromatic solvents should be used on your spas cabinet. 

• 

Hot Soapy water is the best choice for cleaning your spa's cabinet

AvOID PROLONgED EXPOSURE TO DIRECT SUNLIghT OR EXCESSIvE TEMPERATURES

 (100 ºF or 38 ºC)  to avoid your spa cabinet from buckling

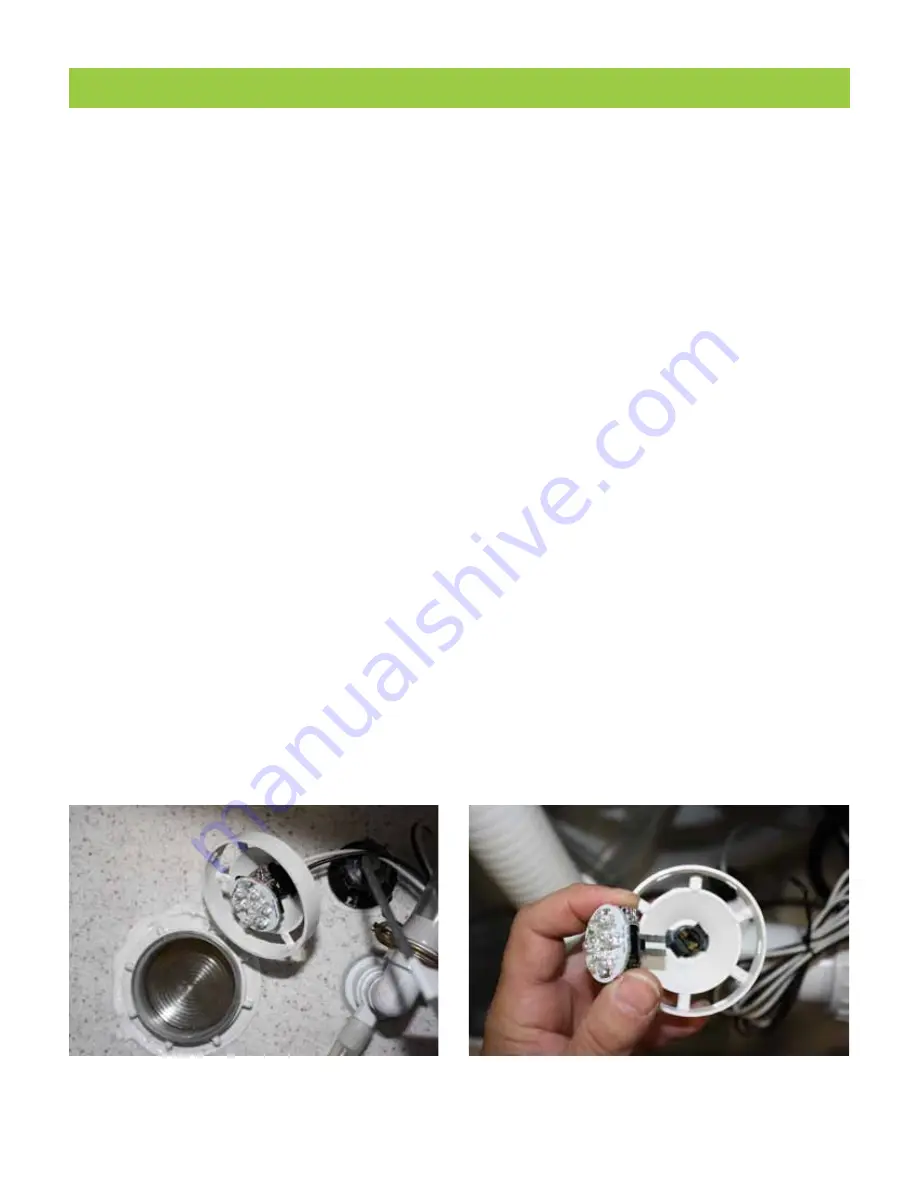
SPA LED LigHT REPLAcEMENT

• 

Turn OFF the power to the spa.

• 

Remove the equipment compartment access door.

• 

Locate the rear of the spa light.

• 

To remove the LED, turn outside housing counter clockwise ¼ turn, and pull out and remove 

LED from socket. 

• 

Replace the LED by reversing the above steps.

Summary of Contents for antiqu

Page 1: ...HD OWNER S MANUAL 115V 230V Models ...

Page 2: ...any obligation SPA DIMENSIONS Model Spa Seating Length Width Height Dry Weight Bermuda 4 person 70 61 32 295 lbs Key Largo 4 person 77 66 29 269 lbs antiqua 5 person 75 75 34 449 lbs Barbados 7 person 80 5 80 5 34 475 lbs Coronado 7 person 80 5 80 5 34 459 lbs CAUTION DO NOT OPERATE SPA BEFORE READING THIS MANUAL Failure to read this manual follow its instructions may result in unsafe operation an...

Page 3: ...ado 12 Preset Filter Cycles 13 Freeze Protection 13 Display Messages Bermuda Key Largo Antiqua Barbados 14 Diagnostic LCD Message Coronado 14 component operation Spacomponent operation 16 Fill Up and Start up instructions FILLING THE SpaWITH WATER 17 applying power 17 adding start up chemicals WATER CHEMISTRY GUIDELINES 18 spa maintenance FILTER CARTRIDGE MAINTENANCE 19 SURFACE CARE 20 COVER CARE ...

Page 4: ...children are careful when entering or exiting the spa DON T Allow children to climb onto the spa cover Allow children to have unsupervised access to the spa Avoiding the risk of electrocution Risk of electrocution Connect only to a grounded source Do not bury the power cord A buried power cord may result in death or serious personal injury due to electrocution if direct burial type cable is not us...

Page 5: ...fore each use of the spa and with the unit operating push the TEST button on the breaker The switch should click over to the Trip position Wait 30 seconds and reset the GFCI breaker by switching it completely off and then completely on The switch should then stay on If the interrupter does not perform in this manner it is an indication of an electrical malfunction and the possibility of an electri...

Page 6: ... spa Keep any loose articles of clothing or hanging jewelry away from rotating jets or other moving components Increased side effects of medication The use of drugs alcohol or medication before or during spa use may lead to unconsciousness with the possibility of drowning Persons using medications should consult a physician before using a spa some medication may cause a user to become drowsy while...

Page 7: ...ure with an accurate thermometer Test the water with your hand before entering the spa to be sure it s comfortable SAFETY SIGN A SAFETY SIGN in the owner s package The sign which is required as a condition of Product Listing should be permanently installed where it is visible to the users of the spa Important spa instructions The following contains important spa information and we strongly encoura...

Page 8: ...o change clothes or a house entry near the spa is convenient A warmer climate may require shade from the hot sun Consider placement of trees shrubs patio cover or perhaps a gazebo structure to provide what you will need Indoor installations require adequate ventilation When the spa is in use considerable amounts of moisture are produced This moisture can damage walls and ceiling surfaces over time...

Page 9: ...irborne moisture s effects on exposed wood paper etc in the room To minimize these effects it is best to provide plenty of ventilation to the spa area An architect can help to determine if more ventilation must be installed Placing the spa CHECK THE DIMENSIONS OF YOUR spa Compare the spa dimensions to the width of gates sidewalks and doorways along the delivery route used to bring the spa into you...

Page 10: ...tment Remove 1 vertical slat and 3 screws on each side of Equipment Access Panel Door Remove 6 screws from Equipment Access Panel Door to remove door Remove screws from Black ABS Door if your spa has vertical slats to access Equipment Compartment Black ABS Door 115 Volt Equipment Compartment Hose Bib Equipment Access Panel 230 Volt Equipment Compartment ...

Page 11: ...t tub Use an 8 AWG solid copper wire and attach it to the grounding lug on the power pack located in the equipment compartment 2 Only a licensed electrician may install power to the spa 3 Power supply installation must include a suitably rated ground fault interrupter GFCI as required by NEC Article 680 42 The circuit breaker must be dedicated and should not be shared with any other appliances It ...

Page 12: ...opper core wire is recommended All wiring must be copper to ensure adequate connections Do not use aluminum wire CAUTION WARNING SHOCK HAZARD No User Serviceable Parts Do not attempt to service any electronic component Contact Customer Service or a reputable spa service company for assistance Follow all owners manual power connection instructions Service must be performed by a licensed electrician...

Page 13: ...nfigured to operate at 230V the heater is rated at 4 0kW and will heat whenever heat is required When configuring the output voltages on your System remember to also consider the amperage of each component Be sure that the total amperage draw does not exceed the capability of the circuit supply and power to the system NOTE The Coronado is configured to have three operational modes It has been pre ...

Page 14: ...he circuit must be dedicated and should not be shared with any other appliances The power supply must be hard wired into the power pack White Neutral Wire that is connected to Spa Neutral goes HERE 230V Wiring Instructions 4 wires Minimum 40 amp GFCI Breaker 8 AWG 75 C Copper Wire Minimum less than 100 length Special Note If the GFCI Breaker trips immediately after attempting to turn on please che...

Page 15: ...urn the light off Every time the light is quickly turned off and back on a new color will illuminate There are 6 different colors followed by a color wheel The color wheel starts out as a white light Exiting the color wheel may require you to press the light button quickly 4 times or more NOTE The blue color is the first of the 6 colors followed by the color wheel If left on the light will automat...

Page 16: ...he temperature sensors detect within the heater a drop to below 44 F 7º C the pump will automatically activate to provide freeze protection The equipment stays on until 4 minutes after the sensors detect that the spa temperature has risen to 44 F 7º C or higher Warning Shock Hazard No User Serviceable Parts Do not attempt service of this control box Contact Customer Service for assistance Follow a...

Page 17: ...y Mode the pump is automatically activated to provide Freeze protection This is a normal spa function no corrective action is necessary The equipment will stay on until the sensor detects 45 F Warning Shock Hazard No User Serviceable Parts Do not attempt servicing the control box Contact Customer Service at 888 961 7727 for assistance Follow all owner s manual power connection instructions Diagnos...

Page 18: ...s been detected This could indicate a flow problem Check water level in spa Refill if necessary If the water level is okay make sure the pumps have been primed If problem persists contact Customer Service LF Persistent low flow problem Dis plays on the fifth occurrence of HL message within 24 hours Heater is shut down but other spa functions continue to run normally Follow action required for HL m...

Page 19: ...color OZONE GENERATOR The ozone system greatly enhances the quality of the spa water when used to supplement the spa owner s regular water maintenance program Contrary to some information circulated throughout the pool and spa industry regarding ozone systems ozone CAN NOT be used as a single source sanitizer water clarifier anti foamer and mineral chelating agent A secondary source sanitizer must...

Page 20: ... reduce the amount of water you normally have in the spa To prevent the water from hitting your topside control or flowing over the top edge of the spa Additionally failure to keep enough water in your spa may result in damage to your system invalidate your warranty If your spa filter is sucking in air causing the pump to cavitate you need to add water 6 Check the filter installation and make sure...

Page 21: ...alcium reading to between 100 250 PPM If the reading requires adjustment it should now be corrected If the water is too soft a low reading calcium hardness should be added to the water to increase the PPM reading If the water is too hard a high reading it can be corrected by either A a mixture of hard and soft water added to attain a reading in the safe range or B addition of stain and scale contr...

Page 22: ...ter cartridge counter clockwise and bring it out of the spa requires many turns Rinse cartridge using a garden hose Rotate and separate filter pleats while spraying water to remove all dirt and debris possible Let filter dry and look for calcium deposits scaling or an oil film If you find these you will need to deep clean your filter cartridge with a spa filter clean er solution to break down and ...

Page 23: ...f the foam inserts This will not be covered under warranty CABINET CARE Little maintenance is required to keep your spa cabinet looking good Spa cabinet product should be cleaned as needed to remove dirt and debris NO abrasive or harsh chemicals should be used on your Spa s cabinet NO solvents or cleaners containing aromatic solvents should be used on your spas cabinet Hot Soapy water is the best ...

Page 24: ...r Water left in the lines might freeze and damage the lines and jets 1 It will be necessary to remove all water from the interior plumbing 2 Remove the floating weir basket and filter cartridge Clean the filter cartridge and store in a dry place Attach the vacuum hose to the vacuum side of the shop vac and thoroughly dry the filter compartment 3 Using the shop vac remove the water starting with th...

Page 25: ...t 2 above the gray filter ring 4 Check for dirty filter Clean if necessary 5 Make sure all jets are in the open position turn counterclockwise WATER IS TOO HOT 1 Check desired temperature on topside control 2 Check for a diagnostic Message see Control System manual for details OH Overheat spa is deactivated DO NOT ENTER THE WATER If the spa water has reached overheated you should remove the cover ...

Page 26: ...ey Largo ONLY 303030 Equipment Pack Coronado 303022 EQUIPMENT PACK Bermuda Key Largo Antiqua Barbados 303028 4 BUTTON TOPSIDE CONTROL PANEL 303298 ROUND FILTER WEIR 303299 FILTER BASKET SKIMMER 303445 VORTEX JET 303443 7 PORT JET 303307 LED Multi color Light 303003 Ozonator 303205 filter lid Large 11 1 4 303204 filter lid Small 10 3 4 ...

Page 27: ...24 ...

Page 28: ...Part 303476 Rev a 1 13 ...

Reviews: