background image


3

I. IMPORTANT SAFETY

   INSTRUCTIONS

WARNING: Read all instructions before using this machine.

It is important your machine receives regular maintenance to prolong its useful life. Failing to
regularly maintain your machine may void your warranty.

Note the following precaution before assembling or operating the machine.

   Keep children and pets away from the Spinning Bike at all times. DO NOT leave unattended children 

     in the same room with the machine.

   Handicapped or disabled persons should not use the spinning Bike without the presence of a        

     qualified health professional or physician.

   If the user experiences dizziness, nausea, chest pain, or any other abnormal symptoms, 

    STOP the workout at once. CONSULT A PHYSICIAN IMMEDIATELY.

   Before beginning training, remove all within a radius of 2 meters from the machine. DO NOT 

     place any sharp objects around the Spinning Bike.

   Position the Spinning Bike on a clear, level surface away from water and moisture. Place mat 

    under the unit to help keep the machine stable and to protect the floor.

   Use the Spinning Bike only for its intended use as described in this manual. DO NOT use any 

     other accessories not recommended by the manufacturer.

   Assemble the machine exactly as the descriptions in the instruction manual.

   Check all bolts and other connections before using the machine for the first time and ensure 

     that the trainer is in the safe condition.

   Hold a routine inspection of the equipment. Pay special attention to components which are the 

     most susceptible to wear off, i.e. connecting points and wheels. The defective components should 
    be replaced immediately. The safety level of this equipment can only be maintained by doing so.        
    Please don’t use the Spinning Bike until it is repaired well.

   NEVER operate the Spinning Bike if it is not functioning properly.

   This machine can be used for only one person’s training at a time.

IMPORTANT SAFETY INSTRUCTIONS  |

Summary of Contents for SP-310 M2

Page 1: ...be subject to updates or changes Updated manuals are available through our website at www lifespanfitness com au Read all instructions carefully before using this product Retain this owner s manual fo...

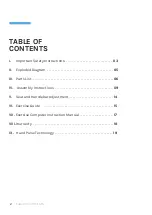
Page 2: ...ructions 03 II Exploded Diagram 05 III Parts List 06 IV Assembly Instructions 09 V Seat and Handlebar Adjustment 14 VI Exercise Guide 15 VII Exercise Computer Instruction Manual 17 VIII Warranty 18 IX...

Page 3: ...the Spinning Bike Position the Spinning Bike on a clear level surface away from water and moisture Place mat under the unit to help keep the machine stable and to protect the floor Use the Spinning Bi...

Page 4: ...ith increasing the speed and the reverse The machine is equipped with adjustable knob which can adjust the resistance IMPORTANT SAFETY INSTRUCTIONS WARNING Before beginning this or any exercise progra...

Page 5: ...7 24 12 11 8 8 7 7 8 29 28 1L 18 19 20 74 73 7 6 5 2 2 49 42 50 63 38 39 16 2 58 58 67 76 76 76 61 21 60 23 58 62 32 9 9 75 59 60 14 15 3 31 14 57 56 55 2 40 72 39 38 41 41 71 69 68 33 34 35 36 37 2 5...

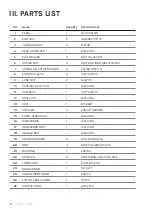
Page 6: ...4 10 VERTICAL SEAT POST 1 WELDING 11 END CAP2 1 53 5 23 5 1 5 12 SEAT POST 1 WELDING 13 SEAT 1 DD 2681 14 STOPPER 4 35 37 M8X20 15 FRONT STABILIZER 1 WELDING 16 MAIN FRAME 1 WELDING 17 HANDLEBAR POST...

Page 7: ...2 2 GB T 6177 2 2000 M10 1 0 39 FIXING BOLT 2 M6 55 40 NUT 2 GB T 41 2000 M6 41 SCREW 1 7 GB T 15856 1 2002 ST4 2X19 42 SCREW 2 2 GB T 845 1985 ST4 2 19 43 SCREW 3 2 GB 845 85 ST4 2X9 5 44 OUTER CHAI...

Page 8: ...10 147 63 WOOLLY BLOCK 2 85 40 6 64 FIXED SEAT 1 28 65 COMPUTER 1 HS 6065 66 FIXING NUT 1 28 M20 1 67 FLYWHEEL COVER 1 59 35 68 SCREW 4 1 ST2 9 9 5 69 LEFT PROTECT COVER 1 157 73 157 70 HANDLEBAR COV...

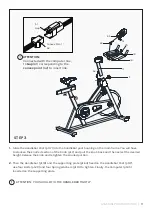
Page 9: ...g two sets of 8 Flat Washer pt 5 M8 Domed Nut pt 6 and M8 42 Carriage Bolt pt 3 1 Before assembling make sure that you will have enough space around the item 2 Use the present tooling for assembling 3...

Page 10: ...7 and pull the knob back and then select the desired height Release the knob and retighten the knurled portion Then slide the Seat Post pt 12 into the Vertical Seat Post pt 10 use the knob pt 7 to ti...

Page 11: ...etighten the knurled portion 2 Then the Handlebar pt 18 and the supporting plate pt 64 fixed on the Handlebar Post pt 17 use four Bolts pt 20 and four Spring Washers pt 19 to tighten Finally the Compu...

Page 12: ...d L and R Left and Right Connect them to their appropriate crank arms The right crank arm is on the right hand side of the cycle as you sit on it Important Note that the Right pedal should be threaded...

Page 13: ...trength to pedal turn the Tension Control Knob pt 25 to the right To decrease tension and decrease resistance requiring less strength to pedla turn the Tension Control Knob pt 25 to the left Use this...

Page 14: ...d in the direction of the handlebar or backwards away from it loosen the adjusting knob and washer and pull the knob back Slide horizontal seat post into desired position Align holes and then retighte...

Page 15: ...h stretch should be held for approximately 30 seconds do not force or jerk your muscles into a stretch if it hurts STOP EXERCISE GUIDE THE EXERCISE PHASE This is the stage where you put the effort in...

Page 16: ...d of the exercise phase you should increase resistance making your legs work harden than normal You may have to reduce your speed to keep your heart rate in the target zone The important factor here i...

Page 17: ...he SPD points to SPD to display the speed value Unit km h Distance When the DIST points to Dist to display the distance value Unit km Calories When the CAL points to CAL to display the calories value...

Page 18: ...itled to have the goods repaired or replaced if the goods fail to be of acceptable quality and the failure does not amount to a major failure Full details of your consumer rights may be found at www c...

Page 19: ...ng Medical conditions or having no electrical signal in the hands are other factors that may affect pulse readings as well These are limitations of hand pulse technology and even the most expensive sy...

Page 20: ...WWW LIFESPANFITNESS COM AU...

Reviews: