background image


20 


SP-710


c. 

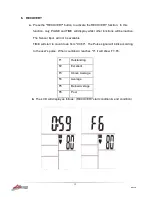
If  the  countdown  to 00:00 is not  completed and there  is no  pulse signal,  F6 will 

show.   


d. 

If  you  press the  RECOVERY  button  prior to the  countdown  reaching  00:00, this 

will  end the  function  and no result  will  show. 


NOTE 

1. 

After being inactive  for 4 minutes,  the  main screen will  turn  off and will  display the  clock 

automatically. 

2. 

If  the  computer  displays abnormally,  please re-install  the  battery  and try  again. 

Battery Spec: 1.5V UM-4 or AAA (2PCS). 


Summary of Contents for SP-710

Page 1: ...nuals are av ailable through our website at www lif espanonline com au Product may vary slightly from the item pictured due to model upgrades Read all instructions carefully before using this product Retain this owner s manual for future reference SP 710 OWNER S MANUAL ...

Page 2: ... 710 TABLE OF CONTENTS 1 IMPORTANT SAFETY INSTRUCTIONS 3 2 EXPLODED DIAGRAM 5 3 PARTS LIST 7 4 ASSEMBLY INSTRUCTIONS 9 5 ADJUSTMENT 14 6 COMPUTER OPERATION 15 7 EXERCISE GUIDE 21 8 WARRANTY REGISTRATION 23 ...

Page 3: ...aining remove all within a radius of 2 meters from the machine DO NOT place any sharp objects around the spin bike 5 Position the machine on a clear level surface away from water and moisture Place mat under the unit to help keep the machine stable and to protect the floor 6 Use the machine only for its intended use as described in this manual DO NOT use any other accessories not recommended by th...

Page 4: ...t use abrasive cleaning articles to clean the machine Remove drops of sweat from the machine immediately after finishing training 13 Always wear appropriate workout clothing when exercising Running or aerobic shoes are also required 14 Before exercising always do stretching first 15 The power of the machine increases with increasing the speed and the reverse The machine is equipped with adjustable...

Page 5: ...5 SP 710 2 EXPLODED DIAGRAM ...

Page 6: ...6 SP 710 ...

Page 7: ... WELDING 18 HANDLE BAR 1 WELDING 19 L SHAPE KNOB 2 M10 25 20 FLAT WASHER 1 3 φ45 φ10 5 4 21 PU WHEEL 2 φ69 23 22 SENSOR 1 SR 202 23 COMPUTER 1 ST 6527 ST 7607 24 NUT 6 GB T 889 1 2000 M8 25 BOLT 1 1 GB T77 2007 M6 6 26 L SHAPE KNOB 2 M16 1 5 X20mm 27 BOLT 1 4 GB T 70 2 2000 M8 15 28 FIXING NUT 1 2 M12X1 25 H 8MM 29 CRANK END CAP 1 φ28 6 5 30 KNOB 1 φ60 113 31 NUT 2 GB T 41 2000 M10 32 Twist The Fi...

Page 8: ...15 20KG 62 FLYWHEEL SHAFT 1 φ49 90 63 BOLT 5 1 GB T 70 1 2000 M6 20 64 BOLT 6 4 GB T 70 1 2000 M6 30 65 FLAT WASHER 1 8 GB T 95 2002 6 66 FIXING NUT 2 27 M20 1 5mm 67 FLYWHEEL HOLDER 2 129 56 5 15 68 BOLT 7 4 GB T 70 1 2000 M6 12 69 BOLT 8 2 GB T 70 1 2000 M6 12 70 ADJUSTING METAL 1 117 14 5 δ1 5 71 BLOCK 1 161 21 19 72 WOOLLY BLOCK 1 156 15 5 10 73 BOLT 9 2 GB T 5780 2000 M5 10 74 SPRING WASHER 1...

Page 9: ...e at the above of this instruction sheet you will find an exploded diagram with all single parts marked with numbers which this item consists of STEP 2 1 Attach the Front Stabilizer pt 15 to the Main Frame pt 16 using two sets of Ø10 Arc Washers pt 5 M10 Domed Nut pt 6 and M10 90 Carriage bolt 3 2 Attach the Rear Stabilizer pt 4 to the Main Frame pt 16 using two sets of Ø10 Arc Washers pt 5 M10 Do...

Page 10: ... Post pt 10 then Secure using a flat washer 1 20 and L Shape knob 19 You will have to slacken the knurled section of the L Shape Knob 26 and pull the knob back and then select the desired height Release the knob and retighten the knurled portion 3 Now fix the Seat pt 13 to the Seat Post pt 12 as shown and tighten the bolts around the screws under the seat ...

Page 11: ...t 26 and pull the knob back and then select the desired height Release the knob and retighten the knurled portion 3 Secure the Handlebar pt 18 with a flat washer 1 20 and L Shape knob 19 ATTENTION The handlebar must be attached tightly 4 Fix the Computer pt 23 onto the Computer Holder with bolt pt 55 connect the plug A1 A2 and then insert the B to the back of Computer pt 23 ...

Page 12: ...o their appropriate crank arms The right crank arm is on the right hand side of the cycle as you sit on it Note that the Right pedal should be threaded on clockwise and the Left pedal anticlockwise Inspect the tightness of the pedals on a regular basis Using loose pedals will damage the thread ...

Page 13: ...ise To decrease tension and decrease resistance turn the Emergency Brake Tension Control Knob 30 to the left Counterclockwise Using the Emergency Brake Function The same knob that allows you to adjust the tension of the bike also doubles as the Emergency Brake Use this safety feature in any situation where you would need to get off the bike and or stop the bike s flywheel To use the Emergency Brak...

Page 14: ...at forward in the direction of the handlebar or backwards away from it loosen the adjusting knob and washer and pull the knob back Slide horizontal seat post into desired position Align holes and then retighten the adjusting knob Handlebar Height To adjust the handlebar height slacken the spring knob and secondary knob and pull both knobs back Slide the handlebar post along the housing on the main...

Page 15: ...or total reset If batteries are replaces all values will reset to ZERO automatically RECOVERY Enable the heart rate recovery function after training FUNCTIONS SCAN Cycles through all functions from TIME DISTANCE CALORIES PULSE RPM SPEED RPM Displays the Rotation Per Minute The RPM and SPEED will rotate every 6 seconds after exercise starts SPEED Displays current training speed Maximum speed is 99 ...

Page 16: ...0 to 9999 calories when no value is preset Count down Press the SET button to set a preset calorie goal between 0 and 9990 Calories will count down from the preset value to 0 This data is a rough guide for comparison of different exercise sessions It must not be used for medical treatment purposes PULSE The user may preset pulse by pressing SET button This data is a rough guide for comparison of d...

Page 17: ...ers the value for a specific category MODE confirms a set value 3 The values RPM SPEED TIME DISTANCE CALORIES PULSE will start increasing as soon as the sensor receives a signal that you are pedalling If preset values have been set the monitor will beep for 8 seconds once the function counts down to 0 The function will then immediately count up from 0 if the workout is continued During this press ...

Page 18: ...PEED TIME DISTANCE CALORIES PULSE will alternate every 6 seconds 5 The MODE button may also be used to select a single function to be displayed on the main display excluding RPM and SPEED These two functions will always alternate automatically Picture C ...

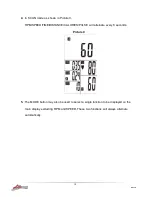
Page 19: ...ns will be inactive The Sensor Input will not be available TIME will start to count down from 00 60 The Pulse signal will blink according to the user s pulse When countdown reaches 0 it will show F1 F6 F1 Outstanding F2 Excellent F3 Above Average F4 Average F5 Below Average F6 Poor b The LCD will display as follows RECOVERY start condition end condition ...

Page 20: ... button prior to the countdown reaching 00 00 this will end the function and no result will show NOTE 1 After being inactive for 4 minutes the main screen will turn off and will display the clock automatically 2 If the computer displays abnormally please re install the battery and try again Battery Spec 1 5V UM 4 or AAA 2PCS ...

Page 21: ...cess is to make exercise a regular and enjoyable part of your everyday life The condition of your heart and lungs and how efficient they are in delivering oxygen via your blood to your muscles is an important factor to your fitness Your muscles use this oxygen to provide enough energy for daily activity This is called aerobic activity When you are fit your heart will not have to work so hard It wi...

Page 22: ... 5 to 10 minutes of stretching to cool down This will increase the flexibility of your muscles and will help prevent post exercise problems Workout Guidelines TARGET ZONE THIS IS HOW YOUR PULSE SHOULD BEHAVE DURING GENERAL FITNESS EXERCISE REMEMBER TO WARM UP AND COOL DOWN FOR A FEW MINUTES The most important factor here is the amount of effort you put in The harder and longer you work the more ca...

Page 23: ...ced if the goods fail to be of acceptable quality and the failure does not amount to a major failure Full details of your consumer rights may be found at www consumerlaw gov au Please visit our website to view our full warranty terms and conditions http www lifespanfitness com au warranty repairs Please email us through support lifespanfitness com au for all warranty or support issues Warranty and...

Page 24: ...ctorsthat may affectthe reading Thiswill cause the pulse readingtobe delayedandwill take longertoupdate the displayasthe heartrate changes Too muchnoise will create anincorrectreading Medical conditionsorhavingnoelectrical signal inthe handsare otherfactors thatmay affectpulse readingsaswell These are limitationsof handpulse technologyandeventhe mostexpensive systems whichcancost upwards of 3 000 ...

Reviews: