background image


19 


SP-870


Training Zone Exercise 

After warming up, increase the intensity to your desired exercise program. Be sure to maintain your intensity 

for maximum performance. Breathe regularly and deeply as you exercise-never hold your breath.  


Cool Down 


Finish each workout with a light jog or walk for at least 1 minute. Then complete 5 to 10 minutes of 

stretching to cool down. This will increase the flexibility of your muscles and will help prevent post-exercise 

problems. 

Workout Guidelines 

TARGET ZONE 


THIS IS HOW YOUR PULSE SHOULD BEHAVE DURING GENERAL FITNESS EXERCISE. 

REMEMBER TO WARM UP AND COOL DOWN FOR A FEW MINUTES. 


The most important factor here is the amount of effort you put in. The harder and longer you work, the more 

calories  you  will  burn.  Effectively  this  is  the  same  as  if  you  were  training  to  improve  your  fitness,  the 

difference is the goal. 


Summary of Contents for SP-870

Page 1: ...uals are available through our website at www lifespanfitness com au Product may vary slightly from the item pictured due to model upgrades Read all instructions carefully before using this product Re...

Page 2: ...2 SP 870 TABLE OF CONTENTS 1 IMPORTANT SAFETY INSTRUCTIONS 3 2 EXPLODED DIAGRAM 5 3 COMPUTER OPERATION 6 4 ASSEMBLY INSTRUCTION 7 5 COMPUTER OPERATION 12 6 EXERCISE GUIDE 18 7 WARRANTY 20...

Page 3: ...tor s advice is essential if you are taking medication that affects your heart rate blood pressure or cholesterol level c Be aware of your body s signals Incorrect or excessive exercise can damage you...

Page 4: ...eral 2 CARE INSTRUCTIONS a Lubricate moving joints with grease after periods of usage b Be careful not to damage plastic or metal parts of the machine with heavy or sharp objects c The machine can be...

Page 5: ...5 SP 870 2 EXPLODED DIAGRAM...

Page 6: ...her d6 12 1 2 9 Screw M8 65 4 32 Computer 1 10 Washer d8 16 1 5 4 33 Computer support join 1 11 Square end cap J100 50 25 4 34 L knob M10 18 2 12 Foot pad join 4 35 Washer d10 40 4 1 13 Rear stabilize...

Page 7: ...7 SP 870 4 ASSEMBLY INSTRUCTIONS STEP 1 1 Secure the front stabilizer 14 and rear stabilizer 13 onto the main frame 26 with the screw 9 and washer 10...

Page 8: ...0 STEP 2 1 Secure the saddle join 3 on the main frame 26 using the L knob 36 2 Secure the saddle tube post 2 on the saddle join 3 using the nut 5 and washer 4 3 Secure the saddle 1 on the saddle tube...

Page 9: ...9 SP 870 STEP 3 1 Secure the up right post 23 on the main frame 26 using the L knob 34 2 Secure the handlebar post 24 on the up right post 23 using the L knob 36 and washer 35...

Page 10: ...SP 870 STEP 4 1 Secure the pedal 7L R on each crank 8L R of the main frame 2 Secure the bottle holder 21 on the main frame 26 with the screw 19 and washer 20 Place the bottle 22 into the bottle holder...

Page 11: ...ort join 39 on the handlebar post 24 by the screw 39 2 Connect the computer wire 38 to the sensor wire 25 and then secure the computer 32 onto the handlebar post 24 using the screw 40 3 Insert the pul...

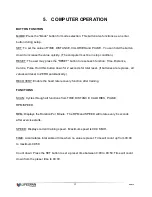
Page 12: ...r total reset If batteries are replaces all values will reset to ZERO automatically RECOVERY Enable the heart rate recovery function after training FUNCTIONS SCAN Cycles through all functions from TIM...

Page 13: ...to 9999 calories when no value is preset Count down Press the SET button to set a preset calorie goal between 0 and 9990 Calories will count down from the preset value to 0 This data is a rough guide...

Page 14: ...rs the value for a specific category MODE confirms a set value 3 The values RPM SPEED TIME DISTANCE CALORIES PULSE will start increasing as soon as the sensor receives a signal that you are pedalling...

Page 15: ...EED TIME DISTANCE CALORIES PULSE will alternate every 6 seconds 5 The MODE button may also be used to select a single function to be displayed on the main display excluding RPM and SPEED These two fun...

Page 16: ...display whilst other functions will be inactive The Sensor Input will not be available TIME will start to count down from 00 60 The Pulse signal will blink according to the user s pulse When countdow...

Page 17: ...utton prior to the countdown reaching 00 00 this will end the function and no result will show NOTE 1 After being inactive for 4 minutes the main screen will turn off and will display the clock automa...

Page 18: ...ess is to make exercise a regular and enjoyable part of your everyday life The condition of your heart and lungs and how efficient they are in delivering oxygen via your blood to your muscles is an im...

Page 19: ...5 to 10 minutes of stretching to cool down This will increase the flexibility of your muscles and will help prevent post exercise problems Workout Guidelines TARGET ZONE THIS IS HOW YOUR PULSE SHOULD...

Page 20: ...re entitled to have the goods repaired or replaced if the goods fail to be of acceptable quality and the failure does not amount to a major failure Full details of your consumer rights may be found at...

Page 21: ...anges Too much noise will create an incorrect reading Medical conditions or having no electrical signal in the hands are other factors that may affect pulse readings as well These are limitations of h...

Reviews: