background image

NOTE: This manual may be subject to updates or changes. Up to date manuals are available through our website at www.lifespanfitness.com.au 


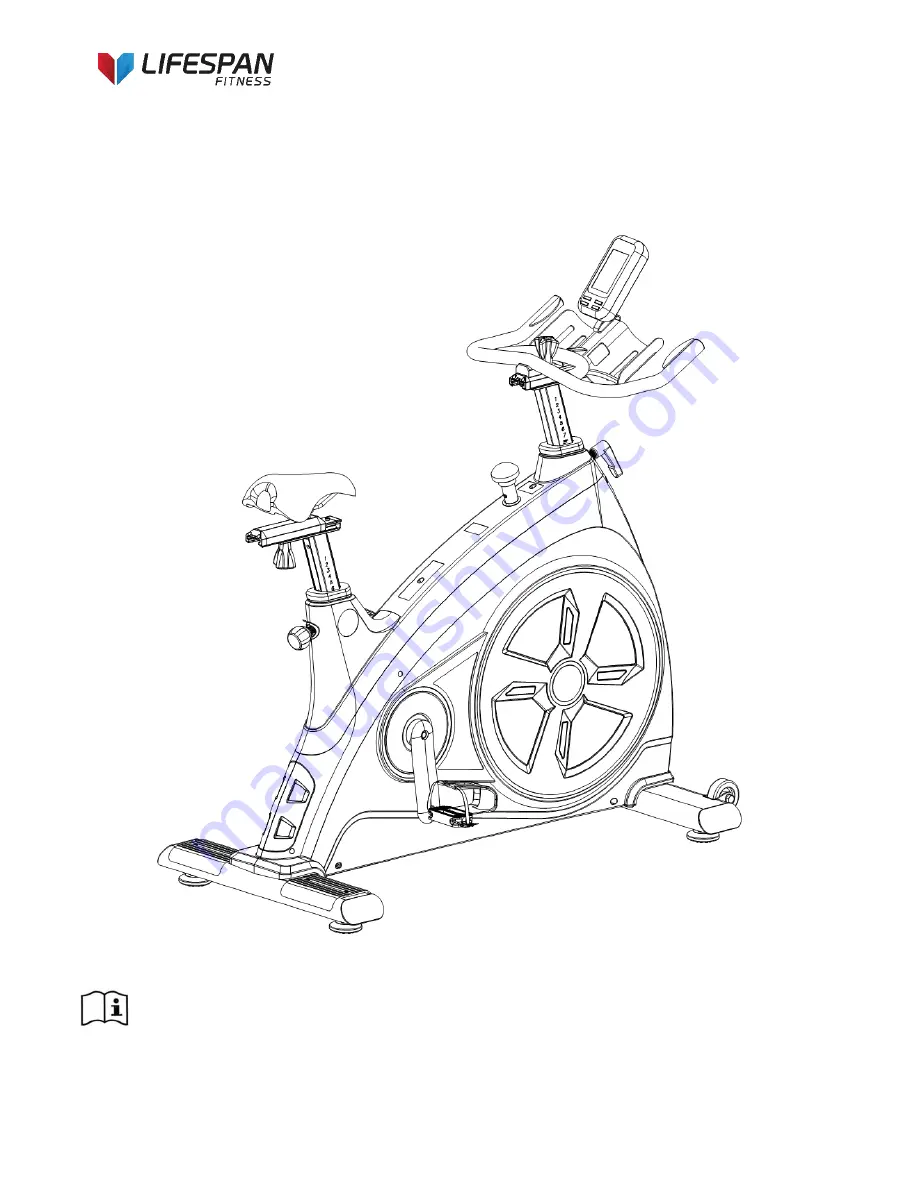
Product may vary slightly from the item pictured due to model upgrades


Read all instructions carefully before using this product. Retain this owner’s manual for future 
reference. 


SP-960 OWNER’S MANUAL 

Summary of Contents for SP-960

Page 1: ...uals are available through our website at www lifespanfitness com au Product may vary slightly from the item pictured due to model upgrades Read all instructions carefully before using this product Re...

Page 2: ...SP960 TABLE OF CONTENTS 1 IMPORTANT SAFETY INSTRUCTIONS 3 2 CARE INSTRUCTIONS 4 3 EXPLODED DIAGRAM 6 4 PARTS LIST 7 5 ASSEMBLY INSTRUCTIONS 8 6 COMPUTER OPERATION 12 7 EXERCISE GUIDE 14 8 WARRANTY 16...

Page 3: ...tor s advice is essential if you are taking medication that affects your heart rate blood pressure or cholesterol level c Be aware of your body s signals Incorrect or excessive exercise can damage you...

Page 4: ...eful not to damage plastic or metal parts of the machine with heavy or sharp objects The machine can be kept clean by wiping it down using dry cloth All nuts and bolts are to be checked and tightened...

Page 5: ...5 SP960...

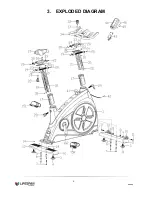
Page 6: ...6 SP960 3 EXPLODED DIAGRAM...

Page 7: ...2 32 Cross screw M4X12 4 10 Roller wheel 2 33 Handlebar slider 1 11 Hex bolt M10 45 2 34 Handlebar assembly 1 12 Rear stabilizer 1 35 Handlebar post strengthen board 1 13 Footrest plate 2 36 Screw M8X...

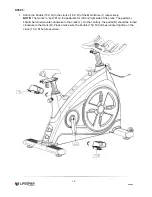
Page 8: ...8 SP960 5 ASSEMBLY INSTRUCTIONS STEP 1 1 Attach the Front stabilizer 2 and Rear stabilizer 12 onto the Main frame 1 with the Hex bolt 7 Spring washer 6 and Spacer 5...

Page 9: ...er position to make it slip into the groove of Handlebar slider 33 Attach End cap 19 to Handlebar post 31 with Cross screw 20 lock Hex bolt 21 back to 31 3 Adjust the Handlebar slider 33 to a proper p...

Page 10: ...E The marks L and R on the pedal are for left and right side of the crank The pedal L should be turned counter clockwise to the crank L On the contrary the pedal R should be turned clockwise to the cr...

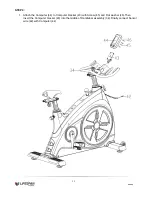
Page 11: ...EP 4 1 Attach the Computer 44 to Computer bracket 43 with Screw 45 and Flat washer 46 Then insert the Computer bracket 43 into the middle of Handlebar assembly 34 Finally connect Sensor wire 42 with C...

Page 12: ...lay window 4 RECOVERY a Heart rate recovery function after workout FUNCTIONS 1 SPEED AVG SPEED MAX SPEED Window A displays a The current exercise speed and the avg speed max speed during exercise 2 TI...

Page 13: ...r else check the installation of magnet and sensor and also the plug connections between sensor and computer OPERATION 1 RESET In any displays hold MODE button for 2 seconds to reset all the data 2 SE...

Page 14: ...y to control your weight improving your fitness and reduce the effect of aging and stress The key to success is to make exercise a regular and enjoyable part of your everyday life The condition of you...

Page 15: ...you exercise Cool Down Finish each workout with a light jog or walk for at least 1 minute Then complete 5 to 10 minutes of stretching to cool down This will increase the flexibility of your muscles a...

Page 16: ...entitled to have the goods repaired or replaced if the goods fail to be of acceptable quality and the failure does not amount to a major failure Full details of your consumer rights may be found at w...

Page 17: ...s Too much noise will create an incorrect reading Medical conditions or having no electrical signal in the hands are other factors that may affect pulse readings as well These are limitations of hand...

Reviews: