background image


z


Use caution while participating in other activities while walking on your treadmill; such 

as watching television, reading, etc. These distractions may cause you to lose balance 
or stray from walking in the centre of the belt; which may result in serious injury. 

z


In order to prevent losing balance and suffering unexpected injury, NEVER mount or 
dismount the treadmill while the belt is moving. This unit starts with at a very low 

speed. Simply standing on the belt during slow acceleration is proper after you have 

learned to operate this machine. 

z


Always hold on to handrail while making control changes. 

z


A safety key is provided with this machine. Remove the safety key will stop the 
walking belt immediately; the treadmill will shut off automatically. Insert the safety 

key will reset the display.  

z


Do not use excessive pressure on console control keys. They are precision set to 
function properly with little finger pressure.  


1.3KEYCOMPONANTSOFTREADMIL 


Safety Key 

Running Mat 

Deck- Underneath 
the running mat 

Motor Cover 

Hand Rails 

Hand Pulse 

Display 

Belt Adjustment 

Transportation Wheels 


   LIFESPAN SPRINTER        

                                            Page4 

Summary of Contents for SPRINTER XL

Page 1: ...Product may vary slightly from the item pictured due to model upgrades LIFESPAN SPRINTER Page0 SPRINTER XL USER S MANUAL...

Page 2: ...10 3 7 PULSE GRIP FEATURE 11 3 8 CALORIE DISPLAY 11 3 9 MANUAL PROGRAM 11 3 10 PROGRAMMABLE OPERATIONS 11 3 11 PRESET PROGRAM 12 3 12 PROGRAM GRAPHS 13 4 MAINTENANCE 16 4 1 GENERAL CLEANING 16 4 2 GE...

Page 3: ...r of the treadmill Provide a minimum of 1 metre clearance between the rear of the treadmill and any fixed object z Place your unit on a solid level surface when in use z Never allow children on or nea...

Page 4: ...interrupt GFCI wall outlet with this treadmill Route the power cord away from any moving part of the treadmill including the elevation mechanism and transport wheels z NEVER remove any cover without...

Page 5: ...e belt during slow acceleration is proper after you have learned to operate this machine z Always hold on to handrail while making control changes z A safety key is provided with this machine Remove t...

Page 6: ...ts Description Remarks Qty I Bottom parts 1 II Left handle 1 III Right handle 1 IV Computer assembly 1 V Horizontal support 1 VI Vertical support 2 TOOLS REQUIRED Description Remarks Qty Cross ringent...

Page 7: ...which is between left handle II and right handle III on the main frame and the bottom parts I tighten the cover VI on the main frame with cross pan self locked screw ST4 2 15 head 8 CAUTION Please don...

Page 8: ...a very heavy piece of exercise equipment and should be handled with caution 4 Children should not be allowed to play on the treadmill or move the treadmill deck up and down WE RECOMMEND YOU HAVE SOME...

Page 9: ...rgently stop when draw out the safety key b Automatic stop when out of control There are 15 Buttons in the console panel and 2 control buttons in each handrail 3 3 Safety Key IMPORTANT The treadmill w...

Page 10: ...it will turn to STOP status c If turn off the safety key it will turn to OFF status 4 OFF In OFF status the treadmill belt stops moving The LED shows off and back light is off a If there is any butto...

Page 11: ...press SPEED UP SPEED DOWN to increase decrease the speed Press SPEED UP SPEED DOWN once the speed will increase decrease 0 1km h But if the speed reaches 18 0km h pressing SPEED UP will no longer incr...

Page 12: ...o When you begin running the time will count up and distance and calories will count up from zero It will stop automatically if the time reaches to 99 59 b COUNTING DOWN In MANUAL PROGRAM mode you may...

Page 13: ...3 P4 INCLINE 2 3 3 2 2 3 3 5 4 3 4 3 3 2 2 1 1 2 3 4 5 6 7 8 9 10 11 12 13 14 15 16 SPEED 2 4 4 5 6 7 7 5 6 7 12 12 5 4 3 3 P5 INCLINE 3 3 3 4 4 5 5 5 4 4 4 4 5 5 3 3 1 2 3 4 5 6 7 8 9 10 11 12 13 14...

Page 14: ...D IN C LIN E P2 0 1 2 3 4 5 6 7 1 2 3 4 5 6 7 8 9 10 11 12 13 14 15 16 Intervals SP E E D IN C LIN E P3 0 2 4 6 8 1 2 3 4 5 6 7 8 9 10 11 12 13 14 15 16 Intervals SP E E D IN C LIN E P4 0 2 4 6 8 10 1...

Page 15: ...P6 0 2 4 6 8 10 1 2 3 4 5 6 7 8 9 10 11 12 13 14 15 16 Intervals SP E E D IN C LIN E P7 0 2 4 6 8 10 1 2 3 4 5 6 7 8 9 10 11 12 13 14 15 16 Intervals SP E E D IN C LIN E P8 0 2 4 6 8 10 12 14 1 2 3 4...

Page 16: ...0 2 4 6 8 10 1 2 3 4 5 6 7 8 9 10 11 12 13 14 15 16 Intervals SP E E D IN C LIN E P11 0 2 4 6 8 10 12 1 2 3 4 5 6 7 8 9 10 11 12 13 14 15 16 Intervals SP E E D IN C LIN E P12 0 2 4 6 8 10 12 14 1 2 3...

Page 17: ...LL BEFORE FOLDING 4 1 General Cleaning z Use a soft damp cloth to wipe the edge of the belt and the area between the belt edge and frame A mild soap and water solution along with a nylon scrub brush w...

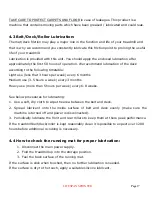
Page 18: ...our treadmill and that is why we recomm life of your treadmill Lubrication is provided with this unit You should apply the enclosed lubrication after approximately the first 50 hours of op according t...

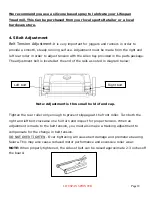
Page 19: ...he rails as noted in diagram below Left bolt Right bolt Note Adjustment is thru small hold of end cap Tighten the rear roller only enough to prevent slippage at the front roller Turn both the right an...

Page 20: ...6mm Allen Key until the belt is centered When adjusting the belt using the 6 mm Allen Key it is important to adjust the belt in half turn increments Over adjusting the belt can cause damage to the ma...

Page 21: ...fessional operation only 5 Treadmill squeaks when walked on 1 Pivot points need lubrication 1 Lubricate pivot points 1 Transmitter not making good contact with skin 1 Moisten skin contact area on the...

Page 22: ...r weight improving your fitness and reduce the effect of aging and stress The key to success is to make exercise a regular and enjoyable part of your everyday life The condition of your heart and lung...

Page 23: ...our body temperature heart rate and circulation in preparation for exercise Ease into your exercise Training zone Exercise After warming up increase the intensity to your desired exercise program Be s...

Page 24: ...e the product warranty form online Please visit http www warrantyform lifespanfitness com au PLEASE NOTE YOUR WARRANTY IS ONLY VALID IF YOU CAN PROVE YOU ARE THE ORIGINAL PURCHASER ON THIS ITEM i e A...

Page 25: ...8 EXPLODED DIAGRAM LIFESPAN SPRINTER Page0...

Page 26: ...33 Cross groove pan headed bolt M10X95 S6 length 85 teeth length 10 8 8 grade 1 11 Nylon nut M5 12 4 34 Cross groove pan headed bolt M6 12 2 35 Inner six angle pan headed bolt M10 1 12 Pan headed six...

Page 27: ...ouge 5 slot 1 52 regula Length 1038 2 53 Back adjustment ABS 1 54 Motor upper cover ABS 1 55 Motor bottom cover ABS 1 56 rubber cushion 30 16 ridigity inner hole 5 4 57 Running mat rubber cushion out3...

Page 28: ...LIFESPAN SPRINTER Page1...

Reviews: