background image

Important Safety Information


Please keep this manual in a safe place for easy reference. 

1.  It  is important  to  read  this  entire  manual  before  assembling  and  using  the 

equipment. 
Safe and effective use can only be achieved if the equipment is assembled, 
maintained  and  used  properly.  It  is  your  responsibility  to  ensure  that  all 
users of the equipment are informed of all warnings and precautions. 

2.  Before  starting  any  exercise  program  you  should  consult  your  doctor  to 

determine if you have any medical or physical conditions that could put your 
health and safety at risk, or prevent you from using the equipment properly. 
Your  doctor’s  advice  is  essential  if  you  are  taking  medication  that  affects 
your heart rate, blood pressure or cholesterol level. 

3.  Be  aware  of  your  body’s  signals.  Incorrect  or  excessive  exercise  can 

damage your health. Stop exercising if you experience any of the following 
symptoms:  pain,  tightness  in  your  chest,  irregular  heartbeat,  and  extreme 
shortness of breath, lightheadedness, dizziness or feelings of nausea. If you 
do experience any of these conditions you should consult your doctor before 
continuing with your exercise program.   

4.  Keep  children  and  pets  away  from  the  equipment.  The  equipment  is 

designed for adult use only. 
 

5.  Use the equipment on a solid, flat level surface with a protective cover for 

your  floor  or  carpet.  To ensure  safety,  the  equipment  should  have at least 
0.5 meters of free space all around it. 

6.  Before  using  the  equipment,  check  that  the  nuts  and  bolts  are  securely 

tightened. 

7.  Dress  up  with  suitable  clothing  while  using  the  equipment.  Avoid  wearing 

loose clothing that may get caught in the equipment or that may restrict or 
prevent movement. 

8. The equipment is not suitable for indoor and commercial use. The equipment 

has been tested under class H.C. 

9. Care must be taken when lifting or moving the equipment so as not to injure 

your  back.  Always  use  proper  lifting  techniques  and/or  seek  assistance  if 
necessary.


Summary of Contents for ST-12

Page 1: ...OWNER S MANUAL IMPORTANT PLEASE READ THIS MANUAL CAREFULLY BEFORE USING THE BIKE...

Page 2: ...the following symptoms pain tightness in your chest irregular heartbeat and extreme shortness of breath lightheadedness dizziness or feelings of nausea If you do experience any of these conditions you...

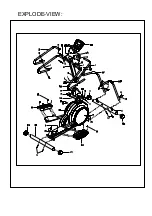
Page 3: ...EXPLODE VIEW...

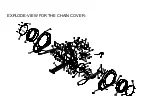
Page 4: ...EXPLODE VIEW FOR THE CHAIN COVER...

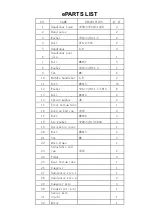
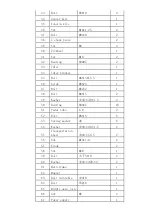
Page 5: ...2 11 Bolt M6 15 16 12 Washer 12 d6 1 5 R16 8 13 Bolt M4 12 2 14 Spring washer d8 2 15 Front bottom tube 1 16 Rolling End cap 76 2 17 Bolt M8 90 4 18 Arc washer 20 d8 5 R40 4 19 Decoration cover 1 20 B...

Page 6: ...5 5 1 46 Screw M8 23 1 47 Bolt M6x52 1 48 Bolt M8 15 2 49 Washer 30 d8 1 5 2 50 Bearing 6004Z 10 51 Pedal tube L R 2 52 Bolt M6 15 6 53 Spring washer d6 6 54 Washer 30 d6 1 5 2 55 Transportation wheel...

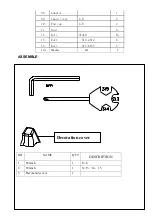
Page 7: ...n cover L R 2 70 End cap L R 2 71 Dial 2 72 Bolt ST4 8 16 73 Bolt ST4 2 12 6 74 Bolt ST4 8 25 5 13A Washer D4 2 ASSEMBLE NO NAME Q TY DESCRIPTION 1 Wrench 1 S 6 2 Wrench 1 S 13 14 15 3 Decoration cove...

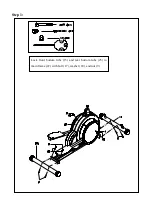
Page 8: ...Step 1 Lock front bottom tube 15 and rear bottom tube 25 to main frame 22 with bolt 17 washer 18 and nut 9...

Page 9: ...Step 2 Lock pedal 24 to L R pedal tube 51L R with bolt 11...

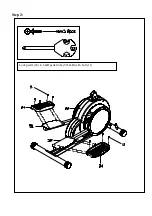
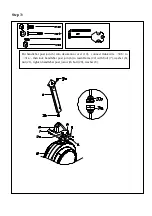
Page 10: ...Put handlebar post join 6 into decoration cover 19 connect trunk wire 30b to 31a then lock handlebar post join 6 to main frame 22 with bolt 7 washer 8 nut 21 tighten handlebar post join with bolt 20 w...

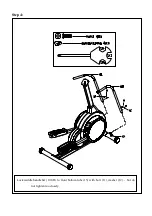
Page 11: ...Step 4 Lock middle handlebar 10L R to front bottom tube 15 with bolt 11 washer 12 but do not tighten too closely...

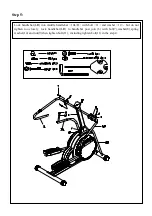
Page 12: ...iddle handlebar 10L R with bolt 11 and washer 12 but do not tighten too closely lock handlebar L R to handlebar post join 6 with bolt 7 washer 8 spring washer 14 and nut 9 then tighten bolt 11 includi...

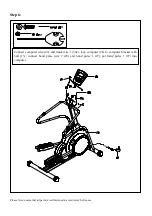
Page 13: ...ll part are well fastened to avoid injury before use Connect computer wire 29 and trunk wire 1 30a lock computer 26 to computer bracket with bolt 13 connect hand pulse wire 2 28 and hand pulse 1 27 pu...

Page 14: ...VALID IF YOU CAN PROVE YOU ARE THE ORIGINAL PURCHASER ON THIS ITEM i e A copy of the receipt invoice delivery date or internet confirmation SERVICING IF YOU FAIL TO COMPLY WITH LIFESPAN S MAINTENANCE...

Reviews: