background image

13

Belt Tensioning 

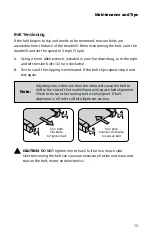
If the belt begins to slip and needs to be tensioned, tension bolts are 

accessible from the back of the treadmill. Before tensioning the belt, start the 

treadmill and set the speed to 3 mph (5 kph).

A.  Using a 6 mm Allen wrench, included in your hardware bag, turn the right 

and left tension bolts 1/2 turn clockwise. 

B.  Test to see if the slipping is eliminated. If the belt slips repeat step A and 

test again.

Maintenance and Tips

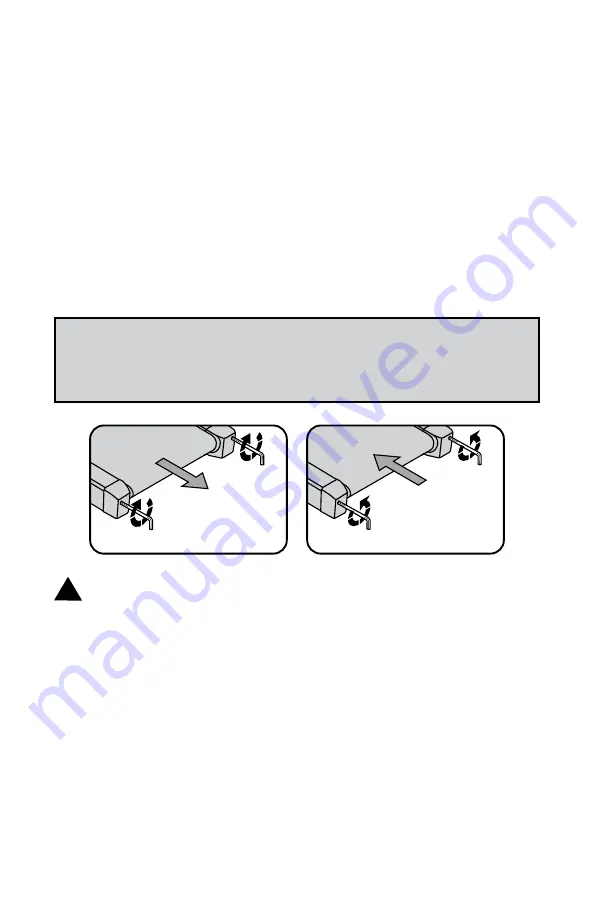
Turn both 

Clockwise 

to Tighten belt

Turn both 

Counter-clockwise 

to Loosen belt

Note:


Adjusting one side more than the other will cause the belt to 

drift to the side of the treadmill and will require belt alignment. 

Check to be sure the running belt is still aligned. If belt 

alignment is off refer to Belt Alignment section.

CAUTION

DO NOT

 tighten more than 2 full turns on each side.  

 Over tensioning the belt can cause unnecessary friction and wear and 

tear on the belt, motor and electronics. 

!!

Summary of Contents for TR1000B

Page 1: ...Owner s Manual TR800B TR1000B TR1200B TR5000B Treadmill Base ...

Page 2: ...uctions and proper operation are included If you need to contact LifeSpan customer service please visit the customer service section of www LifeSpanFitness com Submitted service requests will be responded to within one business day Consumers in the United States and Canada can also dial 877 654 3837 option 4 We recommend you take a personal approach to adding movement to your day Begin slowly gent...

Page 3: ...lcome Safety First 6 Children and Pets Safety Tips About Your Treadmill Base 8 Specifications Warranty Grounding Maintenance and Tips 11 Lubrication and Cleaning Belt Tensioning Belt Adjustment Moving the Treadmill ...

Page 4: ... aerosol spray products are being used or where oxygen is being administered Never place the power cord under carpeting or place any object on top of the cord this may pinch or damage the cord causing fire damage or personal injury Use this product for its intended use as described in this Owner s Manual Do not use attachments that are not recommended by LifeSpan Do not leave your treadmill runnin...

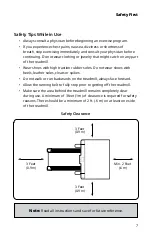
Page 5: ...rubber soles Do not wear shoes with heels leather soles cleats or spikes Do not walk or run backwards on the treadmill always face forward Allow the running belt to fully stop prior to getting off the treadmill Make sure the area behind the treadmill remains completely clear during use A minimum of 3 feet 1m of clearance is required for safety reasons There should be a minimum of 2 ft 6 m on at le...

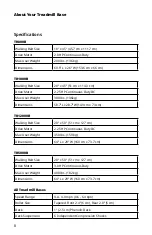
Page 6: ...ons 58 7 L x 28 7 W 149 cm x 73 cm TR12000B Walking Belt Size 20 x 50 51 cm x 127 cm Drive Motor 2 25 HP Continuous Duty DC Max User Weight 350 lbs 159 kg Dimensions 64 L x 29 W 160 cm x 73 7 cm TR5000B Walking Belt Size 20 x 50 51 cm x 127 cm Drive Motor 3 0 HP Continuous Duty Max User Weight 400 lbs 182 kg Dimensions 64 L x 29 W 160 cm x 73 7 cm All Treadmill Bases Speed Range 0 4 4 0 mph 0 6 6 ...

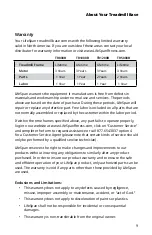
Page 7: ...t please note that certain kinds of service should only be performed by a qualified service technician LifeSpan reserves the right to make changes and improvements to our products without incurring any obligations to similarly alter any product purchased In order to insure our product warranty and to ensure the safe and efficient operation of your LifeSpan product only authorized parts can be used...

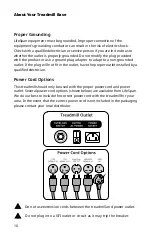
Page 8: ...nded outlet If the plug will not fit in the outlet have the proper outlet installed by a qualified electrician Power Cord Options This treadmill should only be used with the proper power cord and power outlet Several power cord options shown below are available from LifeSpan We do our best to include the correct power cord with the treadmill for your area In the event that the correct power cord i...

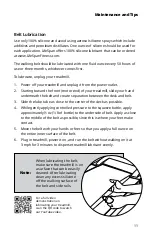
Page 9: ...k and belt 3 Slide the lube tube as close to the center of the deck as possible 4 While gently applying controlled pressure to the squeeze bottle apply approximately oz 1 8 of bottle to the underside of belt Apply as close to the middle of the belt as possible since this is where your feet make contact 5 Move the belt with your hands or feet so that you apply a full ounce on the entire inner surfa...

Page 10: ...mage or anything else that would indicate the need for service Safety and Integrity The safety and integrity designed into the machine can only be maintained when the treadmill is regularly examined for damage and repaired Worn or damaged components shall be replaced immediately or the treadmill be removed from service until the repair is made Pay special attention to components most susceptible t...

Page 11: ...iminated If the belt slips repeat step A and test again Maintenance and Tips Turn both Clockwise to Tighten belt Turn both Counter clockwise to Loosen belt Note Adjusting one side more than the other will cause the belt to drift to the side of the treadmill and will require belt alignment Check to be sure the running belt is still aligned If belt alignment is off refer to Belt Alignment section CA...

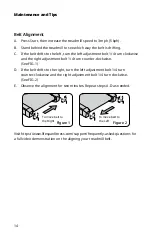
Page 12: ...ounter clockwise See FIG 1 D If the belt drifts to the right turn the left adjustment bolt 1 4 turn counter clockwise and the right adjustment bolt 1 4 turn clockwise See FIG 2 E Observe the alignment for two minutes Repeat steps A D as needed Visit https www lifespanfitness com support frequently asked questions for a full video demonstration on the aligning your treadmill belt Maintenance and Ti...

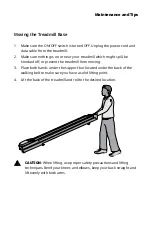
Page 13: ... or prevent the treadmill from moving 3 Place both hands under the support bar located under the back of the walking belt to make sure you have a solid lifting point 4 Lift the back of the treadmill and roll to the desired location Maintenance and Tips CAUTION When lifting use proper safety precautions and lifting techniques Bend your knees and elbows keep your back straight and lift evenly with b...

Page 14: ...LifeSpan Fitness 785 West 1700 South Suite 1 Salt Lake City UT 84104 Phone 877 654 3837 www LifeSpanFitness com Version 2 0 TR800B TR1000B TR1200B TR5000B Treadmill Base ...

Reviews: