12
CONDITIONING GUIDELINES
The following guidelines will help you to plan your
exercise program. Remember that proper nutrition
and adequate rest are essential for successful results.
EXERCISE INTENSITY
Whether your goal is to burn fat or to strengthen your
cardiovascular system, the key to achieving the
desired results is to exercise with the proper intensity.
The proper intensity level can be found by using your
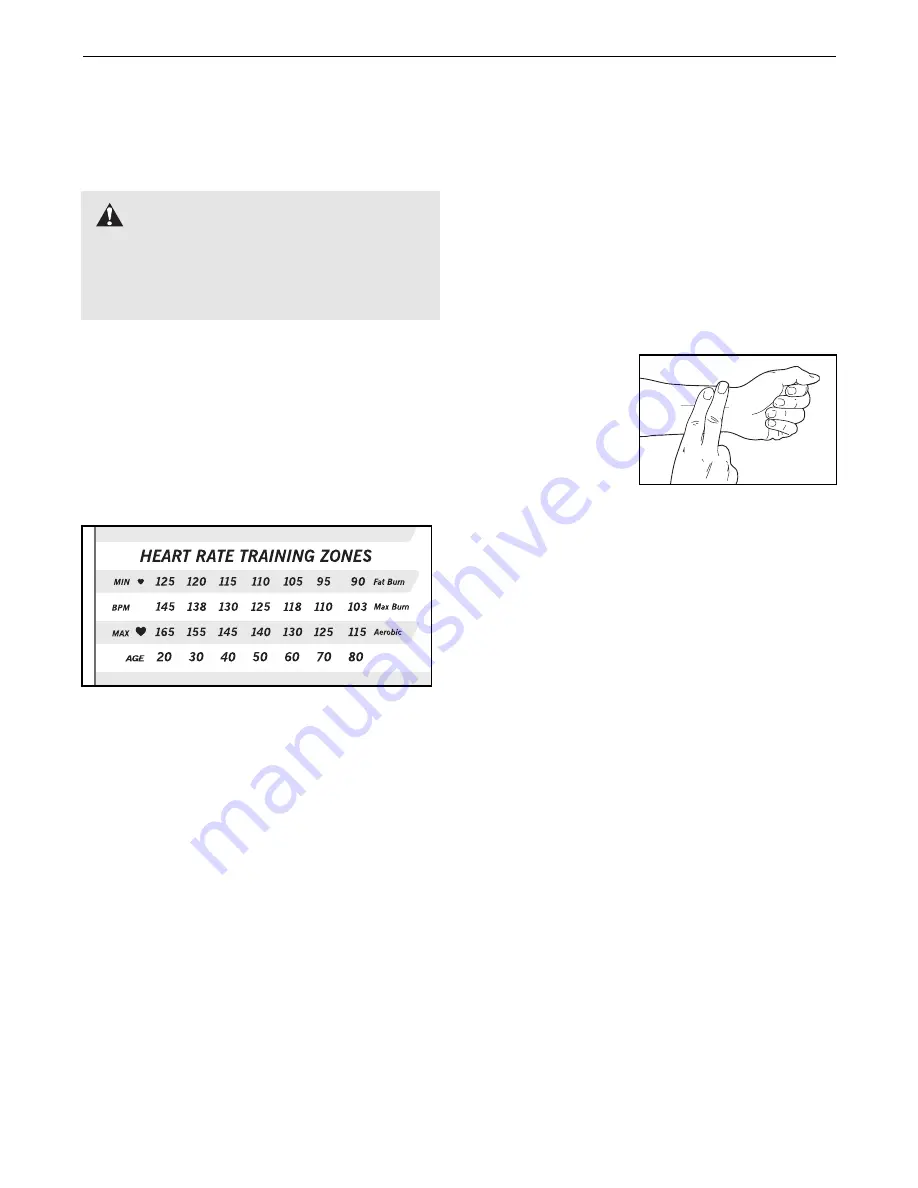
heart rate as a guide. The chart below shows recom-
mended heart rates for fat burning, maximum fat
burning, and cardiovascular (aerobic) exercise.
To find the proper heart rate for you, first find your age
at the bottom of the chart (ages are rounded off to the
nearest ten years). Next, find the three numbers
above your age. The three numbers are your “training
zone.” The smallest number is the recommended
heart rate for fat burning; the middle number is the
heart rate for maximum fat burning; the largest
number is the heart rate for aerobic exercise.
Burning Fat
To burn fat effectively, you must exercise at a low
intensity level for a sustained period of time. During
the first few minutes of exercise, your body uses easi-
ly accessible
carbohydrate calories for energy. Only
after the first few minutes of exercise does your body
begin to use stored
fat calories for energy. If your goal
is to burn fat, adjust the intensity of your exercise until
your heart rate is near the smallest number in your
training zone as you exercise. For maximum fat burn-
ing, adjust the intensity of your exercise until your
heart rate is near the middle number.
Aerobic Exercise
To strengthen your cardiovascular system, your exer-
cise must be “aerobic.” Aerobic exercise is activity
that requires large amounts of oxygen for prolonged
periods of time. This increases the demand on the
heart to pump blood to the muscles, and on the lungs
to oxygenate the blood. For aerobic exercise, adjust
the intensity of your exercise until your heart rate is
near the largest number in your training zone.
HOW TO MEASURE YOUR HEART RATE
To measure your
heart rate, first exer-
cise for at least four
minutes. Then, stop
exercising and place
two fingers on your
wrist as shown.
Take a six-second
heartbeat count,
and multiply the result by 10 to find your heart rate.
For example, if your six-second heartbeat count is 14,
your heart rate is 140 beats per minute. (A six-second
count is used because your heart rate will drop rapidly
when you stop exercising.)
WORKOUT GUIDELINES
Each workout should include the following three parts:
A warm-up, consisting of 5 to 10 minutes of stretching
and light exercise (see page 13). A proper warm-up
increases your body temperature, heart rate, and cir-
culation in preparation for exercise.
Training zone exercise, consisting of 20 to 30
minutes of exercising with your heart rate in your
training zone. (During the first few weeks of your
exercise program, do not keep your heart rate in
your training zone for longer than 20 minutes.)
A cool-down, with 5 to 10 minutes of stretching.
This will increase the flexibility of your muscles
and will help to prevent post-exercise problems.
EXERCISE FREQUENCY
To maintain or improve your condition, plan three work-
outs each week, with at least one day of rest between
workouts. After a few months of regular exercise, you
may plan up to five workouts each week, if desired.
Remember, the key to success is make exercise a
regular and enjoyable part of your everyday life.
WARNING:
Before beginning this
or any exercise program, consult your physi-
cian. This is especially important for persons
over the age of 35 or persons with pre-exist-
ing health problems.


