background image

Summary of Contents for 831.297170

Page 1: ...is found in the location shown below Write the serial number in the space above for future reference erial Number Decal EXERCISE EQUIPMENT o_ LIIJ I _1 II o I_ HELPLINEI 1 800 736 6879 _ _ _ _ _ _ _...

Page 2: ...AND MOVE THE TREADMILL 10 TROUBLE SHOOTING 12 CONDITIONING GUIDELINES 14 ORDERING REPLACEMENT PARTS Back Cover FULL 90 DAY WARRANTY Back Cover Note An EXPLODED DRAWING and a PART LIST are attached to...

Page 3: ...s in speed 16 To reduce the ASSEMBLY on sure that The decal shown has been placed on your treadmill If the decal is missing or if it is not legible please call our toll free HELPLINE to order a free r...

Page 4: ...y 7 a m until 7 p m Central Time excluding holidays To help us assist you please note the product model number and serial num ber before calling The model number of the treadmill is 831 297170 The ser...

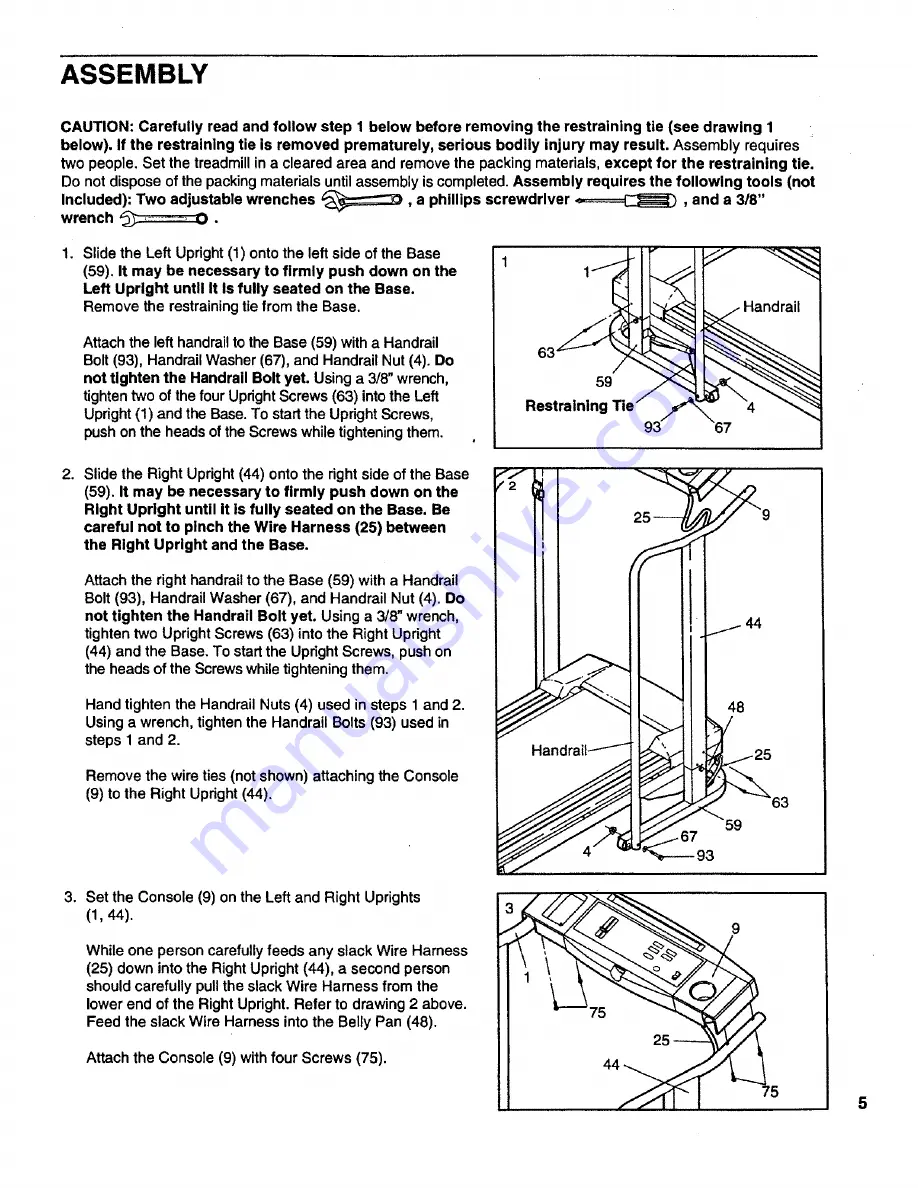
Page 5: ...heads of the Screws while tightening them 63 59 Restraining 2 Slide the Right Upright 44 onto the right side of the Base 59 It may be necessary to firmly push down on the Right Upright until it is fu...

Page 6: ...ore moving the treadmill see HOW TO MOVE THE TREADMILL on page 11 6 Align the holes in the Book Rack 62 with those in the Console 9 Attach the Book Rack to the Console with the four remaining Screws 7...

Page 7: ...product is equipped with a cord having an equipment grounding conductor and a grounding plug Plug the power cord Into a surge protector and plug the surge protector into an ap propriate outlet that I...

Page 8: ...below Press three batteries into the battery com parlment Make sure that the neg ative ends of the batteries are touching the spdngs Close the battery cover STEP BY STEP CONSOLE OPERATION Before oper...

Page 9: ...from one number to the other Arrows in the display will indicate which number is currently shown Note This display will also show your pulse when the pulse sensor is used The displays can be reset if...

Page 10: ...bout five minutes POW R O O _ O_ F Note Any time that the walking belt is stopped and no console buttons are pressed for five min utes the displays will automatically turn off in order to conserve the...

Page 11: ...se as shown 2 Tilt the treadmill back until it rollsfreely on the front wheels Carefully move the treadmill to the desired location Never move the treadmill without tipping it back or the base pads ma...

Page 12: ...for five minutes and then press the switch back in b Make sure that the power cord is plugged in c Remove the key from the console Reinsert the key fully into the console See step 1 on page 9 d If the...

Page 13: ...e careful not to over tighten the walking belt Plug in the power cord insert the key and run the treadmill for a few minutes Repeat until the walking belt is centered c If the walking belt slips when...

Page 14: ...ree numbers below your age The three numbers are your training zone The lower two numbers are recommended heart rates for fat burning the higher number is the recommended heart rate for aerobic exerci...

Page 15: ...rd your toes as far as possible Hold for 15 counts then relax Repeat 3 times Stretches Hamstrings back of knees and back 2 Hamstring Stretch Sit with one leg extended Bring the sole of the opposite fo...

Page 16: ...ND PART LIST FROM THE MANUAL Save this EXPLODED DRAWING and PART LIST for future reference Note Specifications are subject to change without notice For information about ordering replacement parts see...

Page 17: ...EXPLODED DRAWING Model No 831 297170 7 82 92 75 75 74 66 RI096A 75 75 62 71 16 34 38 94 33 52 64 19 37_ 5 19 26 1 27 56 6 41 55 25...

Page 18: ...3307 2 Incline Leg Bolt 1 Motor Hood 70 131562 2 Latch Pad 22 Small Screw 71 131637 1 Incline Leg 1 Motor Pivot Bolt 72 052012 2 Incline Leg Wheel 1 Choke 73 013523 2 Rear Roller Endcap Screw 2 Inclin...

Page 19: ...requesting help or service or ordering parts please be pre pared to provide the following information The NAME OF THE PRODUCT SEARS LIFESTYLEFP EX PANSE 800 treadmill The MODEL NUMBER OF THE PRODUCT...

Reviews: