background image

31 

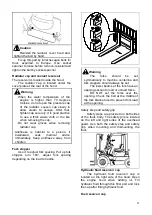
Be  sure  to  stop  in  front  of  the  load 

before  engaging  the  forks,  and  make 
certain there are no obstacles, then engage 
the load by driving forwards. 

38. 38. 

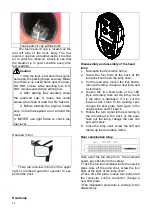
Make  certain  the  load  is  well

stacked and evenly positioned across both
forks.  DO  NOT  attempt  to  lift  a  load  with
only one fork.

On the truck with an attachment such as 

a  load  grab,  make  certain  the  load  is 
securely and correctly grabbed, and pull the 
loading control level to the full (increase to 
relieve pressure). 

39.

Never lift loads when the truck is on an

incline. Avoid loading work on a grade.

40.

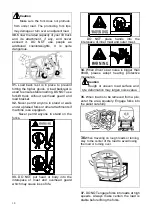
DO NOT stack loads on forks in such a

way  that  the  top  of  the  load  exceeds  the
load backrest height. If this is unavoidable,
make the load as secure as possible. When
handling  bulky  loads  that  restrict  vision,
operate the truck in reverse or have a guide

41.

Use  minimum  forward  and  reverse  tilt

when stacking and unloading loads. Never tilt
forward  unless  the  load  is  over  stack  or  at  a
low lift height.

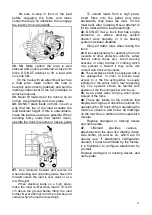
When  stacking  loads  on  a  high  place, 

make the mast vertical when load is 15 to 20 
cm  above  the  ground  before  lifting  the  load 
further. Never attempt to tilt the mast beyond 
vertical when the load is raised high. 

To  unload  loads  from  a  high  place, 

insert  forks  into  the  pallet  and  drive 
backwards,  then  lower  the  load.  Tilt  the 
mast back after lowering. Never attempt to 
tilt the mast with the load raised high. 

42.

DO  NOT  tow  a  truck  that  has  engine

problems,  or  whose  steering  system
doesn‟t  work  properly,  or  if  its  braking
system has been disabled.

Obey  all  traffic  rules  when  towing  the 

truck. 

43.

Dress appropriately for operating the truck

(overalls  or  other  protective  uniforms,  safety
helmet,  safety  shoes  etc.).  Avoid  wearing
neckties  or  other  articles  of  clothing  which
may  present  a  hazard  if  they  come  into
contact with truck components.

44.

The workplace should be equipped with a

fire  extinguisher.  In  order  to  provide  easy
access  to  it,  the  fire  extinguisher  is  usually
installed  on  the  safety  frame  rear  supporting
leg.  The  operator  should  be  familiar  with
position of the fire extinguisher and its use.

45.

Use  a  pallet  when  carrying  small  goods

instead of the forks.

46.

There  are  labels  on  the  machine  that

display warnings and describe methods for
operating the lift truck. When operating the
machine,  observe  and  follow  all  markings
on the machine in addition to this operator‟s
manual.

Replace damaged or missing decals 

and name plate. 

47.


Liftsmart

 provides 

various


attachments to the user, like rotating clamp,


side shifter,  jib and so on,  which are for


special  use.  If  attachment  configuration


needed, it must be admitted by the factory.


It  is forbidden to configure attachment  by


yourself.
Replace damaged or missing decals and


name plate.

Summary of Contents for LS-RT50

Page 1: ...LS RT50 5T rough terrain forklift truck OPERATION AND MAINTENANCE MANUAL Original Instruction LS RT50 LS RT50 4 01 2020...

Page 2: ...e use Because of the update and improvements of our products there may be some differences between this operation manual contents and your forklift truck Illustration adopted by this manual may vary f...

Page 3: ...truck 49 VI Operation 51 1 Start up 51 2 Travel 51 3 Pick up 52 4 Stacking load 52 5 Remove load 53 VII Parking 54 1 Parking daily 54 2 Park the truck for a long time 54 3 Running after storing for a...

Page 4: ...XIV Description of OPS System 82 XV Relevant safety command and standard 84 XVI Maintenance record 86...

Page 5: ...se a block when parking on a grade for a long time 18 If the truck suddenly gets out of order or for leakage of electrolyte hydraulic oil or brake oil when lifting goods or grade climbing leave truck...

Page 6: ...shall 1 Arrange for the modification or alteration to be designed tested and implemented by an engineer s expert in industrial trucks and their safety 2 Maintain a permanent record of the design test...

Page 7: ...e of main parts or component 1 Fork 2 Load backrest 3 Tilt cylinder 4 Mast 5 Lift cylinder 6 Steering wheel 7 Overhead guard 8 Seat 9 Cover hood 10 Counter balance 11 Rear wheel 12 Truck frame 13 Fron...

Page 8: ...8 1 Instruments...

Page 9: ...e hour at regular intervals to reminder of the maintenance to the forklift Refer to monthly maintenance after first flash Refer to periodical maintenance schedule for per period Take the actual flashi...

Page 10: ...a check then Engine fault indicator Electronic controlled engine When the engine gets out of order this Indicator will be on then it must immediately stop according to an engine fault table troublesh...

Page 11: ...condition stays and starts engine protection shut down then this indicator will flash 30 seconds before engine shut down to warn the impending shut down Air filter indicator When the light is on it in...

Page 12: ...black white transflective LCD with LED backlight and built in heater Visual angle Horizontal visual 55 vertical visual 45 60 Button Five touch mode buttons Alarm PV380 display has two alarm lights in...

Page 13: ...needs clean Exhaust temperature indicator It is used to indicate the engine exhaust temperature When this indicator lights up it indicates that the engine exhaust temperature is too high stop the tru...

Page 14: ...lant temperature Caution If the light continues to stay lit or flashes during operation engine coolant temperature is too high and should be checked immediately Fuel gauge When the key in ON position...

Page 15: ...ve cursor return to previous menu confirm password Enter transmission calibration page if password is correct AEB Req means the request for transmission calibration make transmission calibration after...

Page 16: ...eneration process can prohibit regeneration mode 2 3 After entering engine fault page interface displays as the following figure When the cursor points at ACTIVE FAULTS ECU press OK and enter current...

Page 17: ...ter inlet temperature Bottom right displays exhaust filter outlet temperature Continue page turn the third interface displays as the following figure Top left displays current speed load Top right dis...

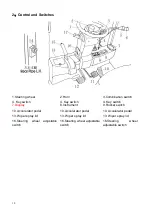
Page 18: ...y switch 4 Key switch 7 Display 8 Instrument 9 Rocker switch 10 Accelerator pedal 10 Accelerator pedal 10 Accelerator pedal 13 Wiper spray lid 13 Wiper spray lid 13 Wiper spray lid 16 Steering wheel a...

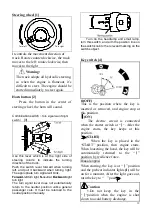
Page 19: ...ht The turn signal lever does not automatically return to the neutral position unlike general passenger cars It must be returned to the neutral position manually Turn on the headlamp and small lamp tu...

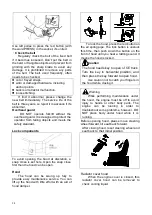
Page 20: ...ing handle can not tilt forward the mast Cup holder 7 It is in the right side of the instrument It s designed for the operator to put the cup 1 Warning light Press backward the warning light is on pre...

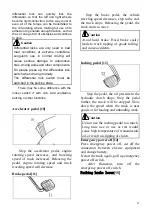
Page 21: ...rotating speed increases and traveling speed of truck increased Releasing the pedal engine rotating speed and truck traveling speed will decrease Brake pedal 11 Step the brake pedal the vehicle travel...

Page 22: ...can you adjust the tilting angle of steering column b After adjustment pull the steering wheel to make sure it being locked Reversing lever 17 It s installed on the left of the steering column These s...

Page 23: ...y when the truck stops In case of accident no seat adjustment is allowed in the process of travelling Make sure the lever is moved completely to separate the seat structure before the forward and rear...

Page 24: ...se first then the hood can be open Hood The hood can be swung up fully to provide easy maintenance service You can lift up the hood with little effort with an aid of hood damper 1 2 WARNING To lock th...

Page 25: ...ediately Keep antifreeze away from children Fork stopper Use it to adjust fork spacing Pull up fork stopper turn 180 adjust fork spacing depending on the load to handle 1 2 3 Warning The forks should...

Page 26: ...d assembly of the head lamp 1 Dismantle the decorative frame 2 Screw the four bolts at the back of the lamp shell and open the lamp shell 3 Cut the lead wire loosen the lock button remove the lamp cha...

Page 27: ...a fire extinguisher available when working on the truck Never fill the fuel tank while the engine is running 5 Warm water temperature to 70 C before operation If the temperature of the water is above...

Page 28: ...ork surface should be solid and level such as a cement road asphalt or concrete road surface For truck operation the following climatic conditions apply average ambient temperature for continuous duty...

Page 29: ...to 30 cm above the ground or floor DO NOT operate the side shift mechanism if equipped when the forks are raised and loaded since this will cause the truck to become unbalanced A truck with attachment...

Page 30: ...if machine is so equipped Never permit anyone to stand on the forks 33 DO NOT put head or body into the interspace of mast and overhead guard which may cause loss of life DO NOT place hands into the...

Page 31: ...rds then lower the load Tilt the mast back after lowering Never attempt to tilt the mast with the load raised high 42 DO NOT tow a truck that has engine problems or whose steering system doesn t work...

Page 32: ...when the engine is cool Remove the dipstick clean the rod and reinstall Pull it out again and check the oil level The level should be within the marks on the dipstick 5 Check engine coolant Inspect t...

Page 33: ...t position of the gantry the liquid level of the hydraulic oil is as follows 30 means liquid level for mast with 3M lifting height or below including duplex full free mast 40 means liquid level for ma...

Page 34: ...belt is normal 15 Shift lever check Inspect the shift lever to see if loose and shift change is smooth 16 Lifting lever tilting lever and attachment lever check Check the loading levers for lift tilt...

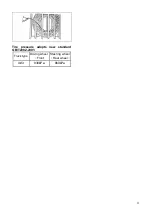
Page 35: ...35 Tire pressure adopts new standard GB T2982 2001 Truck type Driving wheel Front wheel Steering wheel Rear wheel 4t 5t 830kPa 860kPa...

Page 36: ...outer filter element with dry compressed air Safety filter element inner filter hand beat clean avoid blowing with air Special attention Warning 1 Dust will blow into your eyes so please wear protect...

Page 37: ...make it vertical Press middle of the chain by thumb Make certain the tension for the right and left chains are even Adjust the tension Loosen the lock nut 1 screw the nut 2 and adjust the chain to mak...

Page 38: ...g knuckle main bearing lubricate Steering rod bar pin lubricate Steering cylinder pin lubricate 9 Bolt nut tighten Refer to the Maintain periodic chart 10 Hub nut torque check Check if tightening torq...

Page 39: ...ance Brake pedal 145 5 1 3 Inching pedal 145 5 Inching pedal connected bolt brake pedal 0mm 12 Hand brake Make sure that the hand brake lever after pulled up still has good function when return the re...

Page 40: ...ace truck on level ground 2 Apply lubricate to front and rear of pin roll of tilt cylinder Clean the area and remove used oil 3 Check the gear oil of drive axle housing Change the oil after 200 hours...

Page 41: ...nd fuel has been added to the fuel tank After fuel system maintenance such as changing the fuel filter and draining the fuel filter water separator or replacing a fuel system component 7 Oil water sep...

Page 42: ...combustion chamber Warning Don t start the lift truck in bad ventilation space There is carbon monoxide in the exhaust gas it is very dangerous 9 Check battery and electrolyte Refer to Operational me...

Page 43: ...ainer cubage is over 60 L under the hydraulic oil box Dismantle the hydraulic oil tank drain plug and discharge the oil to the container Dismantle hydraulic oil scale and fuel box cover components Tak...

Page 44: ...fuel on the filter airproof Notice Before installation it is prohibited to add fuel to filter otherwise it will accelerate the abrasion of fuel system parts Install new filter component urn the new fi...

Page 45: ...d to prevent rust and frost bite See Table for the oil used in the truck 2 Front wheel bearing change lubricating grease Refer to steering axle content in Maintenance Manual remove hub bearing and the...

Page 46: ...fully backward and place a wooden block under each side of outer mast Tilt mast forward until front wheels are raised from surface Caution Do not loose nuts before the front wheels leave the ground S...

Page 47: ...dditional wooden blocks under both sides of the front truck frame as shown below Take out the wheel nut of rear wheel and then replace the wheel Warning a When removing tire from wheel rim do not remo...

Page 48: ...s If the radiator fins are clogged it will lead to overheating Use compressed air vapor or water to clear Caution Clean the radiator fins by using compressed air or vapor place the muzzle to radiator...

Page 49: ...ruck because the speed of overturn is much fast than you You should hold the steering wheel handle and this practice will let you in the seats Please tie safety belt Caution Gravity and stability Fork...

Page 50: ...d capability chart This chart shows the relationship of MAX LOAD and the location of LOAD CENTER DISTANCE Check whether the load and load center distance is in the range referred by the chart Put the...

Page 51: ...eady for the controls lightly putting it on the wheel Set the bottom of the fork 15 to 20 cm above the ground and fully tilt back the upright Check the safety around the machine and give a signal when...

Page 52: ...hen climbing grades 4 Stacking load Slow down when approaching the load deposit area Stop the truck right in front of the area where your load is to be deposited Check the condition of the deposit are...

Page 53: ...t as far as possible and then stop the truck Caution If the forks cannot be fully inserted use the following procedure move forward and insert the forks 3 4 of the way Raise the forks 5 to 10 cm and m...

Page 54: ...cessary to drain the antifreeze but the water should be completely drained from the radiator 2 Park the truck for a long time When parking the truck for a long period place blocks under the truck body...

Page 55: ...l reservoir and fuel reservoir removing any dirt or water and add with new hydraulic oil fuel Check the clearance of the valve gas valve cap and other parts on the engine Add antifreeze to required le...

Page 56: ...e inspection and maintenance and resolve problem in time Don t use different oil when changing or adding oil If problems like loss of engine power sudden increase in truck noise or black smoke occur c...

Page 57: ...Item Service required Tool Daily 8 hrs One and a half Monthly 250hrs 3months 500hrs Semi annu al 1000hrs Annual 2000hrs Engine Visual check engine run condition including noise exhaust color Clean or...

Page 58: ...Fuel system Visual check if oil leakage at pipeline pump or oil tank Replace fuel filter First time Check nozzle and adjust the pressure diesel engine 2 Injectio n test Injection moment Diesel engine...

Page 59: ...ance Inching valve performance Shift lever operation and loosen condition Hydraulic oil filter Drive axle Front axle Check hub bearing looseness and noise Wipe and re add lubrication oil Leakage check...

Page 60: ...0hrs Annual 2000hrs Steering wheel Check clearance Check axial looseness Check radial looseness Check operation condition St ee rin g ge ar Check if erection bolt loosen Rear axle knuckle Check if mas...

Page 61: ...rol performance If connection loosen Pipeline Damage leakage fracture Connection clamp part looseness condition Brake master cylinder brake cylinder Leakage condition Check oil level change oil Master...

Page 62: ...uction strainer 1 Eliminate foreign body Contro l valve rod If connection loosens Operation condition Filter Check oil leakage Multi way valve Oil leak Relief valve and tilt latching valve operation c...

Page 63: ...onths 500hrs Semi ann ual 1000hrs Annual 2000hrs Chain chain wheel Check chain tensity if transform damage or rust Add oil to the chain Riveting pin and looseness Chain deformation and damage If chain...

Page 64: ...me If lifting cylinder bottom bolt piston head bolt U type bolt and walking beam guide bolt loosen Test hammer first time Roller roller shaft and its welded part crack or damage condition Safety devic...

Page 65: ...93 124 124 165 16 90 110 110 140 145 193 193 257 18 120 150 150 190 199 264 264 354 20 170 210 210 270 282 376 376 502 22 230 290 290 350 384 512 512 683 24 300 377 370 450 488 650 651 868 27 450 530...

Page 66: ...arts Replace them when their service life has expired sooner if they damaged Name of key safe part service life years Brake hose or hard tube 1 2 Hydraulic rubber hose for lifting system 1 2 Lifting c...

Page 67: ...il L HM32 arctic alpine L HV32 110 120 Hydraulic oil tank Hydrodynamic Power Transmission Oil 6 hydrodynamic power transmission oil 25 gearbox Mobil 424 15 Drive axle Brake Liquid Add to brake oiler S...

Page 68: ...load the used oil including cooling fluid engine oil hydraulic oil transmission oil hydrodynamic power transmission oil brake liquid lubrication grease and disused battery 3 Replaced the aforemention...

Page 69: ...curve label 7 Hydraulic oil label 8 Hand injury risk label 9 Antifreeze label 10 Text label 11 Tie down label 12 Diesel label 13 Text label 14 Tonnage label 15 Warning label 16 Hood opening label 17 H...

Page 70: ...Brace Feet Hold on Tight Lean Away From Impact Truck can TIP OVER Risk of serious INHURY or DEATH 6 Load curve label It shows the connection among load center position and max load max lifting height...

Page 71: ...ks and attachments as low as possible fully tilted backp Never Forward Keep a careful lookout for people obstructions and the path of travel Watch clearance especially overhead and tail swing Yield ri...

Page 72: ...ccidents by handling mast lever wrongly 23 Danger label The inner and outer mast fork frame are all lifting slip parts The hands are not allowed to reach in between the inner and outer masts If a part...

Page 73: ...long distance transportation The Fork Lift Truck must be transported by ship train or lorry of over 5T loading Tighten the brake lever place wood blocks to the front and rear wheels and bind the truc...

Page 74: ...km h 27 27 Ground clearance mm 370 370 Min outside turning radius mm 3500 4150 Max Grade ability Full load 58 58 Wheel base mm 2150 2150 Service mass kg 8900 8900 Overall dimension L W H include forks...

Page 75: ...amp If the vehicle has deposited for over 30 days in order to keep the normal charging technical status of the battery you should do the following 2 3 Storage battery check and maintenance Check of ma...

Page 76: ...uld check whether there is fracture leakage or fault to battery Battery displayed status refer to battery label notice Maintenance for maintenance less battery 1 Make sure the electrolyte level is hig...

Page 77: ...e electric equipment positive and negative pole of the battery connect correctly Do not cover electric stuff over the battery in case of the battery short circuit Avoid electrolyte spit to eye skin or...

Page 78: ...and the mast is inclined back 5 The weight of cargo shouldn t exceed the combined limit of the carrying capacity of forklift and attachment It is not allowed to have a partial load at high position It...

Page 79: ...3 Check assembly of attachment to ensure no movement on carriage 4 After hang attachment embed the rise catch block to the gap of top beam Ensure the center line of the attachment offset from the cent...

Page 80: ...brake pedal before starting in case of slipping 2 Forward or Reverse Protection After the engine has started shift the gear switch to first gear of forward or reverse the vehicle is able to start If t...

Page 81: ...ent lever back to the original position Abnormity of OPS Controller If it happens to encounter the following situations please park the forklift truck in a safe place and contact the local agency of L...

Page 82: ...16307 1 2013 A1 2015 EN13059 2002 A1 2008 EN 12053 2001 A1 2008 coordinate standard Main safety factor will according with DIRECTIVE 2006 42 EC OF THE EUROPEAN PAMENT AND OF THE COUNCIL and EN ISO 36...

Page 83: ...86 XVI Maintenance record Date Item of maintenance Signature Remark...

Page 84: ...13 22 54 www adaptalift com au...

Reviews: