background image

USER MANUAL


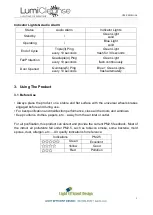
Indicator Lights & Audio Alarm: 

Status 

Audio Alarm 

Indicator Lights 

Standby 

Green Light 

solid 

Operating 

Blue Light 

solid 

End of Cycle 

Triple(3) Ping 

every 10 seconds 

Green Light   

flash for 30 seconds 

Fall Protection 

Quadruple(4) Ping 

every 10 seconds 

Green Light   

flash continuously 

Door Opened 

Quintuple(5) Ping 

every 10 seconds 

Blue + Green Lights 

flash alternately 

3. Using The Product

3.1 Before Use 

• Always place the product on a stable and flat surface with the universal wheels brakes

engaged before and during use.

• For best purification and disinfection performance, close all the doors and windows.
• Keep curtains, clothes, papers, etc… away from the air inlet or outlet.

For air purification, this product can detect and provide the current PM2.5 feedback. Most of 
the  indoor  air  pollutants  fall  under  PM2.5,  such  as  tobacco  smoke,  some  bacteria,  mold 
spores, dust, allergen, etc

…. Air quality indications for reference: 

Indications 

PM2.5 

Green 

Excellent 

Yellow 

Good 

Red 

Pollution 

Summary of Contents for LumiCleanse LC-UVC-AIR-350

Page 1: ...USER MANUAL LC UVC AIR 350 USER MANUAL KEEP THIS MANUAL FOR FUTURENEEDS ...

Page 2: ...ty please read this user manual carefully before operating the product Contents 1 Product Overview 3 2 Control Panel Overview 3 3 Using The Product 5 4 Moving The Unit 9 5 Fall Protection 10 6 Open Door Protection 10 7 Dimensional Drawings 11 8 Replacing and Cleaning The Filters 11 9 Replacing The UV Lamps 14 10 Troubleshooting Tips 16 11 Features 17 12 Cleaning and Maintenance 17 13 Recycling 18 ...

Page 3: ...ith major temperature changes as this may cause condensation inside the product If you need to move the product disconnect the product from the power supply first Do not move the product by pulling its power cable Always engaged the wheels brakes during use or storage to avoid accidentally moving by itself Do not block the air inlet and outlet by placing any items on the air inlet and outlet Do no...

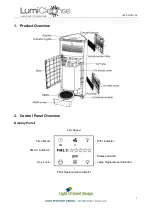
Page 4: ...SER MANUAL 3 1 Product Overview 2 Control Panel Overview Display Panel Fan Speed Time Mode WIFI indicator PM2 5 Indicator Status and Alert Key Lock Lamp Replacement Indicator Filter Replacement Indicator ...

Page 5: ...r 5 seconds Key locked after 27 seconds no operation Filter Replacement Indicator white normal red need to replace Select it and pressing for 5 seconds to reset Lamp Replacement Indicator white normal red need to replace Select it and pressing for 5 seconds to reset Alert door opened during use or fall protection Status ON working OFF standby XX XX time counting down PM2 5 5 stars green excellent ...

Page 6: ...roduct 3 1 Before Use Always place the product on a stable and flat surface with the universal wheels brakes engaged before and during use For best purification and disinfection performance close all the doors and windows Keep curtains clothes papers etc away from the air inlet or outlet For air purification this product can detect and provide the current PM2 5 feedback Most of the indoor air poll...

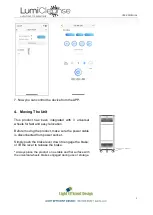
Page 7: ...e indicator lights turn on green 3 Touch button to select your desired function in the main menu 4 Touch button or to select your desired setting time mode and fan speed 5 Touch button to enter the setting and start the operation 6 Touch button to stop the operation If need to change the time mode after operation started need to stop operation first Remote Control Operation 1 Connect the power plu...

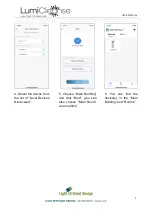
Page 8: ...ly for one user to bind device not for multi user Download GOLDENSEA UV APP from App store or Android market and install into your mobile phone Steps to Connect your device to the LAN network and Bind 1 Launch the APP click to select and add new device 2 Click the device in the list which you want to connect 3 Input the WIFI name and password click Next to connect ...

Page 9: ...NUAL 8 4 Select the device from the list of Local Devices Discovered 5 Choose Main Building and click Bind you can also choose Main Room as an option 6 You can find the device s in the Main Building and Rooms ...

Page 10: ...wheels for fast and easy relocation Before moving the product make sure the power cable is disconnected from power socket Simply push the brake lever down to engage the brake or lift the lever to release the brake Always place the product on a stable and flat surface with the universal wheels brakes engaged during use or storage ...

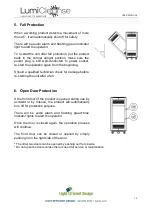
Page 11: ...hould a qualified technician check for damage before re starting the unit after a fall 6 Open Door Protection If the front door of the product is opened during use by accident or by misuse the product will automatically turn off for protection purpose There will be audio alarm and flashing green blue indicator lights to alert the operator Once the door is closed again the operation process will co...

Page 12: ...cing the HEPA and Active Carbon Filters Filter Replacement Indicator This product is equipped with a filter replacement indicator to make sure that the air purification filter is in optimal condition when operating When the filters need to be replaced the icon of Filter Replacement Indicator turn from white to red and stay flashing If the filters are not replaced in time the product will stop oper...

Page 13: ...move the air inlet cover by simply pulling it out 3 Loosen the 2 screws and remove the HEPA cover If the screws are too tight to turn by hand use a screwdriver to loosen them first 4 Remove the current HEPA by simply pulling it out holding the strip Now install a new HEPA re install the HEPA cover and tighten the 2 screws re install the air inlet cover ...

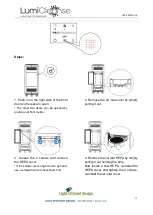
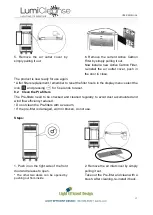
Page 14: ...lect the icon and pressing for 5 seconds to reset 8 2 Clean the Pre filters The Pre filters need to be checked and cleaned regularly to avoid dust accumulated and wind flow efficiency reduced Do not clean the Pre filters with a vacuum If the pre filter is damaged worn or broken do not use Steps 1 Push in on the right side of the front door and release to open The other two doors can be opened by p...

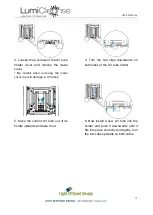
Page 15: ...utomatically lock to protect the disinfection effect in the room Replace the lamps as soon as possible Before carrying out any replacement wait about 15 minutes after switching off the product to let the UV tubes cool down to avoid scalding Steps 1 Push in on the right side of the front door and release to open The other two doors can be opened by pushing out from inside 2 Loosen the 2 screws and ...

Page 16: ...al cover to avoid damage to UV tubes 4 Turn the two clips downwards on both sides of the UV tube holder 5 Move the current UV tube out of its holder upwards and take it out 6 Now install a new UV tube into the holder and push it downwards until it fits into place correctly and tightly turn the two clips upwards on both sides ...

Page 17: ...gged into a working socket plug is wired correctly and terminal well connected 2 Ensure the power switch is switched to on I 3 Check if the door is opened by accident or misuse Push the door in to close it 10 2 How often should the UV tube be replaced 1 The UV tube is the core of the product it should be replaced after 9000 hours of use to maintain the germicidal efficacy If it needs to be replace...

Page 18: ...y long Life up to 9 000 H Features Disinfection time settings Fan speed settings Control panel with touch keys Remote control Control with APP Visual indicator lights Audio alarm Power switch Movable with wheels Fall protection Product Type Commercial Air Purifier Weight Net weight 26 73 kg 12 Cleaning and Maintenance 1 To ensure the device remains in good condition and does not fail prematurely r...

Page 19: ...l rules for the separate collection of electrical and electronic products 14 Service For all service needs please contact your local authorized dealer or Light Efficient Design customer service Our contact details are Light Efficient Design 188 S Northwest Highway Cary IL 60013 TEL 847 380 3540 FAX 978 913 3317 E mail sales led llc com For more energy efficient products visit us online www led llc...

Reviews: