Unpacking, Inspecting and Installing
248083389-1 Rev
3-11
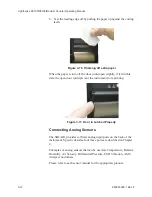
2. Unroll the paper and place the roll in the printer with the paper
feeding from the top.
Figure 3-13 Putting the paper into the printer
3. Make sure that the paper is lined up straight with the cutting edge.
Figure 3-14 Aligning the paper
Note:
The printer door
must be securely closed in
order to print. If attempting
to print and nothing
happens, press the
corners of the door firmly
against the chassis.
4. Close the printer door so that about 1/2 inch or 2 centimeters of
paper protrudes from the opening.
5. Press the paper feed button to ensure that the paper is loaded
correctly.
Figure 3-15 Advancing the Paper
Summary of Contents for solair 3100
Page 1: ......
Page 2: ...00...
Page 3: ...Lighthouse Worldwide Solutions S3100 S5100 Boulder Counter Gen E Operating Manual...
Page 6: ......
Page 12: ...Lighthouse S3100 S5100 Boulder Counter Operating Manual t vi 248083389 1 Rev...
Page 14: ...Lighthouse S3100 S5100 Boulder Counter Operating Manual ii 248083389 1 Rev...
Page 19: ...Introduction 248083389 1 Rev 2 3 Figure 2 1 SOLAIR Dimensions Side Dimensions Top Dimensions...
Page 22: ...Lighthouse S3100 S5100 Boulder Counter Operating Manual 2 6 248083389 1 Rev...
Page 36: ...Lighthouse S3100 S5100 Boulder Counter Operating Manual 3 14 248083389 1 Rev...
Page 60: ...Lighthouse S3100 S5100 Boulder Counter Operating Manual 4 24 248083389 1 Rev...
Page 66: ...Lighthouse S3100 S5100 Boulder Counter Operating Manual 5 6 248083389 1 Rev...
Page 115: ...Operating Counter 248083389 1 Rev 6 49 Figure 6 64 SOLAIR 3100 STATUS Screen...
Page 180: ...Lighthouse S3100 S5100 Boulder Counter Operating Manual D 2 248083389 1 Rev...
Page 187: ...00...
Page 188: ......


