SPEAKER OUTPUT
DC POWER
CHARGE
MIXED AUDIO
OUT
OUT
ADJ
ADJ
AUX
AUX
IN 1
IN 2
OFF ON
OFF ON
OFF ON
OFF ON
1
2
3
4
EQUALIZER
SENSOR
SHORT
SENSOR INPUTS
250
400
600
1K
1K6
2K5
6K3
4K
+10
0
-10
9
10
SPEAKER OUTPUT
DC POWER
CHARGE
MIXED AUDIO
OUT
OUT
ADJ
ADJ
AUX
AUX
IN 1
IN 2
OFF ON
OFF ON
OFF ON
OFF ON
1
2
3
4
EQUALIZER
SENSOR
SHORT
SENSOR INPUTS
250
400
600
1K
1K6
2K5
6K3
4K
+10
0
-10
8
SPEAKER OUTPUT
DC POWER
CHARGE
MIXED AUDIO
OUT
OUT
ADJ
ADJ
AUX
AUX
IN 1
IN 2
OFF ON
OFF ON
OFF ON
OFF ON
1
2
3
4
EQUALIZER
SENSOR
SHORT
SENSOR INPUTS
250
400
600
1K
1K6
2K5
6K3
4K
+10
0
-10
3
4
5
6
7
SPEAKER OUTPUT
DC POWER
CHARGE
MIXED AUDIO
OUT
OUT
ADJ
ADJ
AUX
AUX
IN 1
IN 2
OFF ON
OFF ON
OFF ON
OFF ON
1
2
3
4
EQUALIZER
SENSOR
SHORT
SENSOR INPUTS
250
400
600
1K
1K6
2K5
6K3
4K
+10
0
-10
1
2
[18]
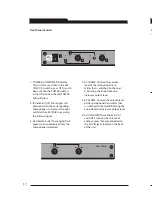
1. SPEAKER OUTPUTS (1-4): These
binding post connectors are used to
connect the 750iR to the loudspeakers.
2. SPEAKER ON/OFF: These individual
speaker switches can be used
to turn off the audio in a specific area
of the classroom where there may be
a learning group or quiet time.
3. DC POWER: Plug the AC/DC power
supply into this jack.
4. CHARGE: These jacks charge the
LightMic(s) and optional handheld
microphone with the supplied
charging cable(s).
5. MIXED AUDIO OUT: These output
jacks send the processed audio signal
the external equipment such as a
recorder or an assistive listening
device like LightSPEED’s LES-370
Personal FM System.
6. ADJ: These controls adjust the
output level of the audio being
sent out of the unit via the MIXED
AUDIO OUT jacks.
7. AUXILIARY INPUTS (AUX IN 1 & 2):
These RCA jacks receive audio
from external sources such as a
TV, VCR, CD, DVD, cassette,
computer, LCD projector, etc.
8. 8-Band EQUALIZER: The sliding controls
adjust the levels of the various audio
frequencies. This allows the installer to
properly equalize the system to produce
optimum sound quality in every room
with any speaker.
9. SENSOR INPUTS: The cable from the
IR sensor connects to either of these two
inputs. Up to two IR sensors can be
connected to the LES 750iR to cover
larger or odd shaped classrooms.
0. SENSOR SHORT: If there is a short in
one of the sensor cables, this LED glows
as a warning signal.
1
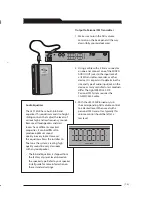
6. LightMic Microphone/Transmitter
For testing purposes, basic instructions
for wearing and operating the LightMic
are provided below. For more detailed
instructions, refer to page 11.
• Clip the LightMic to the
lavaliere cord.
• Place the LightMic and lavaliere cord
around your neck and adjust cord
length so the top of the LightMic
sits just below your collar bone.
• Slide the ON/OFF switch on the
LightMic to ON. The red power
indicator will light.
• Slide the channel select switch to “A.”
7. Testing
Test the system to ensure everything is
correctly connected and working
properly before your first full day of use.
A second person is helpful to listen and
ensure your voice is clear but not loud.
• With the LightMic positioned
properly around the neck, speak
normally and turn the A VOLUME
clockwise until an optimum voice
level is achieved. You may not be
able to hear your own voice when
this is properly set. However, your
students will.
[ note: ]
The system can generate feedback (a squeal-
ing or howling sound) if there is too much
volume or the equalization (EQ) levels are
incorrectly set. Adjust the EQ level sliders
if necessary to eliminate feedback and to
obtain a natural sound.
• With volume and EQ levels set, walk
around the room, paying special
attention to the areas farthest from
the IR sensor. Your voice should
remain clear and intelligible.
Rear Panel Controls
[5]


