10
65
ROTAPULS
Incremental encoders
Series
CH59
More info at www.lika.biz
Warning
: encoders having order code ending with "/Sxxx" may have mechanical and electrical characteristics different from standard and be supplied with additional documentation for special connections (Technical Info).
Attenzione
: gli encoder con codice di ordinazione finale “/Sxxx” possono avere caratteristiche meccaniche ed elettriche diverse dallo standard ed essere provvisti di documentazione aggiuntiva per cablaggi speciali (Technical info).
Achtung
: Geräte, deren Bestellschlüssel mit der Kennung /Sxxx enden, können in ihren mech. und elektr. Eigenschaften vom Standard abweichen. Diese werden daher mit einer ergänzenden Dokumentation ausgeliefert (Technical info).
Atención
: los encoders con código de pedido acabado en "/Sxxx" pueden tener características mecánicas y eléctricas diferentes a las básicas y documentación adicional relativa a conexiones especiales (Technical Info).
Attention
: les codeurs avec code de commande terminant en “/Sxxx” peuvent avoir des caractéristiques mécaniques et électriques différentes du standard et documentation additionnelle pour les câblages spéciaux (Technical info).
EN
Mounting instructions
IT
Istruzioni di montaggio
DE
Montagehinweise
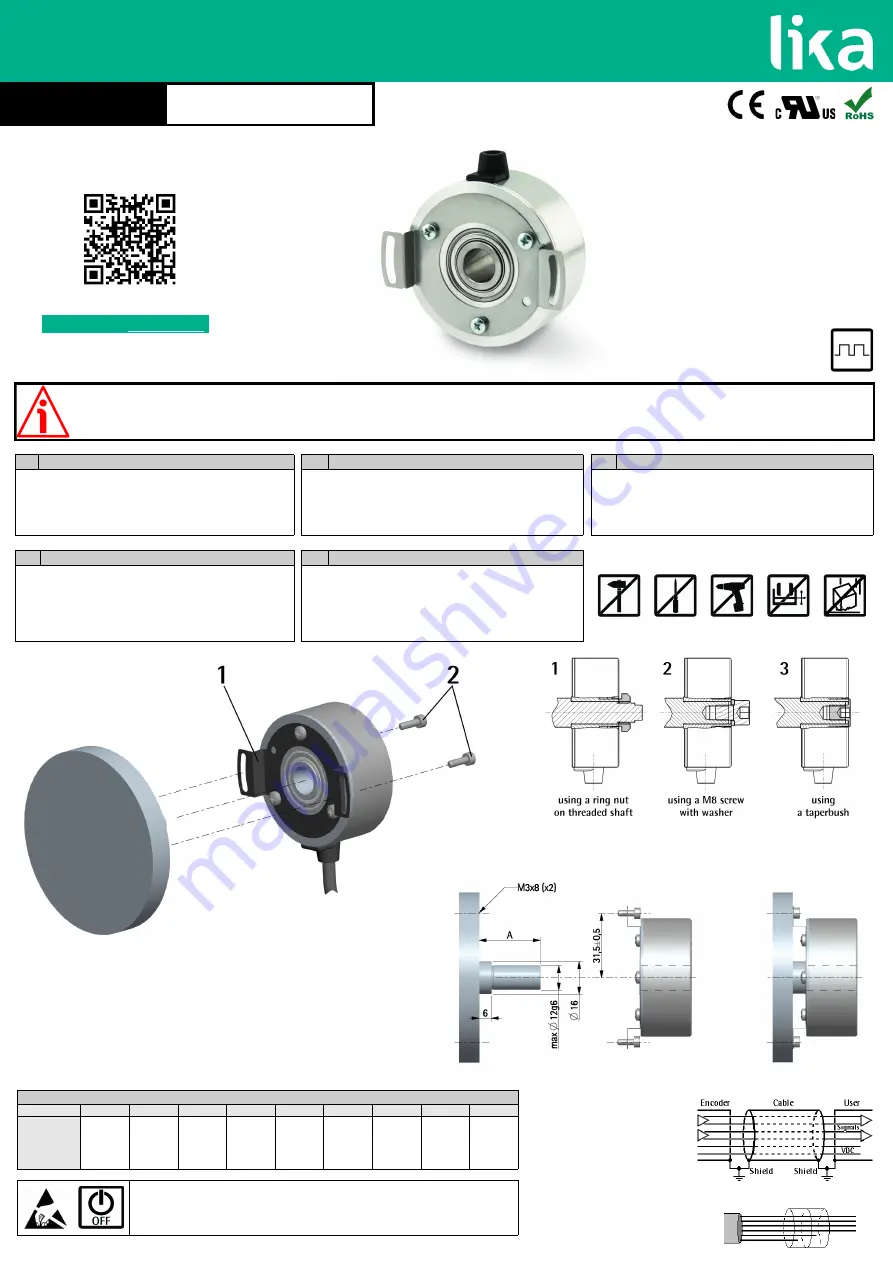
Mount the encoder on the motor shaft; never force the encoder shaft;
fasten the fixing plate
1
to the rear of the motor using two M3 x 8 cylindrical
head screws
2
;
to fix the encoder shaft to the motor shaft you can use either a ring nut on
the threaded shaft (1) or a M8 screw with washer (2) or a taperbush (3).
Inserire l'encoder sull'albero del motore; evitare sforzi sull'albero encoder;
fissare la molla di fissaggio
1
sul retro del motore utilizzando due viti M3 x 8 a
testa cilindrica
2
;
per fissare l'albero encoder all'albero motore è possibile utilizzare una ghiera su
albero filettato (1) o una vite M8 con rondella (2) oppure una bussola di
serraggio (3).
Geber auf die Motorwelle montieren; Belastungen der Geberwelle vermeiden;
Befestigungsfeder
1
auf der Rückseite des Motors mit Verwendung zwei M3 x 8
Zylinderschrauben
2
befestigen;
Hohlwelle auf der passenden Motorwelle mit einem Ring (1), einer M8
Schraube mit Unterlegscheibe (2) oder einer Spannbuchse (3) befestigen.
ES
Instrucciones de montaje
FR
Instructions de montage
Montar el encoder en el eje del motor sin forzar el eje del encoder;
fijar la placa de fijación
1
en la parte posterior del motor mediante los dos
tornillos
2
de cabeza cilíndrica tipo M3 x 8;
para fijar el eje encoder al eje motor es posible utilizar una virola en el eje
roscado (1) o un tornillo tipo M8 con arandela (2) o un casquillo (3).
Monter le codeur sur l'arbre moteur; ne pas forcer l'arbre codeur pendant
l'installation;
fixer la plaquette de fixation
1
à la partie postérieure du moteur en utilisant
deux vis type M3 x 8 à tête cylindrique
2
;
pour fixer l'arbre codeur à l'arbre moteur on peut utiliser un écrous de serrage
dans l'arbre fileté (1) ou une vis type M8 avec rondelle (2) ou bien un moyeu
(3).
Electrical connections
Cable specifications
Model: LIKA encoder cable type I8
Wires: 8 x 0.22 mm
2
(24/7 AWG)
Jacket: PVC, flame retardant
Shield: ALU/PET foil + copper conductor
External diameter: Ø 5.1 ±0.1 mm
Conductor resistance: < 90
/km
Minimum bend radius: Ø x 10
Signals
A
/A
B
/B
0
/0
+5Vdc ±5%
0Vdc
Shield
AB0, /AB0
outputs
(8-wire I8 type
cable)
Yellow
Giallo
Gelb
Amarillo
Jaune
Blue
Blu
Blau
Azul
Bleu
Green
Verde
Grün
Verde
Vert
Orange
Arancione
Orange
Anaranjado
Orange
White
Bianco
Weiß
Blanco
Blanc
Grey
Grigio
Grau
Gris
Gris
Red
Rosso
Rot
Rojo
Rouge
Black
Nero
Schwarz
Negro
Noir
Shield
Schermo
Schirm
Malla
Blindage
Installation has to be carried out with power supply disconnected.
L’installazione deve essere eseguita in assenza di tensione.
Der Anschluss darf nur bei ausgeschalteter Versorgungsspannung erfolgen.
La instalación sólo debe ser efectuada en ausencia total de tensión.
Le montage du dispositif doit être effectué en
absence totale de tension.
Wires not used must be cut at different
lengths and insulated singularly


