background image

28

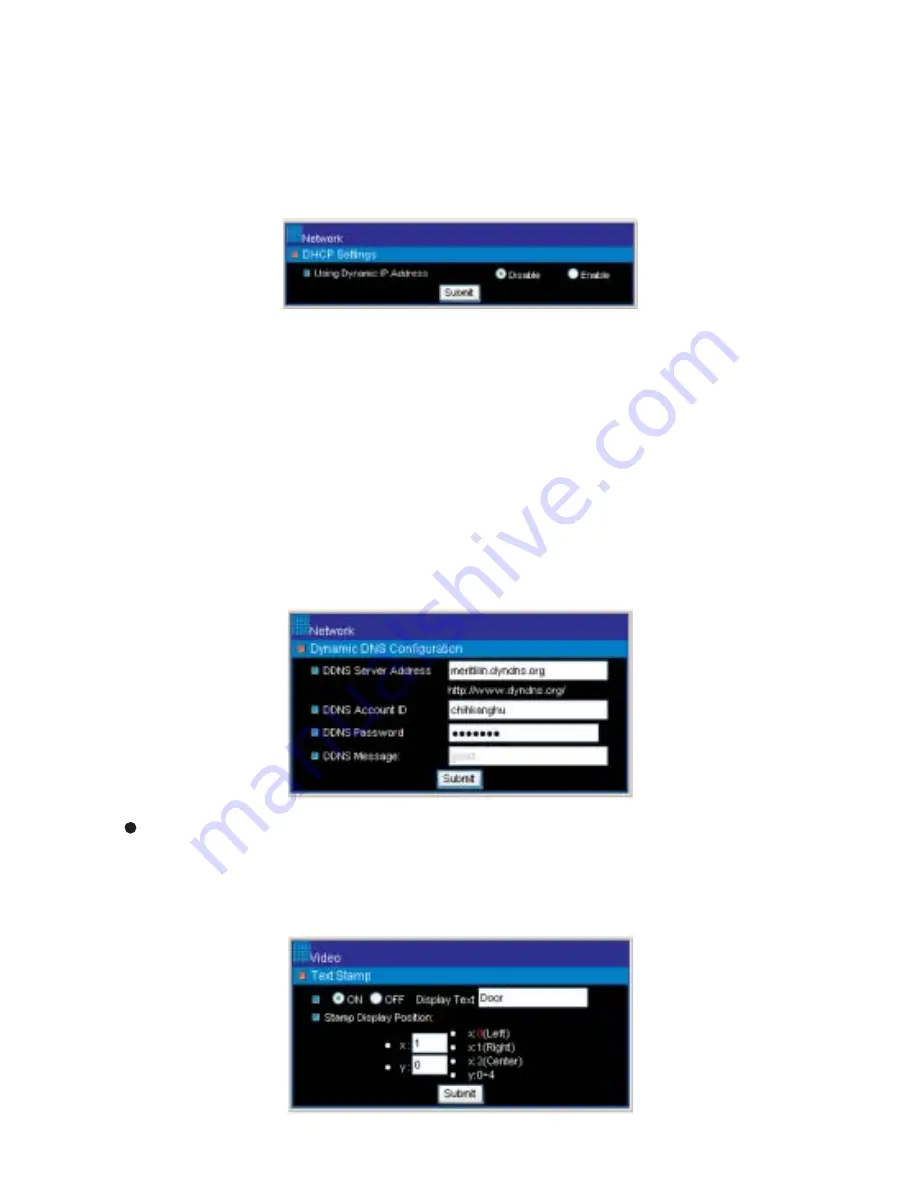
Router, gateway, or other software DHCP server can dynamically distribute an IP address to

PDR-400IP. A user can use IPScan utility to launch Internet browser for PDR-400IP's video.

To enable DHCP, click on Enable radio button and click on Submit button.

Note : Once the DHCP gets enable, PDR-400IP uses IP address from DHCP server instead of

the IP address assigned by IP Settings.

DHCP Setting

DNS stands for domain name server, which provides domain name translation service for a

device's IP. Basically, domain name is easier to remember than numeric values (IP).

DNS service requires service registration and subscription. Dynamic DNS (DDNS) provides

domain name service without subscription.

Please logon www.dyndns.org and register for the service. To use DDNS, please enter DDNS

server account ID, and password to logon to the server. Click on Submit button to perform the

task. The DDNS message box shows the connection status or error message.

Specific information can be displayed on video ActiveX. To show the text information on the

ActiveX, please enter text on Display Text edit box. The position is adjustable by given x and y.

Click Submit button to update above settings.

DDNS Settings

Video Settings

Text Stamp

Summary of Contents for PDR-400

Page 1: ...4 CH STANDALONE DVR INSTRUCTION MANUAL CSE PDR 400 400IP ...

Page 2: ... and severe injury May cause short circuit fire and serious damage to this unit Unplug this unit and have it checked by qualified service personnel May cause overheat The normal operating temperature is 0 C 40 C Contact qualified service personnel for help May cause short circuit or electric shock May cause fire or shock hazard These interference will cause color confusion and screen fluctuation T...

Page 3: ...ettings Password Change Time Set Camera Settings Keylock Sequential Display Auto Gain Control h Hard Drive Setup Overwrite Recording continuous recording Hard Drive Format clear hard drive i Alarm Setup Alarm Recording Time Alarm Record Frame Rate Alarm Output Time Alarm Buzzer Output Time Alarm Input NO NC Selection Motion Detection Sensitivity j Auto Record k Network Setup Optional 3 3 3 4 5 5 5...

Page 4: ...Access a Networking Setting b Internet Browser Setting Software Component Required c IP Address Configuration d Login e Menu Systems Network Features a Operational HTML Page b Configuration Server Setting Network Video Setting c Backup Still Image Appendix a IPScan Software b Ping Utility c Network Module Specification Hard Drive Storage Capacity and Frame Rate Status 13 13 14 14 15 16 16 16 17 18...

Page 5: ...earch Play Back Operation Data Display Alarm Input Alarm Output System Function Operation Temperature Operation Humidity Dimensions mm Weight Digital Video Recorder PAL Total 100 fps 720 x 576 PDR 400 NTSC Total 120 fps 720 x 480 Maximum 25 fps 320 x 136 640 x 272 Maximum 30 fps 320 x 112 640 x 224 4 BNC 1 0Vp p Composite 75 2 BNC 1 0Vp p Composite 75 100 240Vac 50 60Hz 1 4 Continuous Manual Alarm...

Page 6: ...up MENU Enter or Escape Key Setting Item Select Key Setting Item Select Key or Resume Sequential Display Setting Confirm Key Record Key Recording Key Indication Light POWER Power Indication LED HDD Hard Disk Indication LED Flash when recording Socket SD Card Optional 7 8 9 10 11 12 13 14 15 16 Video Output BNC Connectors Video Input BNC Connectors Alarm Input Connector NO NC Alarm Output Connector...

Page 7: ...ation Make sure the power is off before HDD installation 1 Remove the top cover 2 Make sure the jumper on HDD is correctly set as Master or Slave For HDD jumper setting please refer to HDD user manual 3 Fix the HDD on the designated areas with supplied screws Figure 2 shows the Master and Slave HDD installation areas 4 Connect 40 pin HDD cable first then connect power cable showed as Figure 2 5 Wh...

Page 8: ...keys to select the next setting item 3 RECORD MODE After entered setup menu press keys to move the arrow sign to RECORD MODE and press SELECT key to confirm EACH Full Screen Recording QUAD Quad Recording Factory Default Value EACH Press MENU ESC key to exit when finished or keys to select the next setting item Note Full screen can not be recalled in playback if data is recorded in quad recording 4...

Page 9: ...ecording motion alarm recording no recording Press MENU ESC key to exit when finished or keys to select next setting item REC key on the front panel must be pressed to activate recording as programmed When record is activated record mode status will be displayed on screen System will not record if REC key is not pressed Note 1 If alarm activation recording is selected system will only execute alar...

Page 10: ... finished or keys to select the next setting item Note For number keys please refer to Page 4 ILLUSTRATION TIME SET After entered Advance Menu press keys to move the arrow sign to TIME SET and press SELECT key to confirm Use keys to move sign to the number that needs to be changed and press SELECT key to adjust the numbers Time format YY MM DD H M S Press MENU ESC key to exit when finished or keys...

Page 11: ...d or keys to select the next setting item s t s t s t t s t 9 AUTO GAIN CONTROL After entered Advance Menu press keys to move the arrow sign to AUTO GAIN CONTROL and press SELECT key to confirm OFF Disable AGC Function ON Enable AGC Function Factory Default Value OFF Press MENU ESC key to exit when finished or keys to select the next setting item s t s t 8 HARD DRIVE SETUP After entered setup menu...

Page 12: ...m s t s t s t s t 10 9 ALARM SETUP After entered setup menu press keys to move the arrow sign to ALARM SETUP and press SELECT key to confirm Monitor displays ALARM RECORDING TIME After entered Alarm Setup menu press keys to move arrow sign to ALARM RECORD TIME and press SELECT key to select There are 6 selections for alarm record time 5 10 15 20 25 30 seconds Factory Default Value 10 Press MENU ES...

Page 13: ...select alarm buzzer output time There are 12 time for selection 0 1 2 3 4 5 10 15 20 25 30 cont Factory Default Value 0 no alarm buzzer output Press MENU ESC key to exit when finished or keys to select the next setting item Note Press MENU ESC at anytime to stop Buzzer Sound manually s t s t s t s t s t s t ALARM INPUT NO NC SELECTION After entered Alarm Setup menu press keys to move arrow sign to...

Page 14: ...TUP AUTO RECORD NETWORK SETUP 1 2 3 4 1 2 3 4 EACH 30 FPS HIGH 180 SEC TO MOVE MENU TO EXIT SELECT TO SETUP 11 NETWORK SETUP OPTIONAL After entered setup menu press keys to move arrow sign to NETWORK SETUP and Press SELECT to confirm Monitor displays s t NETWORK MENU MAC ADDRESS IP ADDRESS SUBNET MASK GATEWAY 00 0F 01 A1 74 72 192 168 000 090 255 255 255 000 192 168 000 001 MAC ADDRESS MAC ADDRESS...

Page 15: ... setup When any of the camera video signal is lost monitor screen will show as below Note When a Video Loss is detected the corresponding alarm will be triggered automatically Monitoring When system s power is turned on system will auto running Initial HDD This will last 3 to 5 seconds and showed on monitor screen Camera numbers System time display 13 SYSTEM OPERATION 2003 01 11 16 35 25 M 0 1 2 3...

Page 16: ... activated no other function keys can be operated Stop recording before any other operation n n Recording Recording Indicator Recording HDD M Master S Slave Record Schedule To check hard drive storage capacity or record frame rate press SELECT key Monitor screen will show current recording frame rate and hard drive usage percentage Press SELECT again to exit Hard Drive Storage Capacity and Frame R...

Page 17: ...rched When finished press to playback To stop playing press key Ex To search stored data starting from 2004 05 02 PM2 25 30 YY MM DD H M S in master HDD After enter Search time menu press key to move the cursor to select HARD DRIVE MASTER and press SELECT to confirm and press key to move the cursor to the Search Time and use key to move sign and press SELECT to enter 04 05 02 14 25 30 When finishe...

Page 18: ...en playing press again for frame by frame play 4 Stop and escape playback 8 7 Playback Control 16 The system will check hard drive automatically If there is an error or damage on the hard drive monitor screen will show HDD ERROR Hard Drive Error Auto Detect HDD ERROR In live mode press 6 times continuously to reset Monitor screen will show RESET during resetting Manufacturing Default Setting 2003 ...

Page 19: ...52 1263 60 1127 68 104 734 69 1106 50 1175 43 1526 38 2008 87 877 76 1004 25 fps 12 fps 8 fps 6 fps 4 fps 3 fps 2 fps 1 fps PAL 2736 28 1359 56 123 620 902 85 1026 74 680 112 856 89 567 135 737 104 488 156 676 113 455 168 509 150 342 223 423 180 286 267 366 209 246 310 337 226 249 307 254 300 189 404 212 360 157 486 182 419 134 570 2060 37 1716 44 1477 52 91 839 76 1004 65 1174 1021 75 685 111 90 ...

Page 20: ...e DVR via Internet Browser No software application installation is required PDR 400IP provides excellent video quality in remote monitoring and is capable of viewing different video size for different network bandwidth considerations In short PDR 400IP is a cost effective solution for home and small business remote surveillance Internet Browser REMOTE VIEWER OPTIONAL PREFACE 18 ...

Page 21: ... Straight Through White Orange Orange White Green Blue White Bule Green White Brown Brown 1 2 3 4 5 6 7 8 1 2 3 4 5 6 7 8 1 2 3 4 5 6 7 8 White Orange Orange White Green Blue White Bule Green White Brown Brown 1 2 3 4 5 6 7 8 DVR 1 1 2 3 4 QUAD PDR 400 Camera 3 Monitor Video Out PC HUB RJ 45 Straight Through Camera 4 Camera 1 Camera 2 DVR 2 1 2 3 4 QUAD PDR 400 Monitor Video Out Camera 3 Camera 4 ...

Page 22: ...IPScan software tool shipped within the product CD to search PDR 400IP if PDR 400IP is accessible in your local network You can also ping PDR 400IP to see if the DVR is accessible in your local network To use IPScan software or ping utility please see appendix for detail Make sure that your Internet Browser allows signed ActiveX plug in running on your PC Set Download Signed ActiveX plug in to Pro...

Page 23: ...ss if a PC is present at the installation site See appendix for detail Use PDR 400IP s web interface to change IP address if a PC is present at the installation site See Network General Setting P 27 for detail There are two levels of user authentication including administrator and guest The only difference is that administrator can configure system settings Guest can only view live video The defau...

Page 24: ...zoom the video source A user can change a video property at local PC To change a video property please click on Video Property menu item There are six properties that a user can change Changing video properties does not change server s settings However the changes only affect the video ActiveX control of the user s PC 30 FPS 38358MB EACH 4 30 FPS 38358MB EACH 4 2005 01 08 04 43 15 2005 01 08 04 43...

Page 25: ...tored video playback can be captured and saved into local PC Click on Stop button to stop the recording operation To zoom the video ActiveX control please select Zoom menu item Please perform mouse dragging operation The mouse dragging area gets zoomed To disable zoom mode please right click on the video ActiveX control again Select on Zoom menu item again to restore original view area Recording Z...

Page 26: ...arge VGA To change video size simply chick on the hyper link of video size Configure section allows administrator to configure PDR 400IP via HTML web page There are basically three system categories including server network and Video Settings 1 PDR 400IP Operational HTML Page Video Size Configure Video Size Configure hyper link Text Stamp Video ActiveX software component Timer PDR 400IP s timer sy...

Page 27: ... allow ActiveX plug in run on the user s PC PDR 400IP allows a user to control PDR 400IP s keypad system The operation of HTML control panel and PDR 400IP s keypad system are identical Frame rate and frame size Number of person is currently accessing PDR 400IP PDR 400IP s administrator can configure PDR 400IP via standard HTML web page There are basically three system categories including server n...

Page 28: ... and get more features A user can use firmware version to verify that if the device has the latest update Note Firmware upgrade can improve PDR 400IP system performance Please contact authorized dealer to perform firmware upgrade Device Name The device name can be used by IPScan utility to identify the PDR 400IP To change the device name enter the name for PDR 400IP and click on Submit button Serv...

Page 29: ...k administrator or Internet service provider ISP for detail settings Network general settings are the basic settings connecting PDR 400IP to the network The default IP Address of PDR 400IP is 192 168 0 90 A user can use this IP address to verify the network connection between a local PC and PDR 400IP using Internet Browser For local area network configuration please enter at least IP address Subne...

Page 30: ...main name is easier to remember than numeric values IP DNS service requires service registration and subscription Dynamic DNS DDNS provides domain name service without subscription Please logon www dyndns org and register for the service To use DDNS please enter DDNS server account ID and password to logon to the server Click on Submit button to perform the task The DDNS message box shows the conn...

Page 31: ...To perform snapshot please follow the following instructions Insert SD card into SD socket Press on Play button on PDR 400IP front panel Select time or event search for the stored Video see playback section for detail Press Up or Down key that moves cursor to the event Once the event is identified press Play button again to play the video Press Pause to stop the video Press REC button to capture t...

Page 32: ... on product CD Click on Refresh button IPScan scans all the IP devices and shows all PDR 400IP devices in the device list box Click on the device item in the list box Modify Name IP Subnet Mask Gateway and HTTP port if applicable Click on Apply button for changing above settings Double click on device list item to launch Internet browser It opens up associated HTTP link APPENDIX ...

Page 33: ...ideo Adjustment Protocols Resolution Network Throughput Installation Software Upgrade Security SD Card AVI File Exporting Frame Statistics User Logon Statistics 16 bits 1M Bytes Flash ROM 8M Bytes SDRAM JPEG Motion JPEG Brightness Contrast Hue Saturation Video Quality TCP UDP IP ARP ICMP HTTP DHCP DDNS VGA 640 480 CIF default 320 240 QCIF 160 120 Upto 30fps for CIF QCIF 10fps for VGA ARP Admin web...

Page 34: ...MERIT LILIN ENT CO LTD http www meritlilin com 66 400CSE ...

Reviews: