background image

MERIT LILIN ENT. CO., LTD

http://www.meritlilin.com

INSTRUCTION MANUAL

PIH-815/819 Series

66-815CSE

SUPER HI-RESOLUTION DAY&NIGHT CAMERA

Summary of Contents for PIH-815

Page 1: ...INSTRUCTION MANUAL PIH 815 819 Series E SUPER HI RESOLUTION DAY NIGHT CAMERA...

Page 2: ...t within an equilateral triangle is intended to alert the user to the presence of important operating and maintenance servicing instructions in the literature shock to persons accompanying the unit CA...

Page 3: ...touch the power connection with wet hands Do not damage the power cord or leave it under pressure Sensitive electronics inside are vulnerable to excessive shock Excessive heat could damage this unit...

Page 4: ...fore installing and operation your new system Here you will find all the information you need to set up and use the system If any questions are not answered in the manual please contact your dealer Be...

Page 5: ...lete the following product purchase information The factory will requests this information when contacted for technical support or warranty repair It is also valuable in case of loss or theft Purchase...

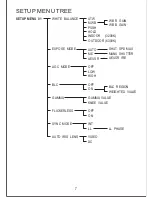
Page 6: ...AE SHUTTER Expose Mode AUTOMATIC GAIN CONTROL MODE AGC Mode BACK LIGHT COMPENSATION BLC GAMMA FLICKERLESS MODE SYNC SETTING MODE AUTO IRIS LENS PRIVACY MASK IR CUT REMOVE CONTROL RESOLUTION MODE IMAGE...

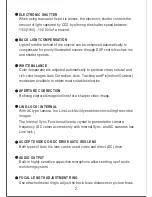
Page 7: ...nt objects and areas such as windows and doors which are within the camera s viewing range but not in the scope of surveillance 8 masking areas per screen simultaneously This camera provides an on scr...

Page 8: ...itable selection Refining captured image outlines for a sharper video image With AC type camera the Line Lock facility enables color rolling free video images The Internal Sync Function utilized a cry...

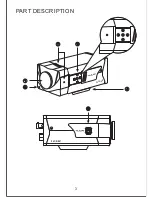
Page 9: ...DAY NIGHT DAY NIGHT PART DESCRIPTION 3...

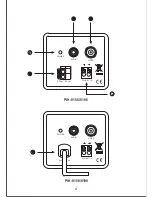
Page 10: ...AUDIO VIDEO POWER D N EXT IN AUDIO VIDEO POWER AC24V DC 12V D N EXT IN PIH 8158 8198 PIH 8156 8196 12 Ac90 260V 4...

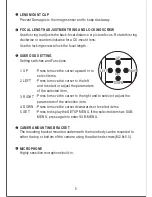
Page 11: ...The mounting bracket mounted underneath the main body can be mounted to either the top or bottom of the camera using the attached screws M2 6x5 0 Highly sensitive microphone built in 1 2 UP DOWN LEFT...

Page 12: ...jack not supplied Power ON OFF indicator Audio signal output Composite video signal output AC24V AC24V 10 or DC12V DC12V 10 Non Polarity power input AC90 260V maximum power input The camera will be t...

Page 13: ...RLESS SYNC MODE AUTO IRIS LENS AUTO OFF OFF GAMMA VALUE ATW MWB HOLD INDOOR ME LOW ON KNEE VALUE AEUSR HIGH OUTDOOR PUSH OFF ON INT DC VIDEO LL SHUT SPD MAX MANU SHUTTER AEUSR IRE LL PHASE 3200K 6300K...

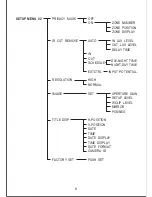
Page 14: ...ET PUSH SET HIGH OFF IN V POSITION DATE TIME DATE DISPLAY TIME DISPLAY DATE FORMAT CAMERA ID SCHEDULE NORMAL ON OUT DAY NIGHT TIME NIGHT DAY TIME ZONE NUMBER IN LUX LEVEL APERTURE GAIN ZONE POSITION O...

Page 15: ...to enter the SUB MENU of selected item 5 Position the cursor beside RET and press SET key to exit SETUP MENU 6 Position the cursor beside NEXT and press SET key to enter SETUP MENU 02 7 Position the c...

Page 16: ...tup Menu 01 Position the cursor beside WHITE BALANCE and select MWB by using LEFT RIGHT key The color temperature range for MWB is from approx 2500K 9500K NOTE Position the cursor beside WHITE BALANCE...

Page 17: ...ctronic Shutter AUTO 1 1 2 Press SET key to display the AUTO EXPOSE menu 3 Select shutter speed maximum using LEFT RIGHT key Shutter Speed Maximum Mode changes as follows 4 Position the cursor beside...

Page 18: ...ng LEFT RIGHT key 1 50 1 60 1 120 1 100 1 250 1 500 1 1000 1 100000 1 10000 1 4000 1 2000 When auto iris lens used 1 50 1 60 speed mode is recommended NOTE AEUSR 3 1 Position the cursor beside EXPOSE...

Page 19: ...ion the cursor beside BLC and select ON by using LEFT RIGHT key 2 Press SET key to display the BLC SETTING menu 3 Position the cursor beside BLC REGION and select the back light compensation convergin...

Page 20: ...curve 00 07 4 Position the cursor beside RET and press SET key and return to Setup Menu 01 GAMMA SETTING GAMMA VALUE KNEE VALUE RET 03 03 GAMMA and KNEE curve When GAMMA is set to 04 and KNEE is set...

Page 21: ...LINE LOCK SETTING menu 3 Adjust LL PHASE value by using LEFT RIGHT key 4 Position the cursor beside RET and press SET key and return to Setup Menu 01 LL PHASE adjustment range 00 100 each step is abo...

Page 22: ...side ZONE POSITION and press SET key to display the mask zone block use LEFT RIGHT UP DOWN key to move the masked zone to desired location then press SET key switch to ZONE SCALE and use LEFT RIGHT ke...

Page 23: ...TO SETTING IN LUX LEVEL OUT LUX LEVEL DELAY TIME RET 10 14 02 sec When light level is higher than IN LUX LEVEL IR Cut Filter switches ON automatically to produce color image When light level drops bel...

Page 24: ...key IR Cut Filter is OFF to produce constant B W image SCHEDULE 4 1 Position the cursor beside IR CUT REMOVE and select SCHEDULE by using LEFT RIGHT key 2 Press SET key to display the ICR SCHEDULE men...

Page 25: ...OTENTIAL RET LOW ICR EXT CONTROL INPUT POTENTIAL RET HIGH This function allows the usage of external TTL device to control camera switching from DAY to NIGHT mode or NIGHT to DAY mode triggered by HIG...

Page 26: ...low illumination environment NOTE Pedestal Level Setting SETUP LEVEL 2 Position the cursor beside SETUP LEVEL adjust the pedestal level black level by using LEFT RIGHT key SETUP LEVEL 00 63 White Cli...

Page 27: ...elect vertical position of the title by using LEFT RIGHT key V POSITION 01 15 3 Position the cursor beside DATE DISPLAY and select ON OFF by using LEFT RIGHT key 4 Position the cursor beside TIME DISP...

Page 28: ...oves one space to the right automatically To enter a blank select SPACE B Repeat the above procedure until all characters are entered Note Maximum 16 characters for camera ID CAMERA ID SETUP SPACE RES...

Page 29: ...TALLATION The lens must be either a C or CS mount type The protrusion behind the mounting surface must be within the following limits SUITABLE LENSES C mount lens CS mount lens 9mm or less 4mm or less...

Page 30: ...lug For cable pin assignment refer to the instruction manual for the lens CHANGING THE PLUG ON AN AUTO IRIS LENS CABLE Cover Lens cable Rib If the cable is thick cut this off Plug Unit accessory Pin 4...

Page 31: ...Screw in the lens unit it is secured Insert the lens plug in the AUTO IRIS connector when fitting a manual iris lens skip step4 Adjust the focal length by turning the focal length adjustment ring Usin...

Page 32: ...he mounting base Please refer to the following drawing FITTING THE CAMERA Connect to the power supply Please refer to the right drawing CONNECTION OF POWER SUPPLY CABLE AC24V or DC12V AC24V 10 or DC12...

Page 33: ...V 15 625KHz 50Hz 768 H x 494 V 15 734KHz 59 94Hz 752 H x 582 V 15 625KHz 50Hz 2 1 Interlace OSD Control Line Lock Internal DC12V Sync Mode is fixed to Internal Auto Day Night Schedule Ext Ctrl Color...

Page 34: ...MERIT LILIN ENT CO LTD http www meritlilin com 66 815CSE...

Reviews: