background image

IS332 ECN2992


9


6  Position top oven on top of stacking kit plinth. 
7  Screw feet through holes in stacking kit plinth (detail B) and into oven 

base. 

8  Remove the top row of screws in the back panel of the bottom oven. 
9  Fit the stacking kit plinth and top oven on top of bottom oven. 
10  Screw the top row of screws back into the oven through the stacking kit 

plinth. 


CLEANING 


  Clean the unit regularly to maintain good hygiene and performance.  

  Use a mild detergent in hot water and a soft cloth. 

  Do not allow excess water to run into the unit. 

  Do not use abrasive creams or scourers. 

  Burnt-on food may be removed using Carb’n’off or similar cleaner 


MAINTENANCE 


No regular maintenance is required. 


Summary of Contents for ECO8/FS

Page 1: ...ou for purchasing this Lincat product With correct use and careful maintenance as described in these instructions your Lincat product will give years of trouble free use We produce over 400 different items of catering equipment and our range is constantly being extended and improved Find out more about Lincat products from your local distributor or direct from us ...

Page 2: ...NANCE 9 SERVICE INFORMATION 10 GUARANTEE 10 SAFETY INFORMATION To prevent injury to yourself or your staff and to avoid damaging the product please read and follow these safety precautions before setting up and using the unit Remove all plastic coatings and clean the unit before use The unit is heavy Make sure enough people are available to lift it onto the stand Do not try to modify the unit Neve...

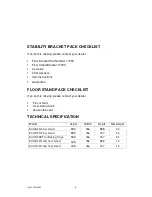
Page 3: ...ructions Guarantee FLOOR STAND PACK CHECKLIST If an item is missing please contact your dealer Floor stand User instructions Guarantee card TECHNICAL SPECIFICATION Model Height Width Depth Net weight ECO8 FS Floor stand 930 786 588 22 ECO9 FS Floor stand 930 766 757 24 ECO9 FSBT for Baking Trays 930 766 757 24 ECO8 LFS Low floor stand 405 786 588 14 ECO9 LFS Low floor stand 405 766 757 15 ...

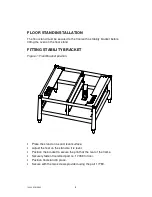
Page 4: ...tand FITTING STABILITY BRACKET Figure 1 Floor Bracket position Place the stand on a solid level surface Adjust the feet on the stand so it is level Position the bracket to secure the plinth at the rear of the frame Securely fasten floorstand part no 17789 to floor Position floorstand in place Secure with the two screws provided using the part 17790 ...

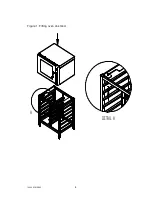
Page 5: ...IS332 ECN2992 5 Figure 1 Fitting oven on stand ...

Page 6: ...th the holes on the top of the stand 5 Screw feet through the holes in the top of the stand and into the base of the oven CLEANING Clean the unit regularly to maintain efficient performance and hygiene Use a mild detergent in hot water and a soft cloth Do not allow excess water to run into the unit Do not use abrasive creams or scourers Burnt on food may be removed using Carb n off or similar clea...

Page 7: ...ck the weight of the unit and ensure enough people are available to lift it Do not try to modify the unit Never clean the unit with a water jet Inform staff that the surfaces may become hot Keep these instructions in a safe place for future reference PACK CHECKLIST If an item is missing please contact your dealer Stacking kit plinth 2 x lifting handles with fitting kit User instructions Guarantee ...

Page 8: ... Fit the lifting handles to the rear of the top oven as directed in the enclosed fitting kit 3 Unscrew the feet from the bottom of both ovens 4 Place the lower oven on the stand lining up the foot holes in the base of the oven with the holes on the top of the stand 5 Screw feet through holes in the brackets detail A and onto the base of the oven ...

Page 9: ...h and top oven on top of bottom oven 10 Screw the top row of screws back into the oven through the stacking kit plinth CLEANING Clean the unit regularly to maintain good hygiene and performance Use a mild detergent in hot water and a soft cloth Do not allow excess water to run into the unit Do not use abrasive creams or scourers Burnt on food may be removed using Carb n off or similar cleaner MAIN...

Page 10: ...e problem Product code Type number Serial number Serial plate details Lincat reserve the right to carry out any work under warranty during normal working hours ie Monday to Friday 08 30 a m 17 30 p m GUARANTEE This unit carries a comprehensive UK twelve month warranty The guarantee is in addition to and does not diminish your statutory or legal rights The guarantee does not cover Accidental damage...

Reviews: