IS355 ECN3592
9
LIGHTING SEQUENCE
Please ensure that the gas isolation valve for the appliance is turned to the open
position before attempting to light this unit.
1.
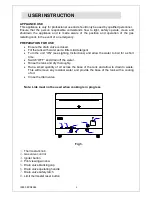
Ensure that the thermostat control knob
(Fig 3, 1)
is in the OFF position.
2.
Ensure the gas valve control knob
(Fig 3, 2)
is in the off position.
3.
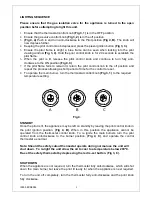
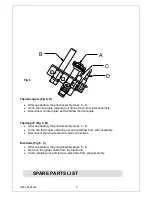
(Fig 4, A)
Push in and turn anti-clockwise to the Pilot position
(Fig 4, B).
The knob will
now depress further.
4.
Keeping the pilot control knob depressed, press the piezo ignition button
(Fig 3, 3).
5.
Ensure the pilot flame is alight, a blue flame can be seen when looking into the pilot
viewing window
(Fig 3, 4).
Hold the pilot control knob in for 20 seconds to establish the
pilot flame.
6.
When the pilot is lit, release the pilot control knob and continue to turn fully anti-
clockwise to the ON position
(Fig 4, C)
.
7.
If the pilot flame fails to remain lit, return the pilot control knob to the off position and
repeat the process allowing a short period of time for the control to reset.
8.
To operate the main burner, turn the thermostat control knob
(Fig 3, 1)
to the required
temperature setting.
O
F
F
PILOT
O
N
OF
F
P
IL
O
T
ON
O
F
F
PIL
OT
O
N
A
B
C
Fig 4.
STANDBY
Once the pilot is lit, the appliance may be left on standby by leaving the pilot control knob in
the pilot ignition position.
(Fig 4, B)
. When in this position the appliance cannot be
operated from the thermostat control knob. To re ignite the main burners turn the pilot
control knob anti-clockwise to the burner position,
(Fig 4, C)
, and operate the control
thermostat as normal.
Note: Should the safety cutout thermostat operate during normal use the unit will
shut down. To re-light the unit allow the oil to cool to a temperature below 200
o
C.
Re-set the safety thermostat by depressing the red re-set button. (Fig 3, 8).
SHUT DOWN
When the appliance is not required, turn the thermostat fully anti-clockwise, which will shut
down the main burner but leave the pilot lit ready for when the appliance is next required.
To turn the unit off completely, turn the thermostat fully anti-clockwise and the pilot knob
fully clockwise.
Summary of Contents for Silverlink 600 DC04
Page 20: ...IS355 ECN3592 Notes...

