BK8053-000107 Rev A.01
FineLine 300HD Plasma System
This information is subject to the controls of the Export Administration Regulations [EAR]. This information shall not be provided to
non-U.S. persons or transferred by any means to any location outside the United States contrary to the requirements of the EAR.
Page 41 of 118
3.12 Install Consumables
DANGER
Electric Shock Can Kill.
Remove primary power from the System before installing or
removing consumables.
WARNING
Hot Parts Can Burn Skin.
Do not touch hot parts bare-handed.
Always use gloves when handling the torch as it can be hot after
cutting, especially with high amperages and long cut times.
Allow cooling period before working on the torch.
Note: When installing the consumables, do not use an excessive amount of
o-ring lubricant. Ensure that the lubricant is only placed on the o-rings.
Excess lubricant can interfere with gas flow, which can cause starting
problems, poor cut quality, and short consumable life.
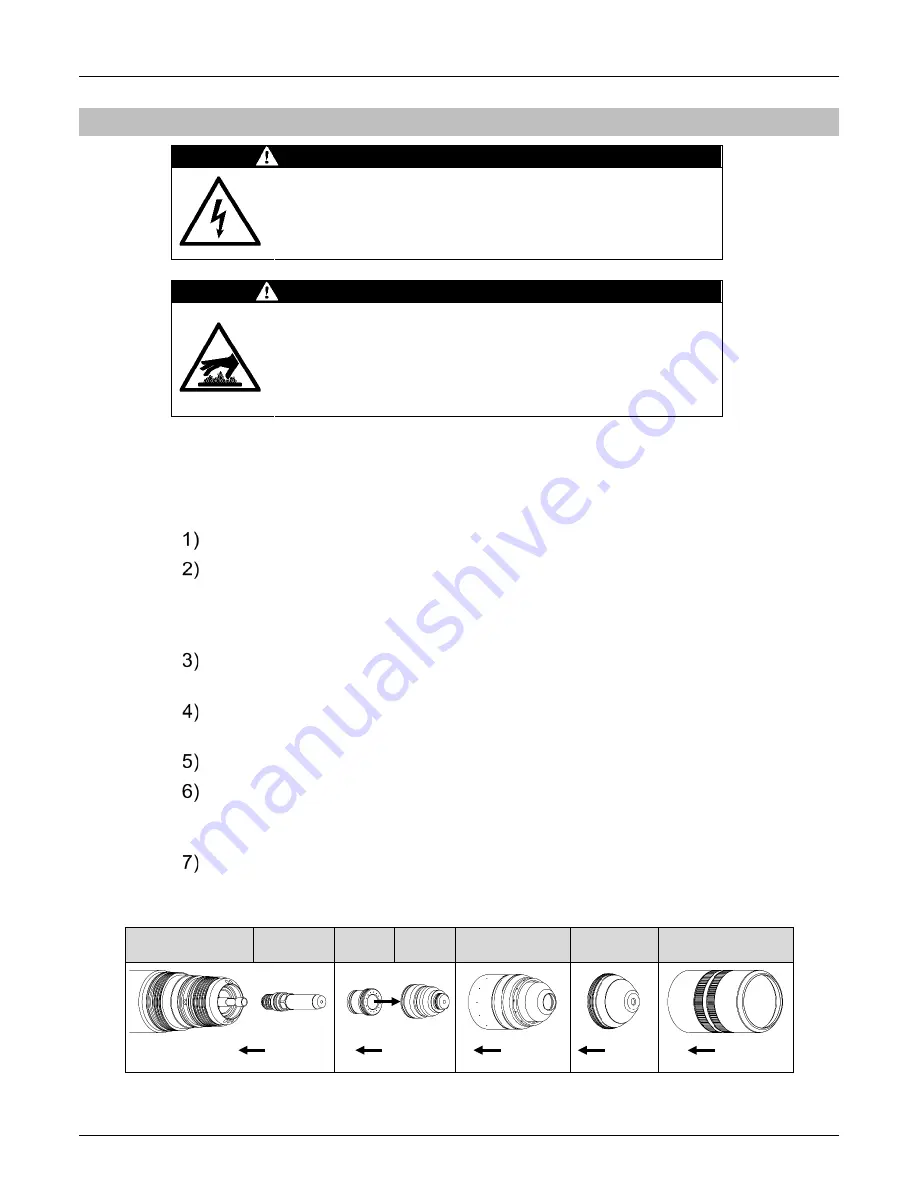
Remove primary (wall) power from the System.
Apply lubricant BK716012 to the o-ring on the electrode. Push the electrode
over the cooling tube and thread the electrode into the torch by hand. Tighten
the electrode using a 10mm, 6-point deep socket (part number BK602396) and
¼” driver (part number BK277086).
Apply lubricant to the o-rings on the swirl ring. Press the larger end of the swirl
ring into the bottom of the nozzle until it is fully seated.
Apply lubricant to the o-rings on the nozzle. Push the nozzle/swirl ring onto
the electrode. The larger nozzle o-ring will fit completely inside the torch.
Thread the retaining cap onto the torch until it is fully seated.
Apply lubricant to the o-ring on the shield cap. Push the shield cap onto the
retaining cap until it is fully seated or push the shield cap into the outer cap
until it is fully seated.
Apply lubricant to the o-rings on the torch. Thread the outer retaining cap onto
the torch until it is fully seated.
Torch
Electrode Swirl
Ring Nozzle
Retaining
Cap
Shield
Cap
Outer
Cap
Step 2
Step
3
Step 4
Step 5
Step 6
Step 7


