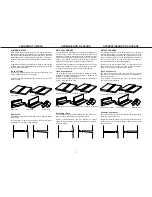
2. La bonne façon d'amorcer l'arc
S'assurer que le connecteur de pièce (ou prise de masse)
est bien connecté à la pièce.
Abaisser le masque à serre-tête ou tenir le masque à main
sur le visage. Gratter lentement l'électrode sur le métal, cela
crée des étincelles. Tout en grattant, soulever l'électrode de
1/8 po (3,2 mm). L'arc est alors amorcé.
NOTA : Lors de l'amorçage, bouger sans arrêt l'électrode
pour ne pas qu'elle colle à la pièce.
NOTA : La plupart des débutants essaient d'amorcer l'arc en
faisant tapoter rapidement l'électrode sur la tôle. Il en
résulte que l'électrode colle ou que, le mouvement étant trop
rapide, l'arc s'éteint immédiatement.
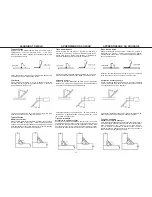
3. La bonne longueur d'arc
La longueur d'arc est la distance entre l'extrémité de l'élec-
trode et le métal de base.
Une fois que l'arc a été amorcé, il est très important que l'on
maintienne la bonne longueur d'arc. L'arc doit être court, et
faire environ 1/16 à 1/8 po ( 1,6-3,2 mm) de longueur. Au fur
et à mesure que l'électrode se consume, on doit l'avancer
vers la pièce pour maintenir la bonne longueur d'arc.
La meilleure façon de savoir si l'arc a la bonne longueur est
d'écouter le son qu'il émet. Un arc court et acceptable émet
un «crépitement» distinctif, tout comme les oeufs que l'on
fait frire dans une poêle. L'arc long et inacceptable émet un
son creux, un souffle ou un sifflement.
4. La bonne vitesse de soudage
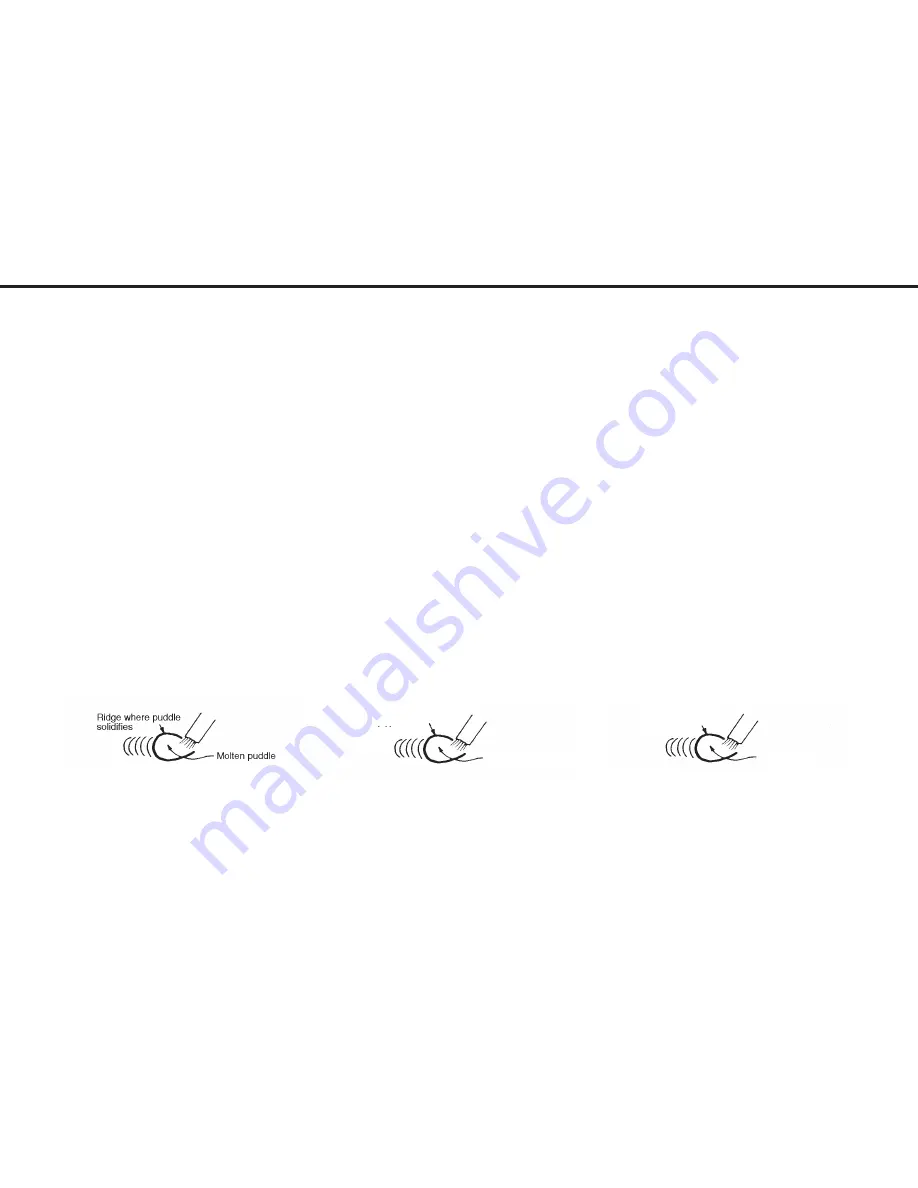
Quand on soude, il est important d'observer le bain de fusion
juste en arrière de l'arc. NE PAS REGARDER L'ARC LUI-
MÊME. C'est l'aspect du bain et la vague de solidification
qui indiquent la bonne vitesse de soudage. La vague doit se
situer à environ 3/8 po (9,5 mm) en arrière de l'électrode.
La plupart des débutants ont tendance à souder trop rapi-
dement, et il en résulte un cordon mince et irrégulier
ressemblant à un ver. Ils ne regardent pas le métal fondu.
IMPORTANT: Il n'est généralement pas nécessaire de faire
osciller l'arc, ni d'avant en arrière ni sur le côté. Souder à un
rythme régulier. C'est plus facile.
NOTA : Quand on soude des tôles minces, on s'aperçoit que
l'on doit augmenter la vitesse de soudage, mais quand on
soude des tôles épaisses, il est nécessaire d'aller plus lente-
ment afin d'obtenir une bonne pénétration.
2. Forma correcta para iniciar un arco
Asegúrese de que la pinza de trabajo haga un buen contac-
to eléctrico con el trabajo.
Baje la careta o sostenga el protector para ojos de mano
frente su cara. Frote suavemente el electrodo sobre el metal
y verá cómo se producen chispas. Mientras lo frota, levante
el electrodo 3.2 mm (1/8") y se establecerá el arco.
NOTA: Si deja de mover el electrodo mientras lo frota, el
electrodo se pegará.
NOTA: La mayoría de los principiantes tratan de iniciar el
arco picando la placa con un moviendo rápido. Resultado:
El electrodo se pega o el movimiento es tan rápido que
rompen el arco inmediatamente.
3. Longitud correcta del arco
La longitud del arco es la distancia desde la punta del núcleo
del electrodo al metal base.
Una vez que el arco se ha establecido, es muy importante
mantener una longitud adecuada del arco. El arco debe ser
corto, con una longitud aproximada de 1.6 a 3.2 mm (de 1/16
a 1/8"). A medida que el electrodo se quema, el electrodo
debe alimentarse al área de trabajo para mantener la longi-
tud correcta del arco.
La forma más fácil para saber si el arco tiene la longitud cor-
recta es escuchando su sonido. Un arco corto y adecuado
tiene un sonido distintivo de "chisporroteo", muy similar al
que se producen cuando se fríen huevos en un sartén. Un
arco largo e incorrecto tiene un sonido como de siseo.
4. Velocidad correcta de avance
Es importante observar mientras suelda el charco de metal derreti-
do justo detrás del arco. NO observe al arco. La apariencia del
charco y el reborde donde el charco derretido se solidifica es lo que
indica la velocidad correcta de avance. El reborde debe ser de
aproximadamente 9.5 mm (3/8") atrás del electrodo.
La mayoría de los principiantes tiende a soldar muy rápido, dando
como resultado un cordón con apariencia de "oruga", delgada y dis-
pareja. Cuando esto sucede, no están observando el metal derreti-
do.
IMPORTANTE: En general, para soldar no es necesario mover el
arco ni hacia adelante ni hacia atrás, ni tampoco hacia los lados.
Suelde a un ritmo estable; será más fácil de esta forma.
NOTA: Cuando suelde sobre una placa delgada, se dará cuenta
de que tiene que aumentar la velocidad de soldadura, mientras que
al soldar sobre una placa gruesa, es necesario llevar un ritmo más
lento a fin de lograr una penetración adecuada.
16
2. The Correct Way to Strike an Arc
Be sure the work clamp makes good electrical contact to the
work.
Lower your headshield or hold the hand shield in front of
your face. Scratch the electrode slowly over the metal and
you will see sparks flying. While scratching, lift the electrode
1/8" (3.2mm) and the arc is established.
NOTE: If you stop moving the electrode while scratching, the
electrode will stick.
NOTE: Most beginners try to strike the arc by a fast jabbing
motion down on the plate. Result: They either stick or their
motion is so fast that they break the arc immediately.
3. The Correct Arc Length
The arc length is the distance from the tip of the electrode
core wire to the base metal.
Once the arc has been established, maintaining the correct
arc length becomes extremely important. The arc should be
short, approximately 1/16 to 1/8" (1.6 to 3.2mm) long. As the
electrode burns off the electrode must be fed to the work to
maintain correct arc length.
The easiest way to tell whether the arc has the correct length
is by listening to its sound. A nice, short arc has a distinctive,
“crackling” sound, very much like eggs frying in a pan. The
incorrect, long arc has a hollow, blowing or hissing sound.
4. The Correct Welding Speed
The important thing to watch while welding is the puddle of
molten metal right behind the arc. Do NOT watch the arc
itself. It is the appearance of the puddle and the ridge where
the molten puddle solidifies that indicate correct welding
speed. The ridge should be approximately 3/8" (9.5mm)
behind the electrode.
Most beginners tend to weld too fast, resulting in a thin,
uneven, “wormy” looking bead. They are not watching the
molten metal.
IMPORTANT: For general welding it is not necessary to
weave the arc; neither forwards and backwards nor side-
ways. Weld along at a steady pace. You will find it easier.
NOTE: When welding on thin plate, you will find that you will
have to increase the welding speed, whereas when welding
on heavy plate, it is necessary to go more slowly in order to
get good penetration.
Vague de solidification
Bain de fusion
Reborde donde el charco
se solidifica
Charco derretido
APPRENTISSAGE DU SOUDAGE
APRENDIENDO A SOLDAR
LEARNING TO WELD
Summary of Contents for HOBBY WELD K1790-1
Page 7: ...7 NOTES HOBBY WELD ...
Page 20: ...NOTES HOBBY WELD 20 ...
Page 21: ...NOTES HOBBY WELD 21 ...
Page 24: ...World s Leader in Welding and Cutting Products ...


