27
Installation and Operations Guide
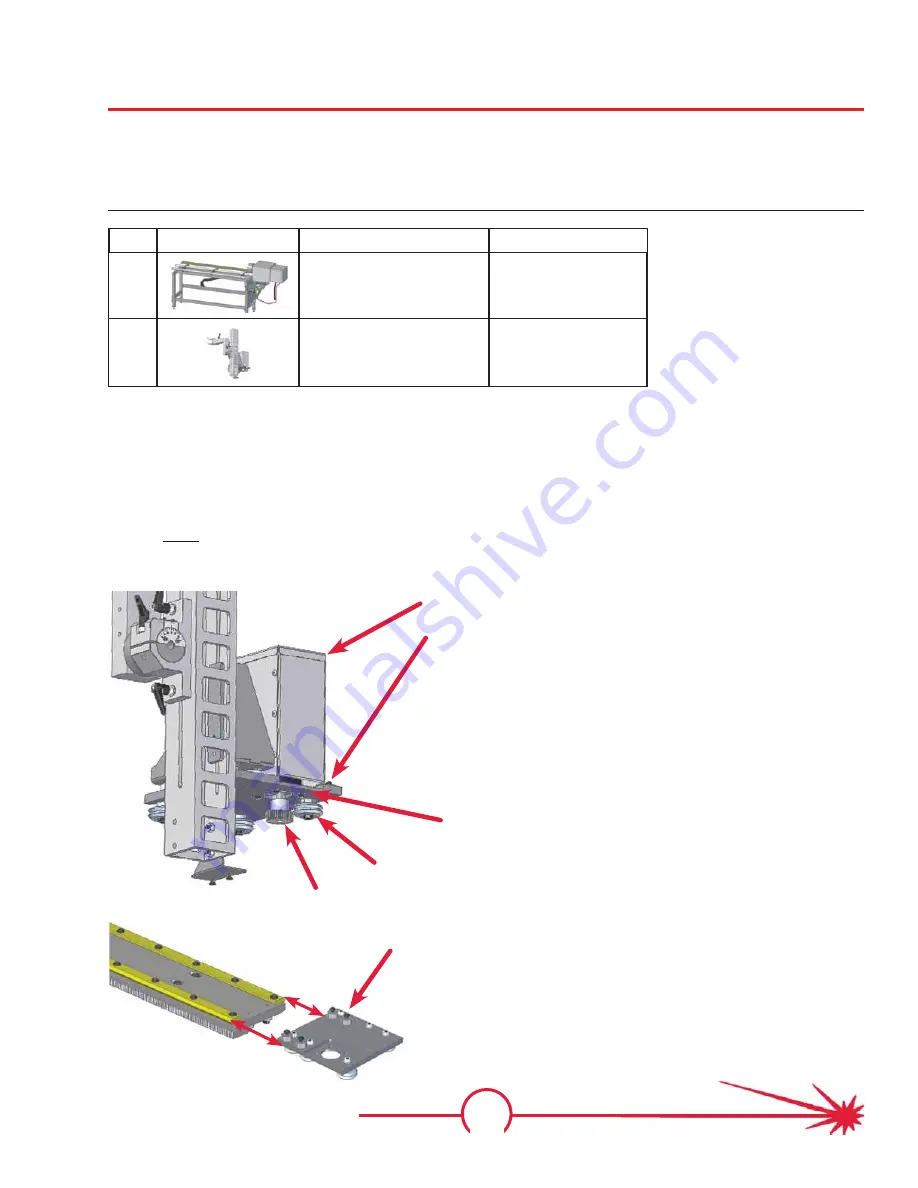
Torch mount carrier plate
shown without torch mount
and motor / guard
Step 8: Install the horizontal drive unit
If the horizontal drive unit is pre-installed, it may still require adjustment to properly engage
the gear rack. The horizontal drive unit holds the torch and moves it along the pipe length us-
ing V-rails, gear racks, and a motor / gear box assembly. These control the motion of the torch
mount.
Qty
Part
Description
Part #
1
Leveled MPMP and any
add-on sections with
aligned gear racks
From Step 7
1
Torch mount carrier as-
sembly
(may be pre-installed)
TMS-140-0001-05
Required parts /
components
Instructions
• Remove the motor covers, loosen the motor mount screws to adjust
the motor position, then, if not already installed, slide the V-rollers
over the V-rails.
• Re-engage and adjust the motor gear with the gear rack, tighten the
motor screws, and replace the cover.
• Note: The spur gear should fully engage the gear rack but must
not bind upon it.
Illustration
Motor cover
Motor cover screws
Motor mounting screws
V-roller
Spur gear
Summary of Contents for MASTERPIPE Mini Profiler
Page 9: ...1 Safety Guide Safety Information ...
Page 19: ...11 Installation and Operations Guide Hardware Installation ...
Page 62: ...54 MASTERPIPE Mini Profiler ...
Page 63: ...55 Driver Software Driver Introduction ...
Page 65: ...57 Driver Software Illustrations screen shots of the TM4 installation pro cess ...
Page 67: ...59 Driver Software Illustrations screen shots of the device driver installa tion process ...
Page 96: ...88 MASTERPIPE Mini Profiler ...
Page 97: ...89 Installation and Operations Guide Parts ...
Page 100: ...92 MASTERPIPE Mini Profiler ...
Page 101: ...93 Installation and Operations Guide Troubleshooting ...


