45
Installation and Operations Guide
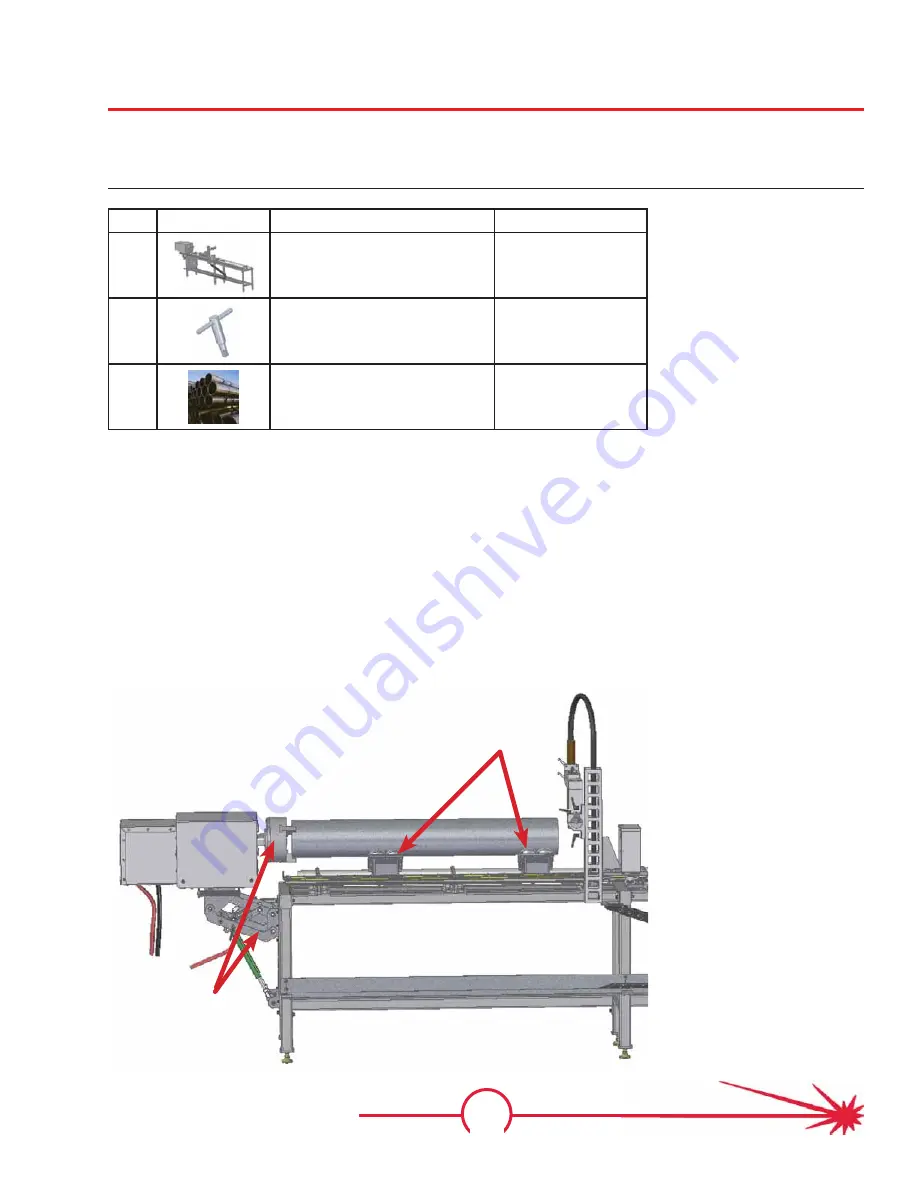
Step 26: Load material for speed and demo cuts
Your MASTERPIPE Mini Profile can manage material from 1” to 8” in production work, so
changing pipe diameter is important. For or speed and demo cuts, you will load a length of 6”
I.D. Schedule 40 pipe (4’ long or greater) and set the MPMP chuck height to grip it.
Qty
Part
Description
Part #
1
MPMP with CNC Controller
and computer
From Step 25
1
Chuck key
Included with base
machine chuck
1
4’ or greater length of 6” I.D.
Sch. 40 pipe
(from your stock or
scrap)
Required parts /
components
Instructions
• Obtain a 4’ or longer length of Sch. 40 pipe with an I.D. of 6” and
load it onto the ball transfer cradles.
• Loosen the height adjustment levers and set the chuck height and
jaw opening to hold the pipe.
• Lightly tighten the jaws with the chuck key.
• Jog the chuck (X-axis) in either direction. Refer to Step 24.
Tighten the jaws with a medium tightness, and lock the height.
• There is no need to over tighten the chuck jaws.
• Set the pipe diameter to 6.625 as in Step 25.
Illustration
Load the 6” ID Sch
40 pipe onto the
ball cradles
Adjust the
chuck height,
then tighten
chuck jaws with
the chuck key
Summary of Contents for MASTERPIPE Mini Profiler
Page 9: ...1 Safety Guide Safety Information ...
Page 19: ...11 Installation and Operations Guide Hardware Installation ...
Page 62: ...54 MASTERPIPE Mini Profiler ...
Page 63: ...55 Driver Software Driver Introduction ...
Page 65: ...57 Driver Software Illustrations screen shots of the TM4 installation pro cess ...
Page 67: ...59 Driver Software Illustrations screen shots of the device driver installa tion process ...
Page 96: ...88 MASTERPIPE Mini Profiler ...
Page 97: ...89 Installation and Operations Guide Parts ...
Page 100: ...92 MASTERPIPE Mini Profiler ...
Page 101: ...93 Installation and Operations Guide Troubleshooting ...


