


B-3
OPERATION
STATIFLEX
®
6000-MS
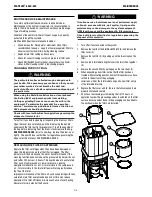
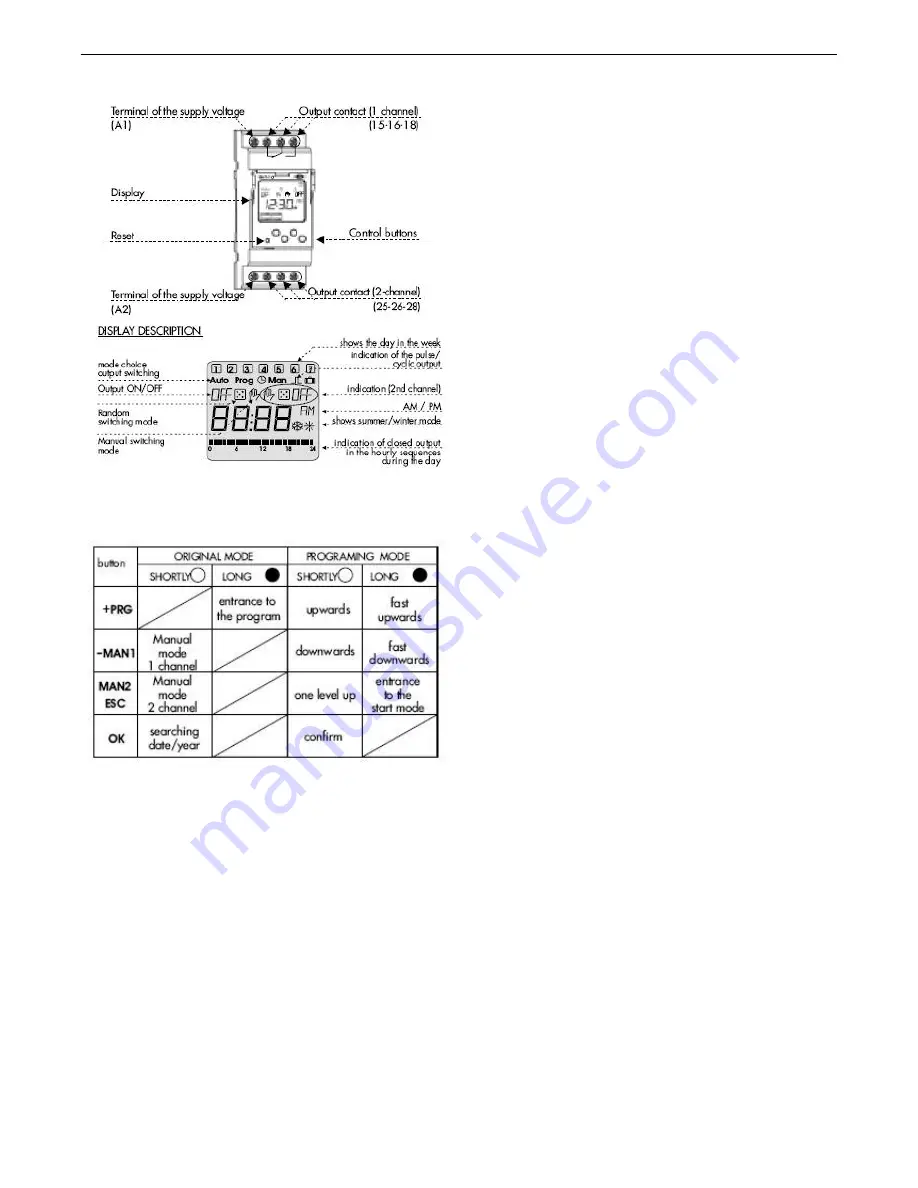
2.) Description of the Device
3.) Description of the Control Buttons and Modes
a)
There are four control buttons located on the face of the unit just
below the display
b) First button going from left to right is the (PRG button) this button
is used to enter the program setup menus by pressing and
holding it down for 3 seconds
c)
The PRG button has a plus sign (+) located right below the PRG
on the face
d) The next button on the right of the (+PRG) button is the (-MAN)
button
e) The (MAN) button can be quickly pressed while in the run mode
operation to quickly turn on output 1 on and off manually
f)
There is also a minus sign (-) located underneath this button
which means that when the unit is in the program mode, this
button can be quickly pressed nto go back to the previous screen
or menu
g) The third button from the left is the (MAN2) which works just like
the MAN button except it controls the output 2 relay during run
mode
h) The third button from the left also works as a double button
(ESC), which is used during the program mode to exit out of the
menu or out of the program mode and back to the run mode
i)
The button on the far right is the (OK) button
j)
The (OK) button can be used to scroll through the date, time, and
year setting during run mode operation by quickly pressing the
button
k) The (Ok) button is also used as the enter button from entering the
program parameters in the program mode
4.) Economical Mode
The 7DT-2CH is shipped with a pre-programmed real time in
economical mode. The unit uses battery memory which allows the
unit to keep data stored even when the unit does not have supply
voltage on terminals A1 and A2. This device is capable of viewing
the time with no supply voltage present by pressing any of the
control buttons for two seconds. The 7DT-2CH display will
illuminate and display pre-set time. When supply voltage is
connected to terminals A1 and A2 the unit will continuously
display the timing switch’s status until supply voltage is removed.
5.) Illumination of Display
The 7DT-2CH illuminates whenever one of the control buttons are
pressed and remains that way for 10 seconds after the last button
was pressed. To have the LCD display stay illuminated
permanently. The three control buttons (ESC/MAN2), (-MAN1), and
the (OK) must be pressed and held down together from 3 second.
The display will flicker once to show that the permanent
illuminated feature has been entered. The same three buttons
again must be pressed and held down simultaneously to turn the
display illumination feature off. The display will flicker and than
turn the display light off.
6.) Reset the Time, Date, and Year
The 7DT-2CH has a small hidden reset button located on the front
left side of the unit (this can be seen on page 4 under description
of the device). By using a pin with a diameter no bigger than 2
mm you can press this small hidden reset button (when pressed
the screen will go blank). Upon releasing the button the display
will show SHT-1 for 3 seconds (This is the version of firmware
used) and go to starting mode. The reset will delete the real time,
the set time of the pulse/cycle mode and all temporary functions.
Reset will keep the set programs.
7.) Reset all the Programs
All storied programs can easily be erased by pressing down and
holding both (+PRG) and (OK) buttons simultaneously for a few
seconds. The word ALL will be displayed once the two control
buttons have been held down. Now just push the (OK) button and
the unit will delete all existing programs


