background image

OPERATION

B2.4

B2.4

VANTAGE® 500

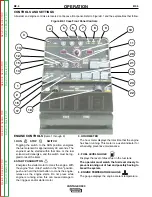
ENGINE CONTROLS 

(Items 1 through 9)

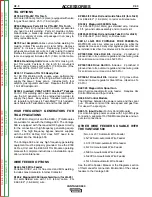
1. RUN           STOP             SWITCH

Toggling  the  switch  to  the  RUN  position  energizes
the fuel solenoid for approximately 30 seconds. The
engine  must  be  started  within  that  time  or  the  fuel
solenoid will denergize, and the switch must be tog-
gled to reset the timer.

2. START PUSHBUTTON

Energizes the starter motor to crank the engine. With
the engine "Run / Stop" switch in the "Run" position,
push and hold the Start button to crank the engine;
release  as  the  engine  starts.  Do  not  press  while
engine  is  running  since  this  can  cause  damage  to
the ring gear and/or starter motor

3. HOUR METER

The hour meter displays the total time that the engine
has been running. This meter is a useful indicator for
scheduling preventive maintenance.

4. FUEL LEVEL GAUGE

Displays the level of diesel fuel in the fuel tank.

The operator must watch the fuel level closely to
prevent running out of fuel and possibly having to
bleed the system.

5. ENGINE TEMPERATURE GAUGE

The gauge displays the engine coolant temperature.

Figure B2.1 Case Front Panel Controls

3

4

5

6

7

8

9

10

11

12

15

14

13

1

2

17

21

16

18

22

23

19

20

CONTROLS AND SETTINGS

All welder and engine controls are located on the case front panel. Refer to Figure B.1 and the explanations that follow.

Return 

to 

Section 

T

OC

Return 

to 

Section 

T

OC

Return 

to 

Section 

T

OC

Return 

to 

Section 

T

OC

Return 

to 

Master 

T

OC

Return 

to 

Master 

T

OC

Return 

to 

Master 

T

OC

Return 

to 

Master 

T

OC

Summary of Contents for VANTAGE SVM178-B

Page 1: ...UT And most importantly think before you act and be careful SERVICE MANUAL For use with machine code numbers 10995 10996 11180 11181 11415 11416 11468 VANTAGE 500 Sales and Service through Subsidiarie...

Page 2: ...IR DOCTOR BEFORE OPERATING Read and understand the following safety highlights For additional safety information it is strongly recommended that you purchase a copy of Safety in Welding Cutting ANSI S...

Page 3: ...arc welding Headshield and filter lens should conform to ANSI Z87 I standards 4 b Use suitable clothing made from durable flame resistant material to protect your skin and that of your helpers from t...

Page 4: ...r hydraulic lines Have a fire extinguisher readily available 6 b Where compressed gases are to be used at the job site special precautions should be used to prevent hazardous situations Refer to Safet...

Page 5: ...outtes de laitier en fusion sont mises de l arc de soudage Se prot ger avec des v tements de protection libres de l huile tels que les gants en cuir chemise paisse pan talons sans revers et chaussures...

Page 6: ...e of the manufacturer In some cases this remedial action may be as simple as earthing grounding the welding circuit see Note In other cases it could involve construction of an electromagnetic screen e...

Page 7: ...be kept as short as possible and should be positioned close together running at or close to floor level Equipotential Bonding Bonding of all metallic components in the welding installation and adjace...

Page 8: ...eutz F3L912 Code 10995 C1 VANTAGE 500 Deutz F4L2011 Code 11180 11415 C2 VANTAGE 500 Deutz D2011L4i Code 11468 C3 VANTAGE 500 Cummins B3 3 Code 10996 C4 VANTAGE 500 Cummins B3 3 Code 11181 11416 C5 Mai...

Page 9: ...owing A1 4 Vehicle Mounting A1 4 Pre Operation Engine Service A1 5 Oil A1 5 Fuel A1 5 Fuel Cap A1 5 Engine Cooling System A1 5 Battery Connection A1 5 Muffler Outlet Pipe A1 6 Spark Arrester A1 6 High...

Page 10: ...50 575 Amps DC multi purpose 35 volts PHYSICAL DIMENSIONS Height 2 Width Depth Weight 42 0 in 31 5 in 63 1 in 1615 lbs 1066 8 mm 800 1mm 1603mm 733kg Approx 1 Output rating in watts is equivalent to...

Page 11: ...directly under stationary or fixed electrical equipment that surface should be covered with a steel plate at least 06 1 6mm thick which should extend not less than 5 90 150mm beyond the equipment on a...

Page 12: ...railer for use with this equipment for road in plant and yard towing by a vehicle1 is Lincoln s K2636 1 If the user adapts a non Lincoln trailer he must assume responsibility that the method of attach...

Page 13: ...mmendations Running out of fuel may require bleeding the fuel injection pump NOTE Before starting the engine open the fuel shut off valve pointer to be in line with hose FUEL CAP Remove the plastic ca...

Page 14: ...rsely affect performance HIGH FREQUENCY GENERATORS FOR TIG APPLICATIONS The K799 Hi Freq Unit obsolete and the K930 1 or 2 TIG Module are suitable for use with the Vantage 500 The Vantage 500 is equip...

Page 15: ...k of a building which has been effectively grounded The U S National Electrical Code lists a number of alternate means of grounding electrical equipment A machine grounding stud marked with the symbol...

Page 16: ...20 240 VAC plug NEMA Type 14 50 to the double pole circuit breaker using four conductor cable of the proper size and desired length The 50 amp 120 240 VAC plug is avail able in the optional K802R plug...

Page 17: ...er Controls B1 6 Engine Operation B1 7 Starting the Engine B1 7 Stopping the Engine B1 7 Break In Period B1 7 Typical Fuel Consumption B1 7 Welder Operation B1 8 Stick Welding B1 8 Constant Current CC...

Page 18: ...rate the welder with the hinged door closed and the side panels in place as these provide maxi mum protection from moving parts and insure proper cooling air flow GENERAL DESCRIPTION The Vantage 500 i...

Page 19: ...ol panel Arc Control potentiometer in Wire and Stick modes for precise adjustment of arc characteristics Advanced circuitry to prevent pop outs in the five slope modes FOR AUXILIARY POWER 12 000 watts...

Page 20: ...METER The hour meter displays the total time that the engine has been running This meter is a useful indicator for scheduling preventive maintenance 4 FUEL LEVEL GAUGE Displays the level of diesel fu...

Page 21: ...mptrol 10 DIGITAL OUTPUT METERS Optional The digital meters allow the output voltage CV WIRE mode or current CC STICK DOWNHILL PIPE and TIG modes to be set prior to welding using the OUT PUT control k...

Page 22: ...an be split for 120VAC single phase auxiliary power This receptacle has a 50 amp rating Refer to the AUX ILIARY POWER RECEPTACLES section in the installation chapter for further information about this...

Page 23: ...requently started below 10 12 C it may be desirable to install the optional ether start kit K887 1 Installation and operating instructions are included in the kits STOPPING THE ENGINE Switch the RUN S...

Page 24: ...acking of iron are key to fast travel speeds It is recommend ed that the ARC CONTROL be set initially at 0 TOUCH START TIG MODE The Vantage 500 can be used in a wide variety of DC TIG welding applicat...

Page 25: ...0 5 20 3 5 10 3 5 5 10 3 5 0 40 1 0 15 80 3 5 10 3 5 5 10 3 5 1 16 1 6 70 150 10 20 5 10 3 5 9 13 4 6 5 6 3 32 2 4 150 250 15 30 13 17 6 8 11 15 5 7 6 7 8 1 8 3 2 250 400 25 40 15 23 7 11 11 15 5 7 5...

Page 26: ...separate 120 VAC outputs with a maxi mum permissible current of 50 A per output to two sep arate 120 VAC branch circuits Output voltage is within 10 at all loads up to rated capacity NOTE The 120 240...

Page 27: ...RD RECOMMENDATIONS An extension cord can be used with the auxiliary power outputs as long as it is of ample size Table B1 4 lists permissible extension cord lengths based on conduc tor size and auxili...

Page 28: ...OTES B1 12 B1 12 VANTAGE 500 Return to Section TOC Return to Section TOC Return to Section TOC Return to Section TOC Return to Master TOC Return to Master TOC Return to Master TOC Return to Master TOC...

Page 29: ...12 Code 10995 Options Accessories C1 1 Optional Field Installed Accessories C1 2 Plasma Cutting Option C1 2 TIG Welding Options C1 3 High Frequency Generators for TIG Applications C1 3 Wire Feeder Opt...

Page 30: ...ETHER START KIT Provides maximum cold weather starting assistance for frequent starting below 10 12 C Required Ether tank is not provided with kit K899 1 SPARK ARRESTOR KIT Easily mounts to standard m...

Page 31: ...te instructions on installation oper ation and maintenance WIRE FEEDER OPTIONS K449 LN 25 Wire Feeder Portable CC CV unit for flux cored and MIG welding Includes Gas Solenoid Internal Contactor K126 2...

Page 32: ...NOTES C1 4 C1 4 VANTAGE 500 Return to Section TOC Return to Section TOC Return to Section TOC Return to Section TOC Return to Master TOC Return to Master TOC Return to Master TOC Return to Master TOC...

Page 33: ...stem D1 8 Cooling Blower Belt D1 8 Engine Maintenance Schedules and Parts D1 9 Battery Maintenance D1 10 Cleaning the Battery D1 10 Checking Specific Gravity D1 10 Checking Electrolyte Level D1 10 Cha...

Page 34: ...r a summary of maintenance inter vals for the items listed below Follow either the hourly or the calendar intervals whichever come first More frequent service may be required depending on your specifi...

Page 35: ...ntil the gasket is evenly seated Then turn it down another 1 2 turn Do not overtighten the new filter 5 Refill the engine with the proper amount and type of oil as described in the Change the Oil sect...

Page 36: ...d to remove the plug 4 Using a pair of pliers gently tug on the pull tabs of the pre filter screen in an alternating pattern to gradually remove the pre filter screen 5 Brush off any debris and rinse...

Page 37: ...click you have not rotated the ring far enough and the element is not in the locked position Another indication that the ring is in the locked position is that one set it doesn t matter which one of...

Page 38: ...one inch away from the ele ment Water Hose 40 psi maximum without nozzle 4 Soak the element in a mild detergent solution for 15 minutes Do not soak more than 24 hours Swish the element around in the...

Page 39: ...7 D1 7 VANTAGE 500 MAINTENANCE INSTRUCTIONS Return to Section TOC Return to Section TOC Return to Section TOC Return to Section TOC Return to Master TOC Return to Master TOC Return to Master TOC Retur...

Page 40: ...ne 7 See Figure D1 4 Loosen the alternator mounting bolts 1 2 3 and rotate the alternator toward the engine 8 Remove the old cooling blower belt and install a new one 9 Push outward on the alternator...

Page 41: ...r Refer to your Deutz engine operation manual for periodic maintenance at 100 hours and beyond 1 125 Hours for severe conditions TABLE D1 2 ENGINE MAINTENANCE PARTS ITEM Air Cleaner Element Cooling Bl...

Page 42: ...accumulation on the battery can lead to more rapid discharge and early battery failure CHECKING SPECIFIC GRAVITY Check each battery cell with a hydrometer A fully charged battery will have a specific...

Page 43: ...sufficient grease to last indefinitely under normal service Where the welder is used constantly or in excessively dirty loca tions it may be necessary to add one half ounce of grease per year A pad o...

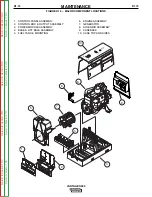
Page 44: ...BOX OUTPUT ASSEMBLY 3 POWER MODULE ASSEMBLY 4 BASE LIFT BALE ASSEMBLY 5 FUEL TANK MOUNTING 6 ENGINE ASSEMBLY 7 GENERATOR 8 SOLENOID ASSEMBLY 9 CASEBACK 10 CASE TOP AND SIDES Return to Section TOC Retu...

Page 45: ...4 Towing A2 4 Vehicle Mounting A2 4 Pre Operation Engine Service A2 5 Oil A2 5 Fuel A2 5 Fuel Cap A2 5 Engine Cooling System A2 5 Battery Connection A2 5 Muffler Outlet Pipe A2 6 Spark Arrester A2 6 H...

Page 46: ...lti purpose 35 volts PHYSICAL DIMENSIONS Height 2 Width Depth Weight 42 0 in 31 5 in 63 1 in 1532lbs 1066 8 mm 800 1mm 1603mm 695kg Approx 1 Output rating in watts is equivalent to volt amperes at uni...

Page 47: ...directly under stationary or fixed electrical equipment that surface should be covered with a steel plate at least 06 1 6mm thick which should extend not less than 5 90 150mm beyond the equipment on a...

Page 48: ...for use with this equipment for road in plant and yard towing by a vehicle1 is Lincoln s K953 1 If the user adapts a non Lincoln trail er he must assume responsibility that the method of attachment a...

Page 49: ...ndations Running out of fuel may require bleeding the fuel injection pump NOTE Before starting the engine open the fuel shut off valve pointer to be in line with hose FUEL CAP Remove the plastic cap c...

Page 50: ...rsely affect performance HIGH FREQUENCY GENERATORS FOR TIG APPLICATIONS The K799 Hi Freq Unit obsolete and the K930 1 or 2 TIG Module are suitable for use with the Vantage 500 The Vantage 500 is equip...

Page 51: ...ork of a building which has been effectively grounded The U S National Electrical Code lists a number of alternate means of grounding electrical equipment A machine grounding stud marked with the symb...

Page 52: ...40 VAC plug NEMA Type 14 50 to the double pole circuit breaker using four conductor cable of the proper size and desired length The 50 amp 120 240 VAC plug is avail able in the optional K802R plug kit...

Page 53: ...Power Controls B2 6 Engine Operation B2 7 Starting the Engine B2 7 Stopping the Engine B2 7 Break In Period B2 7 Typical Fuel Consumption B2 7 Welder Operation B2 8 Stick Welding B2 8 Constant Curren...

Page 54: ...th the hinged door closed and the side panels in place as these provide maxi mum protection from moving parts and insure proper cooling air flow GENERAL DESCRIPTION The Vantage 500 is a diesel engine...

Page 55: ...ol panel Arc Control potentiometer in Wire and Stick modes for precise adjustment of arc characteristics Advanced circuitry to prevent pop outs in the five slope modes FOR AUXILIARY POWER 12 000 watts...

Page 56: ...TER The hour meter displays the total time that the engine has been running This meter is a useful indicator for scheduling preventive maintenance 4 FUEL LEVEL GAUGE Displays the level of diesel fuel...

Page 57: ...ollows A In the High position the engine runs at the high idle speed controlled by the governor B In the Auto position the idler operates as follows a When switched from High to Auto or after starting...

Page 58: ...more forceful digging arc Crisp Increasing the number from 10 Soft to 10 Crisp increases the short circuit current which results in a more forceful digging arc Typically a forceful digging arc is pref...

Page 59: ...main on until the engine is started 6 Within 30 seconds press and hold the engine START button until the engine starts If the engine does not start within 30 seconds the RUN STOP switch must be return...

Page 60: ...CH START TIG setting of the MODE switch is for DC TIG Tungsten Inert Gas welding To initiate a weld the OUTPUT CONTROL knob is first set to the desired current and the tungsten is touched to the work...

Page 61: ...2 4 4 5 6 0 020 50 5 20 3 5 10 3 5 5 10 3 5 0 40 1 0 15 80 3 5 10 3 5 5 10 3 5 1 16 1 6 70 150 10 20 5 10 3 5 9 13 4 6 5 6 3 32 2 4 150 250 15 30 13 17 6 8 11 15 5 7 6 7 8 1 8 3 2 250 400 25 40 15 23...

Page 62: ...output can be split to provide two separate 120 VAC outputs with a maxi mum permissible current of 50 A per output to two sep arate 120 VAC branch circuits Output voltage is within 10 at all loads up...

Page 63: ...RD RECOMMENDATIONS An extension cord can be used with the auxiliary power outputs as long as it is of ample size Table B 5 lists permissible extension cord lengths based on conduc tor size and auxilia...

Page 64: ...OTES B2 12 B2 12 VANTAGE 500 Return to Section TOC Return to Section TOC Return to Section TOC Return to Section TOC Return to Master TOC Return to Master TOC Return to Master TOC Return to Master TOC...

Page 65: ...Codes 11180 11415 Options Accessories C2 2 Optional Field Installed Accessories C2 2 TIG Welding Options C2 3 Plasma Cutting Option C2 2 High Frequency Generators for TIG Applications C2 3 Wire Feeder...

Page 66: ...1 Cable Rack K887 1 ETHER START KIT Provides maximum cold weather starting assistance for frequent starting below 10 12 C Required Ether tank is not provided with kit K899 1 SPARK ARRESTOR KIT Easily...

Page 67: ...nstructions on installation oper ation and maintenance WIRE FEEDER OPTIONS K449 LN 25 Wire Feeder Portable CC CV unit for flux cored and MIG welding Includes Gas Solenoid Internal Contactor K126 2 Mag...

Page 68: ...NOTES C2 4 C2 4 VANTAGE 500 Return to Section TOC Return to Section TOC Return to Section TOC Return to Section TOC Return to Master TOC Return to Master TOC Return to Master TOC Return to Master TOC...

Page 69: ...D2 7 Cooling Blower Belt D2 7 Engine Maintenance Schedules and Parts D2 8 Welder Generator Maintenance D2 8 Storage D2 8 Cleaning D2 8 Nameplates D2 8 Brush Removal and Replacement D2 8 Bearings D2 8...

Page 70: ...ry cable before ser vicing the engine See the Service Plan section of the Engine Operation Manual for a summary of maintenance intervals for the items listed below Follow either the hourly or the cal...

Page 71: ...evenly seated Then turn it down another 1 2 turn Do not overtighten the new filter 5 Refill the engine with the proper amount and type of oil as described in the Change the Oil section Start the engi...

Page 72: ...tening will distort the threads filter element seal or filter can There is also a filter screen in the fuel pump that should be checked whenever the Fuel Filter Water Separator maintenance is performe...

Page 73: ...24 hours Swish the element around in the solution to help remove dirt 5 Rinse elements from inside out with a gentle stream of water less than 40 psi to remove all suds and dirt 6 Dry the element befo...

Page 74: ...6 D2 6 VANTAGE 500 MAINTENANCE INSTRUCTIONS Return to Section TOC Return to Section TOC Return to Section TOC Return to Section TOC Return to Master TOC Return to Master TOC Return to Master TOC Retur...

Page 75: ...at the uppper right mounting bolt of the pulley guard 9 See Figure D3 5 Loosen the idler pulley mounting bolt and move the pulley toward the engine 10 Remove the old cooling blower belt and install a...

Page 76: ...cient grease to last indefinitely under normal service Where the welder is used constantly or in excessively dirty locations it may be necessary to add one half ounce of grease per year A pad of greas...

Page 77: ...accumulation on the battery can lead to more rapid discharge and early battery failure CHECKING SPECIFIC GRAVITY Check each battery cell with a hydrometer A fully charged battery will have a specific...

Page 78: ...2 CONTROL BOX OUTPUT ASSEMBLY 3 POWER MODULE ASSEMBLY 4 BASE LIFT BALE ASSEMBLY 5 FUEL TANK MOUNTING 6 ENGINE ASSEMBLY 7 GENERATOR 8 SOLENOID ASSEMBLY 9 CASEBACK 10 CASE TOP AND SIDES Return to Sectio...

Page 79: ...owing A3 4 Vehicle Mounting A3 4 Pre Operation Engine Service A3 5 Oil A3 5 Fuel A3 5 Fuel Cap A3 5 Engine Cooling System A3 5 Battery Connection A3 5 Muffler Outlet Pipe A3 6 Spark Arrester A3 6 High...

Page 80: ...0 575 Amps DC multi purpose 35 volts PHYSICAL DIMENSIONS Height 2 Width Depth Weight 42 0 in 31 5 in 63 1 in 1532lbs 1066 8 mm 800 1mm 1603mm 695kg Approx 1 Output rating in watts is equivalent to vol...

Page 81: ...directly under stationary or fixed electrical equipment that surface should be covered with a steel plate at least 06 1 6mm thick which should extend not less than 5 90 150mm beyond the equipment on a...

Page 82: ...ler for use with this equipment for road in plant and yard towing by a vehicle1 is Lincoln s K2636 1 If the user adapts a non Lincoln trailer he must assume responsibility that the method of attachmen...

Page 83: ...eding the fuel injection pump NOTE Before starting the engine open the fuel shutoff valve pointer to be in line with hose NOTE Before starting the engine open the fuel shut off valve pointer to be in...

Page 84: ...rsely affect performance HIGH FREQUENCY GENERATORS FOR TIG APPLICATIONS The K799 Hi Freq Unit obsolete and the K930 1 or 2 TIG Module are suitable for use with the Vantage 500 The Vantage 500 is equip...

Page 85: ...ork of a building which has been effectively grounded The U S National Electrical Code lists a number of alternate means of grounding electrical equipment A machine grounding stud marked with the symb...

Page 86: ...40 VAC plug NEMA Type 14 50 to the double pole circuit breaker using four conductor cable of the proper size and desired length The 50 amp 120 240 VAC plug is avail able in the optional K802R plug kit...

Page 87: ...wer Controls B3 6 Engine Operation B3 7 Starting the Engine B3 7 Stopping the Engine B3 7 Break In Period B3 7 Typical Fuel Consumption B3 7 Welder Operation B3 8 Stick Welding B3 8 Constant Current C...

Page 88: ...th the hinged door closed and the side panels in place as these provide maxi mum protection from moving parts and insure proper cooling air flow GENERAL DESCRIPTION The Vantage 500 is a diesel engine...

Page 89: ...ol panel Arc Control potentiometer in Wire and Stick modes for precise adjustment of arc characteristics Advanced circuitry to prevent pop outs in the five slope modes FOR AUXILIARY POWER 12 000 watts...

Page 90: ...TER The hour meter displays the total time that the engine has been running This meter is a useful indicator for scheduling preventive maintenance 4 FUEL LEVEL GAUGE Displays the level of diesel fuel...

Page 91: ...ollows A In the High position the engine runs at the high idle speed controlled by the governor B In the Auto position the idler operates as follows a When switched from High to Auto or after starting...

Page 92: ...more forceful digging arc Crisp Increasing the number from 10 Soft to 10 Crisp increases the short circuit current which results in a more forceful digging arc Typically a forceful digging arc is pref...

Page 93: ...main on until the engine is started 6 Within 30 seconds press and hold the engine START button until the engine starts If the engine does not start within 30 seconds the RUN STOP switch must be return...

Page 94: ...welding applications The TOUCH START TIG setting of the MODE switch is for DC TIG Tungsten Inert Gas welding To initiate a weld the OUTPUT CONTROL knob is first set to the desired current and the tun...

Page 95: ...2 4 4 5 6 0 020 50 5 20 3 5 10 3 5 5 10 3 5 0 40 1 0 15 80 3 5 10 3 5 5 10 3 5 1 16 1 6 70 150 10 20 5 10 3 5 9 13 4 6 5 6 3 32 2 4 150 250 15 30 13 17 6 8 11 15 5 7 6 7 8 1 8 3 2 250 400 25 40 15 23...

Page 96: ...output can be split to provide two separate 120 VAC outputs with a maxi mum permissible current of 50 A per output to two sep arate 120 VAC branch circuits Output voltage is within 10 at all loads up...

Page 97: ...RD RECOMMENDATIONS An extension cord can be used with the auxiliary power outputs as long as it is of ample size Table B 5 lists permissible extension cord lengths based on conduc tor size and auxilia...

Page 98: ...OTES B3 12 B3 12 VANTAGE 500 Return to Section TOC Return to Section TOC Return to Section TOC Return to Section TOC Return to Master TOC Return to Master TOC Return to Master TOC Return to Master TOC...

Page 99: ...Codes 11180 11415 Options Accessories C3 2 Optional Field Installed Accessories C3 2 Plasma Cutting Option C3 2 TIG Welding Options C3 3 High Frequency Generators for TIG Applications C3 3 Wire Feeder...

Page 100: ...1 Cable Rack K887 1 ETHER START KIT Provides maximum cold weather starting assistance for frequent starting below 10 12 C Required Ether tank is not provided with kit K899 1 SPARK ARRESTOR KIT Easily...

Page 101: ...nstructions on installation oper ation and maintenance WIRE FEEDER OPTIONS K449 LN 25 Wire Feeder Portable CC CV unit for flux cored and MIG welding Includes Gas Solenoid Internal Contactor KP653 3 32...

Page 102: ...NOTES C3 4 C3 4 VANTAGE 500 Return to Section TOC Return to Section TOC Return to Section TOC Return to Section TOC Return to Master TOC Return to Master TOC Return to Master TOC Return to Master TOC...

Page 103: ...7 Cooling Blower Belt D3 7 Engine Maintenance Schedules and Parts D3 8 Welder Generator Maintenance D3 8 Storage D3 8 Cleaning D3 8 Nameplates D3 8 Brush Removal and Replacement D3 8 Bearings D3 8 Re...

Page 104: ...ry cable before ser vicing the engine See the Service Plan section of the Engine Operation Manual for a summary of maintenance intervals for the items listed below Follow either the hourly or the cal...

Page 105: ...evenly seated Then turn it down another 1 2 turn Do not overtighten the new filter 5 Refill the engine with the proper amount and type of oil as described in the Change the Oil section Start the engi...

Page 106: ...tening will distort the threads filter element seal or filter can There is also a filter screen in the fuel pump that should be checked whenever the Fuel Filter Water Separator maintenance is performe...

Page 107: ...24 hours Swish the element around in the solution to help remove dirt 5 Rinse elements from inside out with a gentle stream of water less than 40 psi to remove all suds and dirt 6 Dry the element befo...

Page 108: ...6 D3 6 VANTAGE 500 MAINTENANCE INSTRUCTIONS Return to Section TOC Return to Section TOC Return to Section TOC Return to Section TOC Return to Master TOC Return to Master TOC Return to Master TOC Retur...

Page 109: ...r right mounting bolt of the pulley guard 8 See Figure D3 5 Loosen the idler pulley mounting bolt and move the pulley toward the engine 9 Remove the old cooling blower belt and install a new one 10 Pu...

Page 110: ...cient grease to last indefinitely under normal service Where the welder is used constantly or in excessively dirty locations it may be necessary to add one half ounce of grease per year A pad of greas...

Page 111: ...accumulation on the battery can lead to more rapid discharge and early battery failure CHECKING SPECIFIC GRAVITY Check each battery cell with a hydrometer A fully charged battery will have a specific...

Page 112: ...2 CONTROL BOX OUTPUT ASSEMBLY 3 POWER MODULE ASSEMBLY 4 BASE LIFT BALE ASSEMBLY 5 FUEL TANK MOUNTING 6 ENGINE ASSEMBLY 7 GENERATOR 8 SOLENOID ASSEMBLY 9 CASEBACK 10 CASE TOP AND SIDES Return to Sectio...

Page 113: ...Towing A4 4 Vehicle Towing A4 4 Pre Operation Engine Service A4 5 Oil A4 5 Fuel A4 5 Fuel Cap A4 5 Engine Cooling System A4 5 Battery Connection A4 5 Muffler Outlet Pipe A4 6 Spark Arrester A4 6 High...

Page 114: ...rpose 36 volts 50 575 Amps DC multi purpose 35 volts PHYSICAL DIMENSIONS Height 2 Width Depth Weight 42 0 in 31 5 in 63 1 in 1605 lbs 1066 8 mm 800 1mm 1603mm 728kg Approx 1 Output rating in watts is...

Page 115: ...directly under stationary or fixed electrical equipment that surface should be covered with a steel plate at least 06 1 6mm thick which should extend not less than 5 90 150mm beyond the equipment on a...

Page 116: ...iler for use with this equipment for road in plant and yard towing by a vehicle1 is Lincoln s K953 1 If the user adapts a non Lincoln trail er he must assume responsibility that the method of attachme...

Page 117: ...ction pump NOTE Before starting the engine open the fuel shutoff valve pointer to be in line with hose NOTE Before starting the engine open the fuel shut off valve pointer to be in line with hose FUEL...

Page 118: ...rsely affect performance HIGH FREQUENCY GENERATORS FOR TIG APPLICATIONS The K799 Hi Freq Unit obsolete and the K930 1 or 2 TIG Module are suitable for use with the Vantage 500 The Vantage 500 is equip...

Page 119: ...ork of a building which has been effectively grounded The U S National Electrical Code lists a number of alternate means of grounding electrical equipment A machine grounding stud marked with the symb...

Page 120: ...40 VAC plug NEMA Type 14 50 to the double pole circuit breaker using four conductor cable of the proper size and desired length The 50 amp 120 240 VAC plug is avail able in the optional K802R plug kit...

Page 121: ...iliary Power Controls B4 6 Engine Operation B4 7 Starting the Engine B4 7 Stopping the Engine B4 7 Typical Fuel Consumption B4 7 Welder Operation B4 8 Stick Welding B4 8 Constant Current CC Welding B4...

Page 122: ...e this equipment ADDITIONAL SAFETY PRECAUTIONS Always operate the welder with the hinged door closed and the side panels in place as these provide maxi mum protection from moving parts and insure prop...

Page 123: ...control panel Arc Control potentiometer in Wire and Stick modes for precise adjustment of arc characteristics Advanced circuitry to prevent pop outs in the five slope modes FOR AUXILIARY POWER 12 000...

Page 124: ...R METER The hour meter displays the total time that the engine has been running This meter is a useful indicator for scheduling preventive maintenance 4 FUEL LEVEL GAUGE Displays the level of diesel f...

Page 125: ...e will operate at full speed for approximately 12 seconds and then go to low idle speed b When the electrode touches the work or power is drawn for lights or tools approximately 100 Watts minimum the...

Page 126: ...more forceful digging arc Crisp Increasing the number from 10 Soft to 10 Crisp increases the short circuit current which results in a more forceful digging arc Typically a forceful digging arc is pref...

Page 127: ...6 Within 30 seconds press and hold the engine START button until the engine starts If the engine does not start within 30 seconds the RUN STOP switch must be returned to the STOP position then return...

Page 128: ...d puddle control and deposition stacking of iron are key to fast travel speeds It is recommend ed that the ARC CONTROL be set initially at 0 TOUCH START TIG MODE The Vantage can be used in a wide vari...

Page 129: ...2 4 4 5 6 0 020 50 5 20 3 5 10 3 5 5 10 3 5 0 40 1 0 15 80 3 5 10 3 5 5 10 3 5 1 16 1 6 70 150 10 20 5 10 3 5 9 13 4 6 5 6 3 32 2 4 150 250 15 30 13 17 6 8 11 15 5 7 6 7 8 1 8 3 2 250 400 25 40 15 23...

Page 130: ...output can be split to provide two separate 120 VAC outputs with a maxi mum permissible current of 50 A per output to two sep arate 120 VAC branch circuits Output voltage is within 10 at all loads up...

Page 131: ...RD RECOMMENDATIONS An extension cord can be used with the auxiliary power outputs as long as it is of ample size Table B 5 lists permissible extension cord lengths based on conduc tor size and auxilia...

Page 132: ...OTES B4 12 B4 12 VANTAGE 500 Return to Section TOC Return to Section TOC Return to Section TOC Return to Section TOC Return to Master TOC Return to Master TOC Return to Master TOC Return to Master TOC...

Page 133: ...3 Code 10996 Options Accessories C4 1 Optional Field Installed Accessories C4 2 Plasma Cutting Option C4 2 TIG Welding Options C4 3 High Frequency Generators for TIG Applications C4 3 Wire Feeder Opt...

Page 134: ...SPARK ARRESTOR KIT Easily mounts to standard muffler K949 1 Oil Drain Kit includes ball valve hose and clamp K1816 1 Full KVA Adapter Kit Plugs into the 120 240V NEMA 14 50R receptacle on the case fr...

Page 135: ...nstructions on installation oper ation and maintenance WIRE FEEDER OPTIONS K449 LN 25 Wire Feeder Portable CC CV unit for flux cored and MIG welding Includes Gas Solenoid Internal Contactor K126 2 Mag...

Page 136: ...NOTES C4 4 C4 4 VANTAGE 500 Return to Section TOC Return to Section TOC Return to Section TOC Return to Section TOC Return to Master TOC Return to Master TOC Return to Master TOC Return to Master TOC...

Page 137: ...r Filter D4 5 Engine Maintenance Schedules and Parts D4 7 Welder Generator Maintenance D4 7 Storage D4 7 Cleaning D4 7 Nameplates D4 7 Brush Removal and Replacement D4 7 Bearings D4 7 Receptacles D4 7...

Page 138: ...ating conditions OIL Check the oil level after every 8 hours of operation or daily BE SURE TO MAINTAIN THE OIL LEVEL Change the oil the first time between 25 and 50 hours of operation Then under norma...

Page 139: ...om for the fuel to expand Refer to your engine operation manual for recom mended grade of fuel COOLING SYSTEM To avoid scalding do not loosen or remove the radiator cap while the engine is hot The VAN...

Page 140: ...ean lubricating oil 4 Install the filter as specified by the filter manufactur er 5 Open the fuel valve and check for leaks Mechanical overtightening will distort the threads filter element seal or fi...

Page 141: ...he element around in the solution to help remove dirt 5 Rinse elements from inside out with a gentle stream of water less than 40 psi to remove all suds and dirt 6 Dry the element before reuse with wa...

Page 142: ...6 D4 6 VANTAGE 500 MAINTENANCE INSTRUCTIONS Return to Section TOC Return to Section TOC Return to Section TOC Return to Section TOC Return to Master TOC Return to Master TOC Return to Master TOC Retur...

Page 143: ...fittings completely clean and use clean equipment More bearing failures are caused by dirt introduced during greasing than from insufficient grease RECEPTACLES Keep the electrical receptacles in good...

Page 144: ...ccumulation on the battery can lead to more rapid discharge and early battery failure CHECKING SPECIFIC GRAVITY Check each battery cell with a hydrometer A fully charged battery will have a specific g...

Page 145: ...TPUT ASSEMBLY 3 POWER MODULE ASSEMBLY 4 BASE LIFT BALE ASSEMBLY 5 FUEL TANK MOUNTING 6A ENGINE ASSEMBLY 7 GENERATOR FRAME 8 SOLENOID ASSEMBLY 9 CASEBACK 10 CASE TOP AND SIDES Return to Section TOC Ret...

Page 146: ...OTES D4 10 D4 10 VANTAGE 500 Return to Section TOC Return to Section TOC Return to Section TOC Return to Section TOC Return to Master TOC Return to Master TOC Return to Master TOC Return to Master TOC...

Page 147: ...4 Towing A5 4 Vehicle Mounting A5 4 Pre Operation Engine Service A5 5 Oil A5 5 Fuel A5 5 Fuel Cap A5 5 Engine Cooling System A5 5 Battery Connection A5 5 Muffler Outlet Pipe A5 6 Spark Arrester A5 6 H...

Page 148: ...mps DC multi purpose 35 volts PHYSICAL DIMENSIONS Height 2 Width Depth Weight 42 0 in 31 5 in 63 1 in 1443lbs 1066 8 mm 800 1mm 1603mm 655kg Approx 1 Output rating in watts is equivalent to volt amper...

Page 149: ...directly under stationary or fixed electrical equipment that surface should be covered with a steel plate at least 06 1 6mm thick which should extend not less than 5 90 150mm beyond the equipment on a...

Page 150: ...iler for use with this equipment for road in plant and yard towing by a vehicle1 is Lincoln s K953 1 If the user adapts a non Lincoln trail er he must assume responsibility that the method of attachme...

Page 151: ...ction pump NOTE Before starting the engine open the fuel shutoff valve pointer to be in line with hose NOTE Before starting the engine open the fuel shut off valve pointer to be in line with hose FUEL...

Page 152: ...rsely affect performance HIGH FREQUENCY GENERATORS FOR TIG APPLICATIONS The K799 Hi Freq Unit obsolete and the K930 1 or 2 TIG Module are suitable for use with the Vantage 500 The Vantage 500 is equip...

Page 153: ...ork of a building which has been effectively grounded The U S National Electrical Code lists a number of alternate means of grounding electrical equipment A machine grounding stud marked with the symb...

Page 154: ...40 VAC plug NEMA Type 14 50 to the double pole circuit breaker using four conductor cable of the proper size and desired length The 50 amp 120 240 VAC plug is avail able in the optional K802R plug kit...

Page 155: ...Auxiliary Power Controls B5 6 Engine Operation B5 7 Starting the Engine B5 7 Stopping the Engine B5 7 Typical Fuel Consumption B5 7 Welder Operation B5 8 Stick Welding B5 8 Constant Current CC Weldin...

Page 156: ...te this equipment ADDITIONAL SAFETY PRECAUTIONS Always operate the welder with the hinged door closed and the side panels in place as these provide maxi mum protection from moving parts and insure pro...

Page 157: ...ntrol potentiometer in Wire and Stick modes for precise adjustment of arc characteristics Advanced circuitry to prevent pop outs in the five slope modes FOR AUXILIARY POWER 12 000 watts of 120 240 VAC...

Page 158: ...METER The hour meter displays the total time that the engine has been running This meter is a useful indicator for scheduling preventive maintenance 4 FUEL LEVEL GAUGE Displays the level of diesel fue...

Page 159: ...ollows A In the High position the engine runs at the high idle speed controlled by the governor B In the Auto position the idler operates as follows a When switched from High to Auto or after starting...

Page 160: ...more forceful digging arc Crisp Increasing the number from 10 Soft to 10 Crisp increases the short circuit current which results in a more forceful digging arc Typically a forceful digging arc is pref...

Page 161: ...light may turn off after 5 seconds or remain on until the engine is started 6 Within 30 seconds press and hold the engine START button until the engine starts If the engine does not start within 30 s...

Page 162: ...d puddle control and deposition stacking of iron are key to fast travel speeds It is recommend ed that the ARC CONTROL be set initially at 0 TOUCH START TIG MODE The Vantage can be used in a wide vari...

Page 163: ...2 4 4 5 6 0 020 50 5 20 3 5 10 3 5 5 10 3 5 0 40 1 0 15 80 3 5 10 3 5 5 10 3 5 1 16 1 6 70 150 10 20 5 10 3 5 9 13 4 6 5 6 3 32 2 4 150 250 15 30 13 17 6 8 11 15 5 7 6 7 8 1 8 3 2 250 400 25 40 15 23...

Page 164: ...s turn the WELD MODE switch to the CC STICK position Operation in other modes may produce erratic outputs and large output imbalances between the units AUXILIARY POWER OPERATION If a GFCI receptacle i...

Page 165: ...1 AND 3 PHASE WATTS AMPS 50 50 50 12 000 10 000 5 600 0 0 PLUS OR OR TABLE B5 5 VANTAGE 500 CUMMINS Extension Cord Length Recommendations Current Amps 15 15 20 20 25 30 38 50 Voltage Volts 120 240 120...

Page 166: ...OTES B5 12 B5 12 VANTAGE 500 Return to Section TOC Return to Section TOC Return to Section TOC Return to Section TOC Return to Master TOC Return to Master TOC Return to Master TOC Return to Master TOC...

Page 167: ...Codes 11181 11416 Options Accessories C5 1 Optional Field Installed Accessories C5 2 Plasma Cutting Option C5 2 TIG Welding Options C5 3 High Frequency Generators for TIG Applications C5 3 Wire Feeder...

Page 168: ...SPARK ARRESTOR KIT Easily mounts to standard muffler K949 1 Oil Drain Kit includes ball valve hose and clamp K1816 1 Full KVA Adapter Kit Plugs into the 120 240V NEMA 14 50R receptacle on the case fr...

Page 169: ...nstructions on installation oper ation and maintenance WIRE FEEDER OPTIONS K449 LN 25 Wire Feeder Portable CC CV unit for flux cored and MIG welding Includes Gas Solenoid Internal Contactor K126 2 Mag...

Page 170: ...NOTES C5 4 C5 4 VANTAGE 500 Return to Section TOC Return to Section TOC Return to Section TOC Return to Section TOC Return to Master TOC Return to Master TOC Return to Master TOC Return to Master TOC...

Page 171: ...r Filter D5 5 Engine Maintenance Schedules and Parts D5 7 Welder Generator Maintenance D5 7 Storage D5 7 Cleaning D5 7 Nameplates D5 7 Brush Removal and Replacement D5 7 Bearings D5 7 Receptacles D5 7...

Page 172: ...ting conditions OIL Check the oil level after every 8 hours of operation or daily BE SURE TO MAINTAIN THE OIL LEVEL Change the oil the first time between 25 and 50 hours of operation Then under normal...

Page 173: ...om for the fuel to expand Refer to your engine operation manual for recom mended grade of fuel COOLING SYSTEM To avoid scalding do not loosen or remove the radiator cap while the engine is hot The VAN...

Page 174: ...ean lubricating oil 4 Install the filter as specified by the filter manufactur er 5 Open the fuel valve and check for leaks Mechanical overtightening will distort the threads filter element seal or fi...

Page 175: ...e element around in the solution to help remove dirt 5 Rinse elements from inside out with a gentle stream of water less than 40 psi to remove all suds and dirt 6 Dry the element before reuse with war...

Page 176: ...6 D5 6 VANTAGE 500 MAINTENANCE INSTRUCTIONS Return to Section TOC Return to Section TOC Return to Section TOC Return to Section TOC Return to Master TOC Return to Master TOC Return to Master TOC Retur...

Page 177: ...fittings completely clean and use clean equipment More bearing failures are caused by dirt introduced during greasing than from insufficient grease RECEPTACLES Keep the electrical receptacles in good...

Page 178: ...ccumulation on the battery can lead to more rapid discharge and early battery failure CHECKING SPECIFIC GRAVITY Check each battery cell with a hydrometer A fully charged battery will have a specific g...

Page 179: ...UTPUT ASSEMBLY 3 POWER MODULE ASSEMBLY 4 BASE LIFT BALE ASSEMBLY 5 FUEL TANK MOUNTING 6A ENGINE ASSEMBLY 7 GENERATOR FRAME 8 SOLENOID ASSEMBLY 9 CASEBACK 10 CASE TOP AND SIDES Return to Section TOC Re...

Page 180: ...OTES D5 10 D5 10 VANTAGE 500 Return to Section TOC Return to Section TOC Return to Section TOC Return to Section TOC Return to Master TOC Return to Master TOC Return to Master TOC Return to Master TOC...

Page 181: ...e Feeder No 120 VAC on EURO Models THREE PHASE RECTIFIER __ __ TO WELD CONTROL BOARD _ _ START BUTTON BATTERY ON STARTER 12 VDC RUN ENGINE SENSORS OIL PRESSURE WATER TEMP PERIPHERAL PCB PULL COIL PCB...

Page 182: ...MS typel Connector The engine alternator supplies charging current for the battery circuit The Peripheral board monitors the engine sensors and will shut the engine off in the event of low oil pressu...

Page 183: ...erminals and current feedback from the shunt is fed to the Weld Control PC board as a means of controlling the output NOTE Unshaded areas of Block Logic Diagram are the subject of discussion ENGINE RO...

Page 184: ...GINE ROTOR STATOR AUXILIARY WINDINGS W E L D W I N D I G MECHANICAL ROTATION ALTERNATOR OUTPUT CONTROL MODE SELECT SWITCH SLIP RINGS ARC CONTROL WELD CONTROL BOARD VOLTMETER AMMETER 42 VAC and 120VAC...

Page 185: ...nal a positive DC voltage relative to the source is applied to the gate terminal of the IGBT the device is capable of conducting current A voltage sup ply connected to the drain terminal will allow th...

Page 186: ...up conducting for 2 microsecond The dwell time off time is 48 microseconds Since only 2 microsec onds of the 50 microsecond time period is devoted to conducting the output power is minimized MAXIMUM O...

Page 187: ...rolled The following diagram depicts the current flow in the system when the switch is open and closed When the switch is closed current is applied through the inductor to the arc When the switch open...

Page 188: ...NOTES E 8 E 8 VANTAGE 500 Return to Section TOC Return to Section TOC Return to Section TOC Return to Section TOC Return to Master TOC Return to Master TOC Return to Master TOC Return to Master TOC...

Page 189: ...st F 31 Stator Voltage Test F 33 Output Rectifier Bridge Test F 37 Electronic Governor Test F 43 Charging Circuit Test F 45 Oscilloscope Waveforms F 47 Normal Open Circuit Voltage Waveform 115VAC Supp...

Page 190: ...nents in the order listed to eliminate one possibility at a time until you locate the cause of your problem All of the referenced test procedures referred to in the Troubleshooting Guide are described...

Page 191: ...per plastic or cloth which could have a static charge If the PC board can t be installed immediately put it back in the static shield ing bag If the PC board uses protective shorting jumpers don t rem...

Page 192: ...iring Diagram 2 With the engine at high idle 1900RPM the machine in the Stick mode and the OUTPUT CONTROL at maximum check for the presence of approxi mately 87VDC open circuit volt age at the output...

Page 193: ...rm the Flashing and Rotor Voltage Test If the flashing voltage is not pre sent the leads 6 5H 200B 201 or 200 may be faulty See the Wiring Diagram Also make sure that lead 5P has continuity zero ohms...

Page 194: ...age feedback leads for loose or faulty con nections See the Wiring Diagram 4 Perform the Chopper Module Test 5 The Weld Control PC board may be faulty 6 Pull coil board may be faulty Except tier II Cu...

Page 195: ...mote control unit may be defective 3 Check the Amphenol connec tions and associated wiring 1 Check Plug J11 on the Weld Control PC board for loose or faulty connections 2 The Weld Control PC board may...

Page 196: ...y be faulty 3 The wire feeder may be faulty 1 Check for the presence of appropriate source voltage at the 14 pin amphenol 2 If the appropriate voltage 42 VAC or 115 VAC is NOT pre sent at the 14 pin a...

Page 197: ...engine oil temperature may be too high Check cooling sys tem 4 The battery voltage may be too low 5 ON OFF switch has been on for more than 30 seconds before starting cycle switch OFF then ON 1 The s...

Page 198: ...C board should normally supply 10VDC to the shutdown solenoid via leads 252 and 262 See the Wiring Diagram except tier II Cummins code 11181 4 Tier II Cummins electronic gov ernor control board may be...

Page 199: ...nsing toroid for loose or faulty con nections See the Wiring Diagram 2 Make sure leads 3 and 6A pass through the toroid twice in opposite directions 3 The current sensing toroid may be faulty 4 Pull c...

Page 200: ...ose connection on the heavy current carrying leads inside the Vantage 500 See the Wiring Diagram 2 If the OCV is low at the welder output terminals perform the Engine Throttle Adjustment Test 3 Perfor...

Page 201: ...assistance before you proceed Call 1 888 935 3877 TEST DESCRIPTION This procedure will aid the technician in the removal and replacement of the case sheet metal covers MATERIALS NEEDED 3 8 wrench 7 16...

Page 202: ...8 wrench remove the screws from the top front of the roof assembly and the screws from the sides of the control box Carefully lower the front control panel 6 With the 9 16 wrench remove the exhaust pi...

Page 203: ...e Department for electrical trou bleshooting assistance before you proceed Call 1 888 935 3877 TEST DESCRIPTION This procedure will insure that the large capacitors in the chopper modules have been di...

Page 204: ...acitors can be discharged by holding the resistor with insulated pliers and using the resistor terminals to bridge chopper module terminals B1 to B2 and B4 to B5 DO NOT TOUCH THE TER MINALS OR METAL P...

Page 205: ...the Lincoln Electric Service Department for electrical trou bleshooting assistance before you proceed Call 1 888 935 3877 TEST DESCRIPTION This test will help determine if the chopper module is shorte...

Page 206: ...wrench remove the negative jumper strap attaching the power capacitors to the Power Module PC Board 6 Check resistance with analog ohmmeter per the Chopper Test Table F 1 Note Make sure the bolts do...

Page 207: ...00k or higher B6 B4 400k or higher B2 B3 6k to 9k B3 B2 6k to 9k B4 B2 200k or higher B2 B4 400k or higher B4 B3 200k or higher B3 B4 400k or higher CHOPPER TEST CHOPPER TERMINAL CONNECTIONS OHMMETER...

Page 208: ...NOTES F 20 F 20 VANTAGE 500 Return to Section TOC Return to Section TOC Return to Section TOC Return to Section TOC Return to Master TOC Return to Master TOC Return to Master TOC Return to Master TOC...

Page 209: ...e you proceed Call 1 888 935 3877 TEST DESCRIPTION This test will determine if the idler solenoid is capable of functioning when it is energized with 12VDC MATERIALS NEEDED External 12VDC supply 30 am...

Page 210: ...l supply con nected to terminals 232M and 265 for longer than three seconds will damage the coil The solenoid should deactivate when the 12VDC is removed 6 If the solenoid does not operate properly ch...

Page 211: ...e before you proceed Call 1 888 935 3877 TEST DESCRIPTION This test will determine if the shutdown solenoid is capable of functioning when it is ener gized with 12VDC MATERIALS NEEDED External 12VDC s...

Page 212: ...he external supply con nected to terminals 232M and 265 for longer than three seconds will damage the coil The solenoid should deactivate when the 12VDC is removed 6 If the solenoid does not operate p...

Page 213: ...this test will determine whether the engine is operat ing at the correct speed RPM during both HIGH and LOW idle conditions Directions for adjusting the throttle to the correct RPM are given MATERIALS...

Page 214: ...500 RPM Cummins 1425 6 If either of the readings is incorrect adjust the throttle as follows Adjust HIGH IDLE Use the 10mm wrench to loosen the locking nut See Figure F 7 for location of the adjusting...

Page 215: ...t HIGH IDLE Use the 10mm wrench to loosen the locking nut See Figure F 7 for location of the adjusting screw and locking nut Turn the threaded screw counter clockwise to increase the HIGH IDLE speed A...

Page 216: ...nds Retighten the locking nut Adjust LOW IDLE First make sure there is no load on the machine Set the IDLE switch to AUTO and wait for the engine to change to low idle speed Use the 10mm wrench to loo...

Page 217: ...est procedures or are unable to perform the test repairs safely contact the Lincoln Electric Service Department for electrical trou bleshooting assistance before you proceed Call 1 888 935 3877 TEST D...

Page 218: ...ne meter probe on either of the slip rings Place the other probe on any good unpainted ground The resistance should be very high at least 500 000 ohms 7 If the test does not meet the resistance specif...

Page 219: ...ct the Lincoln Electric Service Department for electrical trou bleshooting assistance before you proceed Call 1 888 935 3877 TEST DESCRIPTION This test will determine if the correct DC voltage is bein...

Page 220: ...ge reading is low or not present the gen erator field is not functioning properly Perform the Rotor Resistance Test Also check the field diode rectifier bridge filter capacitor and associated leads an...

Page 221: ...test procedures or are unable to perform the test repairs safely contact the Lincoln Electric Service Department for electrical trou bleshooting assistance before you proceed Call 1 888 935 3877 TEST...

Page 222: ...the green ground lead will still be attached AUXILIARY POWER AND WELD WIND INGS TEST Start the engine and run at high idle 1900 RPM Do not load welding or auxiliary power See Figure F11 and the appro...

Page 223: ...ON BACK OF CONTROL PANEL STATOR VOLTAGE TEST CONTINUED TROUBLESHOOTING AND REPAIR F 35 F 35 VANTAGE 500 3A 236A 238B CB3 CB5 CB1 CB4 CB6 CB2 42B 6B 11 32A 12 5C GND C 5E GND D 8 9 5B J11 J10 GND E J1...

Page 224: ...also the Rotor Resistance Test 4 Also check leads 6F and 5P for loose or faulty connections to the field bridge See the Wiring Diagram 5 If the tests in Steps 6 and 7 are OK and the stator voltages ar...

Page 225: ...oln Electric Service Department for electrical trou bleshooting assistance before you proceed Call 1 888 935 3877 TEST DESCRIPTION This test will determine if the rectifier is grounded or if there are...

Page 226: ...rectifier as follows Mark leads W1 W2 and W3 so they can be prop erly reconnected after the test is complete Remove these leads and position them so they do not come in contact with any part of the r...

Page 227: ...diodes again Diodes should have a low resistance in one polarity and very high resistance in the opposite polarity See diode test Table F 2 One open diode will not be detected 13 Replace rectifier br...

Page 228: ...40 F 40 VANTAGE 500 FIGURE F 15 DIODE LEAD REMOVAL AC 1 D C D C 1 2 3 AC DC DC AC 1 2 3 1 2 3 Return to Section TOC Return to Section TOC Return to Section TOC Return to Section TOC Return to Master...

Page 229: ...Bias High Resistance AC2 DC ReverseBias High Resistance AC3 DC ReverseBias High Resistance DC AC1 ReverseBias High Resistance DC AC2 ReverseBias High Resistance DC AC3 ReverseBias High Resistance DIOD...

Page 230: ...NOTES F 42 F 42 VANTAGE 500 Return to Section TOC Return to Section TOC Return to Section TOC Return to Section TOC Return to Master TOC Return to Master TOC Return to Master TOC Return to Master TOC...

Page 231: ...cal trou bleshooting assistance before you proceed Call 1 888 935 3877 TEST DESCRIPTION This test will help determine if the Electronic Governor is operating properly MATERIALS NEEDED Volt Ohmmeter An...

Page 232: ...inkage rod from fuel control lever at injection pump 2 Loosen lock nut on fuel lever off stop screw 3 Adjust fuel lever stop screw clockwise down until engine will just start and run slowly while hold...

Page 233: ...ou bleshooting assistance before you proceed Call 1 888 935 3877 TEST DESCRIPTION This test will determine if the engine alternator and associated circuitry are functioning properly MATERIALS NEEDED 3...

Page 234: ...DC 7 Set the voltmeter for DC volts and measure the DC volts at lead 281 232 Cummins to engine ground See the Wiring Diagram Normal is 13 2 to 14 5 VDC NOTE Lead 281 232 Cummins carries the flash ing...

Page 235: ...cted at machine 115VAC receptacle SCOPE SETTINGS Volts Div 50V Div Horizontal Sweep 5 ms Div Coupling DC Trigger Internal NORMAL OPEN CIRCUIT VOLTAGE WAVEFORM 115VAC SUPPLY HIGH IDLE NO LOAD TROUBLESH...

Page 236: ...on represents 5 milliseconds in time SCOPE SETTINGS Volts Div 50V Div Horizontal Sweep 5 ms Div Coupling DC Trigger Internal NORMAL OPEN CIRCUIT VOLTAGE WAVEFORM STICK MAX TAP MAX CONTROL POT HIGH IDL...

Page 237: ...e machine was loaded with a resistance grid bank to 500 amps at 40 volts SCOPE SETTINGS Volts Div 20V Div Horizontal Sweep 0 1 ms Div Coupling DC Trigger Internal NORMAL WELD VOLTAGE WAVEFORM STICK CC...

Page 238: ...machine was loaded with a resis tance grid bank to 200 amps at 16 VDC SCOPE SETTINGS Volts Div 10V Div Horizontal Sweep 05 ms Div Coupling DC Trigger Internal NORMAL TIG MODE VOLTAGE WAVEFORM LOADED...

Page 239: ...n represents 5 milliseconds in time SCOPE SETTINGS Volts Div 50V Div Horizontal Sweep 5 ms Div Coupling DC Trigger Internal NORMAL OPEN CIRCUIT VOLTAGE WAVEFORM WIRE CV HIGH IDLE NO LOAD TROUBLESHOOTI...

Page 240: ...machine was loaded with a resistance grid bank to 500 amps at 40 volts SCOPE SETTINGS Volts Div 20V Div Horizontal Sweep 0 1ms Div Coupling DC Trigger Internal NORMAL WELD VOLTAGE WAVEFORM WIRE CV MA...

Page 241: ...ce before you proceed Call 1 888 935 3877 TEST DESCRIPTION This procedure will aid the technician in the removal and replacement of the shutdown solenoid MATERIALS NEEDED 7 16 Wrench 10mm wrench Long...

Page 242: ...n from the solenoid linkage assembly 6 Remove the solenoid assembly 7 Replace any faulty or worn parts and reassemble the solenoid assembly REASSEMBLY 1 Reassemble the pivot pin and retaining ring to...

Page 243: ...ing and pivot pin from the solenoid linkage assembly 6 Remove the solenoid assembly 7 Replace any faulty or worn parts and reassemble the solenoid assembly REASSEMBLY 1 Reassemble the pivot pin and re...

Page 244: ...NOTES F 56 F 56 VANTAGE 500 Return to Section TOC Return to Section TOC Return to Section TOC Return to Section TOC Return to Master TOC Return to Master TOC Return to Master TOC Return to Master TOC...

Page 245: ...orm the test repairs safely contact the Lincoln Electric Service Department for electrical trou bleshooting assistance before you proceed Call 1 888 935 3877 TEST DESCRIPTION The following procedure w...

Page 246: ...ing the 7 16 wrench remove the appropriate stator leads and AC terminals leads Refer to Figure F 19 Label the leads for reassembly 5 Using 7 16 socket remove 4 bolts holding power module assembly to b...

Page 247: ...nt for electrical trou bleshooting assistance before you proceed Call 1 888 935 3877 TEST DESCRIPTION The following procedure will aid the technician in removing and replacing the Vantage 500 stator a...

Page 248: ...ng the 3 8 wrench remove leads 229 white and 242D from the fuel level sensor Label the leads for reassembly 7 Turn the fuel off at the shutoff valve Remove and plug the fuel return line 8 Remove and p...

Page 249: ...rew driver disconnect leads 200A 200B and 201A or remove screw cap bracket and remove cap from the filter capacitor 12 Label and remove leads 5H and 201A 200A and 6A from the field diode rectifier bri...

Page 250: ...r of the door hinge assembly where it attaches to the roof Remove the support rod TROUBLESHOOTING AND REPAIR F 62 F 62 VANTAGE 500 FIGURE F 23 CONTROL BOX CONNECTIONS 200A 200B 201 Refer to Figure F 2...

Page 251: ...the alternator shroud together 19 With the 7 16 wrench remove the two nuts lock washers and flat washers that hold the bottom of the shroud to the machine base Remove the shroud TROUBLESHOOTING AND RE...

Page 252: ...ft frame weldment 22 With the 3 8 wrench remove the nuts lock wash ers and flat washers from the two studs that hold the fan baffle to the machine base 23 Using the 3 4 wrench remove the four bolts lo...

Page 253: ...lace 4 Using two air impact from bottom wrench on top remove the nut lock washer and carriage bolt holding the alternator mounting foot to the machine base Do this on each side 5 Using the 3 8 wrench...

Page 254: ...to the engine flywheel INSTALL STATOR Be sure the engine is blocked securely and the stator is supported with the hoist Watch bearing housing install tolerance ring and install bearing cover plate Whe...

Page 255: ...ectifier OUTPUT PANEL AND CONTROL BOX n Leads 232N and 227 to Pull Coil PC board n Leads 232L and 232N to 12 VDC insulated stud n Leads 200A 200B and 201 and 201A to the field capacitor TROUBLESHOOTIN...

Page 256: ...0 NA High Idle 1890 1910 1750 1890 WELDER DC STICK OUTPUT Mode Selector Open Circuit Switch Fine Control Voltage Load Volts Load Amps 30 575 Setting Maximum 55 60 39 5 42 0 565 585 WELDER CV WIRE OUTP...

Page 257: ...10 15 18 28 TIG 20 250 A Minimum 10 15 18 28 AUXILIARY POWER OUTPUT 230 Volt Receptacle 115 Volt Receptacles Open Circuit Open Circuit Voltage Load Volts Load Amps Voltage Load Volts Load Amps 230 26...

Page 258: ...NOTES F 70 F 70 VANTAGE 500 Return to Section TOC Return to Section TOC Return to Section TOC Return to Section TOC Return to Master TOC Return to Master TOC Return to Master TOC Return to Master TOC...

Page 259: ...Complete Machine G4848 Codes 11180 11415 11468 Deutz G 10 G 11 Schematic Complete Machine G4791 Codes 11181 1416 Cummins G 12 Schematic Weld Control PC Board G4108 1 G 13 thru G 17 Schematic Chopper P...

Page 260: ...M RIGHT OF CONTROL BOX GROUND STUD ON OUTPUT PANEL GND J 12 VOLT GROUND STUD ON LEFT SIDE BACK OF CONTROL BOX 5N 5S 5L 5M 5T GND A GND B 31 5H GND J L1 CHOKE 5J 5K 5K 5A 5B 5 GND C GND E GND D M1 M2 M...

Page 261: ...8 6 10 J4 J5 6 10 CONTROL MODE SEL CHOPPER POWER PWM THERMAL 25A 23A 13 14 77 76 75 2 4 75A 76A 77A 500 J6 SHUNT J1 AMPHENOL I D J2 ENGINE PERIPHERAL ALT 405A 247 243 405B 232E GOLD SILVER ENG PROT P...

Page 262: ...05A 247 243 405B GOLD SILVER ENG PROT PROGRAMMING 9 16 1 8 J31 5T 270 262A 405 232F 1 6 12 7 J32 234 271 247 3 4 1 J30 6 405A 239 232M 232K 232A 232R 232B 232C 12VDC INSULATED STUD 232C OIL PRESSURE 2...

Page 263: ...PROT GOVERNOR CONTROL MODULE 404 5T 270 262A 405 232F 1 6 12 7 J31 234 271 SHLD 232K 232A 232B 232C 12VDC INSULATED STUD 232C OIL PRESSURE 241 228 5L 229 232B 5M COOLANT TEMPERATURE 232K 5K 4 1 4 1 4...

Page 264: ...B 75B GROUND AMPHENOL INPUT TO AMPHENOL 115VAC CONTACTOR W ORK REMOTE CONTROL 42VAC GROUND AMPHENOL J A D C H B K E F G I 77B 76B 75B GND B 4B 2B 4B 2B 13 J3 8 14 J3 16 J1 5 500 J1 13 500 500 I D JUMP...

Page 265: ...3 11 J3 9 47 5 ohm TRANSFORMER 15V 3 3V 15V 5V J3 16 J3 8 40 100VDC INPUT FRAME 15V COM 12VISOLATEDCIRCUITRYFORENGINEFUNCTIONS STUD STUD 10K POT 10K POT 10K POT MACHINE IDENTITY TABLE PINS JUMPERED TO...

Page 266: ...A 4A 2A 76A 77B 76B 75B GROUND AMPHENOL INPUT TO AMPHENOL 115VAC CONTACTOR W ORK REMOTE CONTROL 42VAC GROUND AMPHENOL J A D C H B K E F G I 77B 76B 75B GND B 4B 2B 4B 2B 13 J3 8 14 J3 16 J1 5 500 J1 1...

Page 267: ...FRAME J2 6 J2 4 J2 5 IDLE HOLD COIL TO IDLE PULL COIL BOARD HIGH PULL TO LOW IDLE FRAME 15V COM 12VISOLATEDCIRCUITRYFORENGINEFUNCTIONS STUD STUD AUXILLARY CURRENT SENSE 10K POT 10K POT 10K POT AUXILI...

Page 268: ...cles Open Circuit Volts CC Max Min 58 58 58 58 58 26 12 12 CV Pipe Tig Control board common is at welder positive output and shunt Control board circuits associated with J2 are part of engine electric...

Page 269: ...UXILIARY SENSE TOROID MACHINE IDENTITY TABLE PINS JUMPERED TO SELECTMACHINE 1 2 3 4 A TIG PIPE CC CV MODE SELECTOR SW ITCH AUSTRAILIAN VANTAGE 575 USES A 3 POSITION TOGGLE SWITCH 77 76 75 77B 76B 75B...

Page 270: ...uF 100V 9 J5 4 J5 3 J5 2 J5 1 J5 DZ1 1W 5 1V DZ9 1W 5 1V D16 1A 1000V DZ4 5W 10V R37 700 5W D34 1A 400V D28 1A 400V D33 1A 400V D27 1A 400V D22 1A 1000V R158 5 1K 5W C32 22uF 63V DZ3 5W 20V LED10 05A...

Page 271: ...G 13 NOTE This diagram is for reference only It may not be accurate for all machines covered by this manual Return to Section TOC Return to Section TOC Return to Section TOC Return to Section TOC Retu...

Page 272: ...G 14 NOTE This diagram is for reference only It may not be accurate for all machines covered by this manual Return to Section TOC Return to Section TOC Return to Section TOC Return to Section TOC Ret...

Page 273: ...G 15 NOTE This diagram is for reference only It may not be accurate for all machines covered by this manual Return to Section TOC Return to Section TOC Return to Section TOC Return to Section TOC Ret...

Page 274: ...G 16 NOTE This diagram is for reference only It may not be accurate for all machines covered by this manual Return to Section TOC Return to Section TOC Return to Section TOC Return to Section TOC Ret...

Page 275: ...7 NOTE This diagram is for reference only It may not be accurate for all machines covered by this manual Return to Section TOC Return to Section TOC Return to Section TOC Return to Section TOC Return...

Page 276: ...8 NOTE This diagram is for reference only It may not be accurate for all machines covered by this manual Return to Section TOC Return to Section TOC Return to Section TOC Return to Section TOC Return...

Page 277: ...NOTE This diagram is for reference only It may not be accurate for all machines covered by this manual Return to Section TOC Return to Section TOC Return to Section TOC Return to Section TOC Return to...

Page 278: ...G 20 NOTE This diagram is for reference only It may not be accurate for all machines covered by this manual Return to Section TOC Return to Section TOC Return to Section TOC Return to Section TOC Retu...

Reviews: