background image

Page 5

Vernon Tool MasterPipe Compact Profiler 

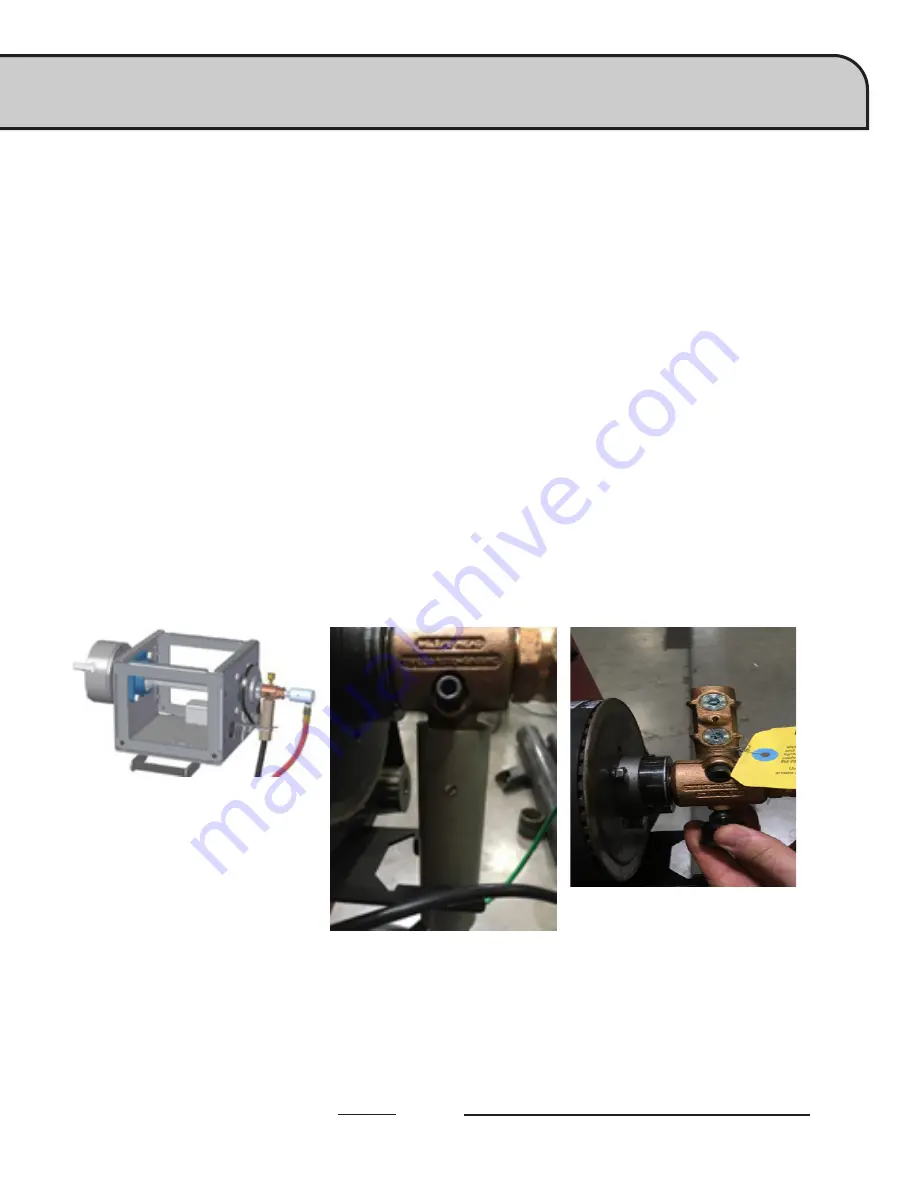
Installing the ground wire:

Plasma cutting depends on a low-resistance return current work lead (ground lead) and this is provided by positive 
contact with the chuck and its rotating connection. The ground lead from your plasma cutter is connected to the 
rotating ground assembly via two ¼” hex head bolts inside the chuckbox assembly. 
Attach your ground wire from the independant ground rod to this connection.

Grounding Your Machine

The MasterPipe Compact Profiler machine requires an earth ground rod to ensure personnel safety, and to supress 

the high-frequency noise created by the plasma power supply. A star ground point on the rotating chuck will connect 

directly to the earth ground rod via a 6 AWG stranded wire or other stranded, grounding cable. Consult with a 

qualified electrician to verify your connections.

Instructions:

1. 

Remove the #2 slotted setscrew from the gray plastic ground clamp shield.

2. 

Slide the plastic shield off the ground clamp and slide over the plasma cutter work lead

3. 

Slide a 6 AWG stranded wire inside the plastic shield along with the plasma work lead

4. 

Install the bare stranded wire from the plasma cutter work lead into the rotating ground  


 assembly

5. 

With both the work lead and ground wire installed into the rotating ground clamp, tighten the 1/4” hex  


head bolts until both ground wires are firmly secured.

6. 

Locate the plastic shield back into the rotating ground capture and reinstall the #2 slotted set   

 screw.

Summary of Contents for Vernon Tool MasterPipe Compact Profiler

Page 1: ...Nov 1 2022 Copyright 2022 Lincoln Electric Cutting Systems OPERATORSGUIDE VernonTool MasterPipe Compact Profiler...

Page 2: ...ine Specifications III Safety Information IV Machine Overview 1 Power Air Requirements 3 Grounding Your Machine 5 Connect Air Supply 6 FlexCut 80 Plasma Controls Settings 7 Overview of Visual Machine...

Page 3: ...th 10 extension Operating Temperature 40 100 Fahrenheit 1 38 Celsius Motors Bi Polar Stepper Motors Drive System Precision planetary gear box and belt drive Linear Guidance Precison rack and pinion In...

Page 4: ...g including gloves made from durable flame resistant material Disconnect the power source before performing any service or repairs When the power source is operating voltages in excess of 250 volts ar...

Page 5: ...a highly toxic gas and other irritating products Remove all sources of these vapors Gases used for plasma cutting and gouging can displace air and cause injury or death Always use enough ventilation...

Page 6: ...Hydrogen gas may be formed and trapped under aluminum work pieces when they are cut underwater or while using a water table DO NOT cut aluminum alloys underwater or on a water table unless the hydroge...

Page 7: ...ork cables If the torch cable is on your right side the work cable should also be on your right side Connect the work cable to the workpiece as close as possible to the area being cut or gouged Do not...

Page 8: ...ng and marking operations create waste that can fragment and fly Make sure you and everyone close to the CNC machine during operations has proper eye protection PINCHANDCRUSHPOINTS Pinch and crush poi...

Page 9: ...USTIBLES obtainable from American Welding Society 8669 NW 36 Street 130 Miami Florida 33166 6672 NFPA Standard 51 OXYGEN FUEL GAS SYSTEMS FOR WELDING CUTTING AND ALLIED PROCESSES obtain able from the...

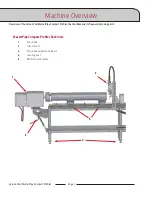
Page 10: ...5 MasterPipeCompactProfiler BackView 1 Chuck Box 2 Lifter Station 3 Chuck Box adjustment levers 4 Leveling Feet 5 Ball Transfer Cradles Overview of the Vernon Tool MasterPipe Compact Profiler the chu...

Page 11: ...2 User Guide 1 2 MasterPipeCompactProfiler FrontView 1 Adjustable jaw rotating chuck 2 Cutting bed 3 Chuck Box adjustment levers 4 Air and Ground connections inside removable chuck box MachineOverview...

Page 12: ...s are required The power supply cord is supplied without an attachment plug to accommodate single phase or three phase installations Warning The FlexCut on off switch is not intended as a service disc...

Page 13: ...achments This process requires a 3 16 hex head wrench Removethechuckboxcover Instructions 1 Remove the 3 16 hex head bolts from the slotted tabs that hold the chuck box cover in place 2 Save the screw...

Page 14: ...A star ground point on the rotating chuck will connect directly to the earth ground rod via a 6 AWG stranded wire or other stranded grounding cable Consult with a qualified electrician to verify your...

Page 15: ...priate filters and connectors for the connections 2 Connect one air hose to your plasma cutter and the other to the compressed air connect near the chuck mount Route the compressed air hose so that th...

Page 16: ...el will light up FRONT 1 CUTTING OPERATING MODE SELECTION 2 PRIMARY AIR GAS PRESSURE GAUGE AND REGULATOR KNOB 3 TORCH CONNECTION 4 SINGLE PHASE GREEN LED 5 POWER ON OFF GREEN LED 6 OUTPUT RED LED 7 TH...

Page 17: ...96 44 80A 140V 80 3PH 80 41 37 21 18 14 230 1 50 60 60A 140V 100 80A 140V 80 1PH 100 48 1PH 80 62 1PH 25 80A 200 208 1 50 60 60A 140V 100 80A 140V 60 1PH 100 52 1PH 60 71 25 80A MECHANIZED CUT CAPACI...

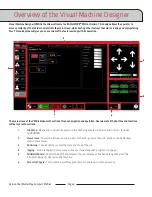
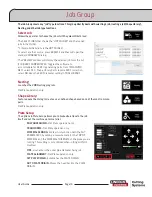
Page 18: ...navigation and operation Overview of all the buttons and functions will be covered in sections 1 Job Group Opens and controls all aspects of the file being entered or the creation of jobs Includes SH...

Page 19: ...tion select NO Uses the KERF diameter setting in TOOL LIBRARY Nesting Launches the VMD Nesting program Flat Plate operation only Shape Library Feature opens the dialog to create a user defined shape b...

Page 20: ...hen shutting down the system Prompts a dialog box to TURN OFF ACCUMOVE CONTROLLER Press the E Stop button to power down the controller The computer will then shut down Turn the power switch to OFF Pro...

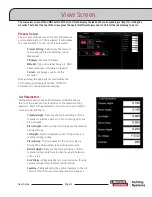
Page 21: ...er Cut Charts Transfer Height Distance the torch will retract off the material to initiate a pilot arc prior to moving up to the pierce height Pierce Height Distance the torch sits above the material...

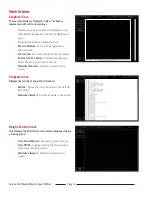
Page 22: ...lifter station s movement during operation Maximize Viewport Displays all views in one screen Graphics View The machine limits are displayed in blue The head is represented with white crossed lines P...

Page 23: ...long with running jobs Active Run Dry Run Toggles between ACTIVE RUN and DRY RUN ACTIVE RUN Activates your torch to fire when you RUN a job DRY RUN Deactivates your torch from operation If in DRY RUN...

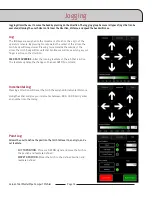
Page 24: ...w the torch body will move faster Continuous will move as long as your finger is active on the direction FEED RATE OVERRIDE Alter the running feedrate of the job that is active The feedrate updates th...

Page 25: ...rocess setup tab User Defined You can manually enter the cut parameters based off of the cut charts found in the FlexCut manual Sample Voltage is a toggle between On or Off On with MODE AUTO At the be...

Page 26: ...s zero position Dashboard The dashboard displays the host indicators and tools for the operator Arc Voltage Displays Arc Voltage feedback from the plasma during cutting Plasma Pierce Count This is use...

Page 27: ...Page 18 User Guide...

Page 28: ...is is a manual adjsutment Please access the WinMPM User s Guide through the HELP menu for more details Open the WinMPM software by swiping from right to left from the right edge of the screen and clic...

Page 29: ...st cut to the shortest point on the second cut measured along the inside of the pipe The WinMPM software can be configured so the program option Offset is set to Workpoint length this sets the length...

Page 30: ...ng a Straight cut will program a single revolution cut to bring the pipe to length there are no parameters that need to be input by the user to produce this cut With the Straight cut selected press th...

Page 31: ...ipe is being programmed Note that as parameters are entered under the End 1 Saddle Cut Data section the short description underneath will update to match To generate the G CODE for the machine press F...

Page 32: ...file was generated The Display screen shows a 2 5 dimensional preview of the pipe profile that was programmed The tools at the bottom allows the operator to rotate to visualize the cut Choosing F7 PR...

Page 33: ...WinMPM Torchmate VMD Jobs To load a cut program go to the Select Job button Follow the process described in the Performing a Test Cut section of this user guide WinMPMOperations Step11 Once the G CODE...

Page 34: ...Page 25 Vernon Tool MasterPipe Compact Profiler...

Page 35: ...40 pipe weld coupon 3 overall length with a 38 5 bevel on both ends It is recommended that you cut each of these sample programs to verify it s operation against the factory cuts and ensure that the m...

Page 36: ...gm or 4000TC Saddle Cut FC125 gm file located in the WinMPM folder at C WinMPM Torchmate VMD Jobs Each file has specific settings to either the FlexCut 80 or FlexCut 125 plasma cutters please verify y...

Page 37: ...erage on the FlexCut power supply to match the loaded consumables and the Process Setup tab in the VMD software Set the air pressure output on the plasma cutter to match the Plasma Pressure on the Pro...

Page 38: ...he pipe O D of 3 sch 40 3 5 Jog the Y axis in the positive direction until you reach the end of the pipe opposite the chuck Press the SET PLATE ORIGIN button This tells the machine where the end of th...

Page 39: ...rt will be extremely hot once cut allow the part to cool before removing it from the machine With the part sufficiently cooled compare the size angles and overall cut quality to the factory test cut p...

Page 40: ...fer to the plasma cutter owners manual The following maintenance should be performed on the mechanical system after every 40 hours of use Use dry graphite on the wear parts as petroleum products will...

Page 41: ...Page 32 User Guide...

Page 42: ...dingly Lincoln Electric does not warrant or guarantee or assume any liability with respect to such information or communications Moreover the provision of such information or technical information doe...

Reviews: