13
/15
Comply with the minimum distances indicated on section Minimum
distances
Single fire damper wall opening
A rectangular opening must be provided in the wall with a frame
made by metal profiles ideal for use with plasterboard (min. thick-
ness 0,6 mm) with a side 75 mm greater than the nominal size of
the damper. It is advisable not to exceed by more than 10 mm from
the indicated sizes so as not to compromise the correct thermal in-
sulation.
The perimeter of the opening must be covered with a layer of plas-
terboard as wide as the thickness of the wall.
Paired fire dampers wall opening
A rectangular opening must be provided in the wall with a frame
made by metal profiles ideal for use with plasterboard (min. thick-
ness 0,6 mm) with a side 75 mm greater than the nominal size of the
paired dampers:
– Vertically paired fire dampers
base = damper base + 75 mm
height = h h 45 mm + 75 mm
– Side by side paired fire dampers
base = base1 + base2 + 45 mm + 75 mm
height = damper 75 mm.
The perimeter of the opening must be covered with a layer of plas-
terboard as wide as the thickness of the wall.
It is advisable not to exceed by more than 10 mm from the indicated
sizes so as not to compromise the correct thermal insulation.
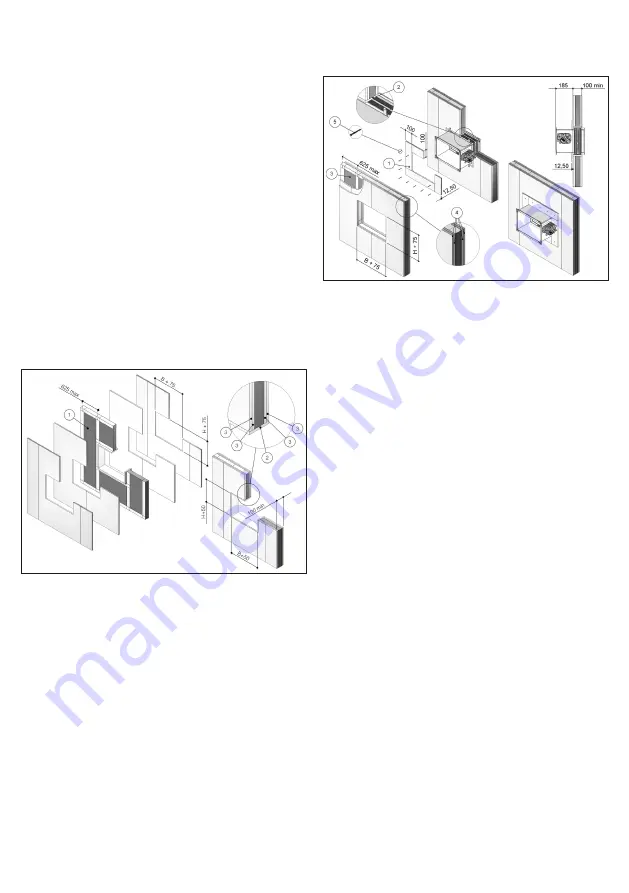
B. Nominal base dimension (mm)
H. Nominal height dimension (mm)
1. Rock wool, 100 kg/m³
2. Plasterboard infill panel, thickness 12,5 mm
3. Plasterboard thickness 12,5 mm
Damper positioning
Lift the fixing flaps located on the fire damper casing. See section
Fixing flaps for further details.
Position the damper in the opening so that the side of the closing
mechanism extends from the wall by 185 mm.
Be careful not to damage the intumescent gasket on the outside the
casing.
Secure the fire damper to the wall using four screws on the four holes
of the fixing flaps.
The double test (with the mechanism inside and outside the fire
area) demonstrated that there is no preferred direction for the po-
sition of the damper, both in relation to air flow and the side with
the higher probability of exposure to fire, as indicated in standard
EN1366-2 (paragraph 6.2).
Filling
It is not necessary to insert any material, but simply cover the gap
between the damper and the wall by applying on face of the wall
mechanism side a layer of plasterboard, to a total minimum thickness
of 12,5 mm, to make a frame 100 mm wide.
1. Plasterboard infill panel, thickness 12,5 mm
2. Plasterboard infill panel, thickness 12,5 mm
3. Rock wool density up to 100 kg/m³ (optional)
4. Plasterboard thickness 12,5 mm
5. Self-drilling screw Ø 3,5 X 45 mm
EI 120 S Installation within vertical light wall (plasterboard) -
Special cases
Installation in contact with ceiling or floor or side wall
A rectangular opening must be provided in the wall with the three
sides made by metal profles ideal for use with plasterboard. The side
parallel to the ceiling or to the wall 75 mm greater than the nominal
sizes of the damper and the side perpendicular to the ceiling or to
the floor 63 mm greater than the nominal sizes of the damper.
The three metal profiles must be covered with a plasterboard layer
12,5 mm thick, as wide as the the thickness of the wall.
No need to apply anything on the wall or on the ceiling.
Just apply three plasterboard layers, to compose a “U” shape on the
three free sides of the fre damper.
This installation is allowed for two fire dampers paired in battery as
well.
Corner room installation
A rectangular opening must be provided in the wall with the two
sides made by metal profles ideal for use with plasterboard. The
opening size must be 63 mm greater than the nominal sizes of the
damper.
The two metal profiles must be covered with a plasterboard layer
12,5 mm thick, as wide as the the thickness of the wall.
No need to apply anything on the wall or on the ceiling.
Apply two plasterboard layers, to compose a “L” shape on the two
free sides of the fre damper.
This installation is allowed for two fire dampers paired in battery as
well.
In case of two side by side paired fre dampers it is necessary to
position the fre dampers with vertical axis, due to the mechanism
presence.


