background image

26

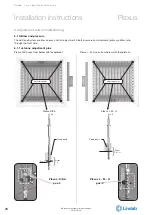
4, 5, 6, 7, 14

x4

x4

A

B

C

10-25

kg !

Installation instructions 

Plexus

We reserve the right to make changes

2019-06-20

We reserve the right to make changes

2019-06-20

lindab  |  we simplify construction

Ceilingtype 4, 5, 6, 7, 14 (Plexus X)

Summary of Contents for Plexus F 120

Page 1: ...out written permission are forbidden is the registered trademark of Lindab AB Lindab s products systems product and product group designations are protected by intellectual property rights IPR lindab...

Page 2: ...16 4 3 Possible combination of connections 16 4 4 Electrical connections 17 4 4 1 Regula components on the beam 17 4 4 2 Example 1 Wiring scheme with Regula Connect multi 18 4 4 3 Example 2 Wiring sc...

Page 3: ...t have been installed in any way other than shown in these installation instructions 1 2 Symbols Heavy Load 2 man job It is recommended to use a lift for mounting Hand pull Hot water Cold water 2 4 Un...

Page 4: ...plastic folio or other to protect the product during on site construction continually to keep the products in best condition and avoid any scratches 2 8 Where to find additional instructions or techni...

Page 5: ...5 10 25 kg Installation instructions Plexus We reserve the right to make changes 2019 06 20 lindab we simplify construction 2 10 Packing unpacking guideline...

Page 6: ...of JetCone adjustment pins Plexus_label indd 1 09 02 2016 14 15 56 Order xx xxxxx Project xxxxxx xxxxxxxx Mark xxxxx Nozzles N A Product ID xxxxxxx Plugs N A Sign Pos xx Munio I xxx 12 125 AX Pressure...

Page 7: ...xx N A 24 l s Order xx xxxxx Project xxxxxx xxxxxxxx Mark xxxxx Nozzles N A Product ID xxxxxxx Plugs N A Sign Pos xx Munio I xxx 12 125 AX Pressure AA Pa Flow BB l s x xx m Plexus F S 60 12 125 A1 60...

Page 8: ...ains Beam Plus features pre installed in factory 4 pc beam of copper insets separate in smaller box Accessories separate in smaller box 2 16 Plus features 2 16 1 Inlet faceplates Not relevant for Plex...

Page 9: ...75 575 125 125 160 9 11 Z S L M H 60 584 584 125 125 160 10 I S L M H 62 619 619 125 125 160 21 I S L M H 67 669 669 125 125 160 31 32 I S SA 120 594 1194 125 160 1 2 3 8 X S 120 599 1199 125 160 4 5...

Page 10: ...8 Air quality Primary supply air have to be clean dry and filtered before reaching the beam 3 9 Capacity test Lindabs active chilled beams are Eurovent certified and tested according to EN 15116 Pleas...

Page 11: ...on indicator on the valve to insure correct installation in relation to the desired flow When connecting a panel or a beam with the piping system either a push on fitting or a compression coupling sho...

Page 12: ...er insert into position Mount a compression coupling and or a valve to the pipe Don t stress the nut too much since this may crush the pipe Please refer to the suppliers manual 4 1 4 Flexible hoses Ou...

Page 13: ...re seconds Order no 647690 12mm Ballofix valves For easy closing off water con nection pipes available with or without handle Order no 642663 642662 without handle 12mm For more details see Accessorie...

Page 14: ...o called 2 pipe connection and contain one water circuit cooling The dimension for all water pipe connections are 12 mm Plexus 60 I X U Y Z Cooling Standard Plexus 120 I X U Y Z Cooling Standard Plexu...

Page 15: ...4 5 Plexus F120 634 5 79 333 79 44 79 44 Installation instructions Plexus We reserve the right to make changes 2019 06 20 lindab we simplify construction We reserve the right to make changes 2019 06 2...

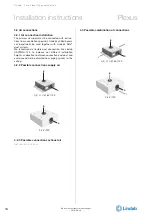
Page 16: ...nstruc tions from a ventilation specialist Lindab s chilled beams can beneficially be used together with Lindab s Safe duct systems We recommend a flexible duct connection like Lindab DRATMFU 125 to b...

Page 17: ...S Heating out N Heating out L Supply in N Supply in 24V L LINDAB N Neutral L Load S Signal Basic Pascal REGULA CONNECT Rc LINK Rc LINK CO2 in S1 CO2 in S2 CO2 out N CO2 out L Presence in S1 Presence i...

Page 18: ...10 To other Regula Connect Multi To other Regula Connect Multi 1 2 3 4 5 21 22 40 32 31 White Orange T568B Orange White Green Blue White Blue 6 41 Green 7 White Brown ends must be insulated 8 Brown Rc...

Page 19: ...Damper in Pos Damper out S Damper out N Damper out L Heating 0 10V S Heating 0 10V N Heating 0 10V L Supply Link2 N Supply Link2 L Supply Link1 N Supply Link1 L Supply in N Supply in 24V L LINDAB N Ne...

Page 20: ...e Contur Ecophon D Rockfon D XL 7 599x599 11 X Water Luxalon SQ Clip In 6 600x600 chamfer 45 x3 26 X Water Dampa Clip in square edge 5 600x600 13 X Water Dampa Clip in bevelled edge 4 600x600 chamfer...

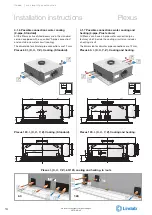
Page 21: ...o make changes 2019 06 20 5 3 General installation principles 5 3 1 Recessed in suspended T bar ceiling 5 3 5 Recessed in suspended permanent ceiling 5 3 6 Recessed in suspended permanent ceiling with...

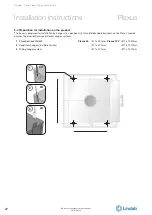
Page 22: ...5 4 Preparation for installation on the product The beam is prepared for installation by hangers 4 x per beam 4 turnable bendable brackets on the Plexus models ensures the possibility to use differen...

Page 23: ...23 B A C D B A C D E Installation instructions Plexus We reserve the right to make changes 2019 06 20 lindab we simplify construction...

Page 24: ...ctions Plexus We reserve the right to make changes 2019 06 20 lindab we simplify construction 5 5 1 Basics steps of installing the product Ceilingtype 1 2 8 9 10 11 21 22 31 32 Plexus I Y Z Plexus S S...

Page 25: ...ht to make changes 2019 06 20 lindab we simplify construction Ceilingtype 3 Permanent ceiling Plexus I Cutout dimensions in permanent ceilings Plexus I S SA L M H 60 544 x 544 mm Plexus I S SA 120 544...

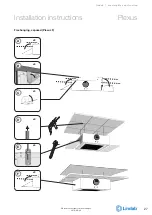
Page 26: ...26 4 5 6 7 14 x4 x4 A B C 10 25 kg Installation instructions Plexus We reserve the right to make changes 2019 06 20 lindab we simplify construction Ceilingtype 4 5 6 7 14 Plexus X...

Page 27: ...27 x4 x4 x4 x4 D E B C A F x2 x2 Installation instructions Plexus We reserve the right to make changes 2019 06 20 lindab we simplify construction Freehanging exposed Plexus F...

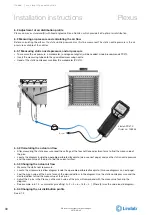
Page 28: ...nt and commissioning 6 1 Airflow and pressure The JetCone System enables an easy and fast adjustment in both pressure and air volume primary airflow rate through the front side 6 1 1 Jetcone adjustmen...

Page 29: ...5 6 7 8 9 10 15 20 25 30 35 40 qa l s qa m3 h pstat Pa Date Pstat Pa qa l s 1 2 3 4 Signature JetCones 1 3 2 4 Pos 0 9 Rev 04 2012 Plexus_label indd 3 25 02 2016 15 48 12 Installation instructions Ple...

Page 30: ...the actual air flow After measuring the static pressure read the settings of the four JetCone adjustment pins to find the mean value of the pins Locate the diagram inside the openable perforated face...

Page 31: ...s 09 02 2016 14 15 56 nature Plexus M60 Position of JetCone adjustment pins qa l s qa m3 h 10 15 20 25 30 35 40 50 60 40 50 60 70 80 100 150 200 30 40 50 60 70 80 100 120 0 1 2 3 4 5 6 7 8 9 pstat Pa...

Page 32: ...TTR TTV water valves documentation 6 4 2 Balancing strategy Lindab recommends always balancing the water system to guarantee thermal comfort in all areas to avoid noise nuisance problems and to safe...

Page 33: ...h a dust cleaner vacuum cleaner Only use lukewarm water and a mild detergent and a piece of wet cloth to clean the inlet face plate Open the inspection hatch 7 3 Clean the air plenum chamber and air c...

Page 34: ...exus 120 M4x30 Installation instructions Plexus We reserve the right to make changes 2019 06 20 lindab we simplify construction 7 4 Lower battery Battery can only be lowered when the plus feature drop...

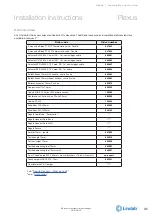
Page 35: ...halogen cable 684667 Actuator APR 40405 0 10 V mod NC 1m cable 684604 Ballofix Broen 12mm with handle shut off valve 642663 Ballofix Broen 12mm without handle shut off valve 642662 Ballorex dynamics...

Page 36: ...ons that are easy to use as well as offering ef ficient availability and logistics We are also working on ways to reduce our impact on our environment and climate We do that by developing methods to p...

Reviews: