background image

4

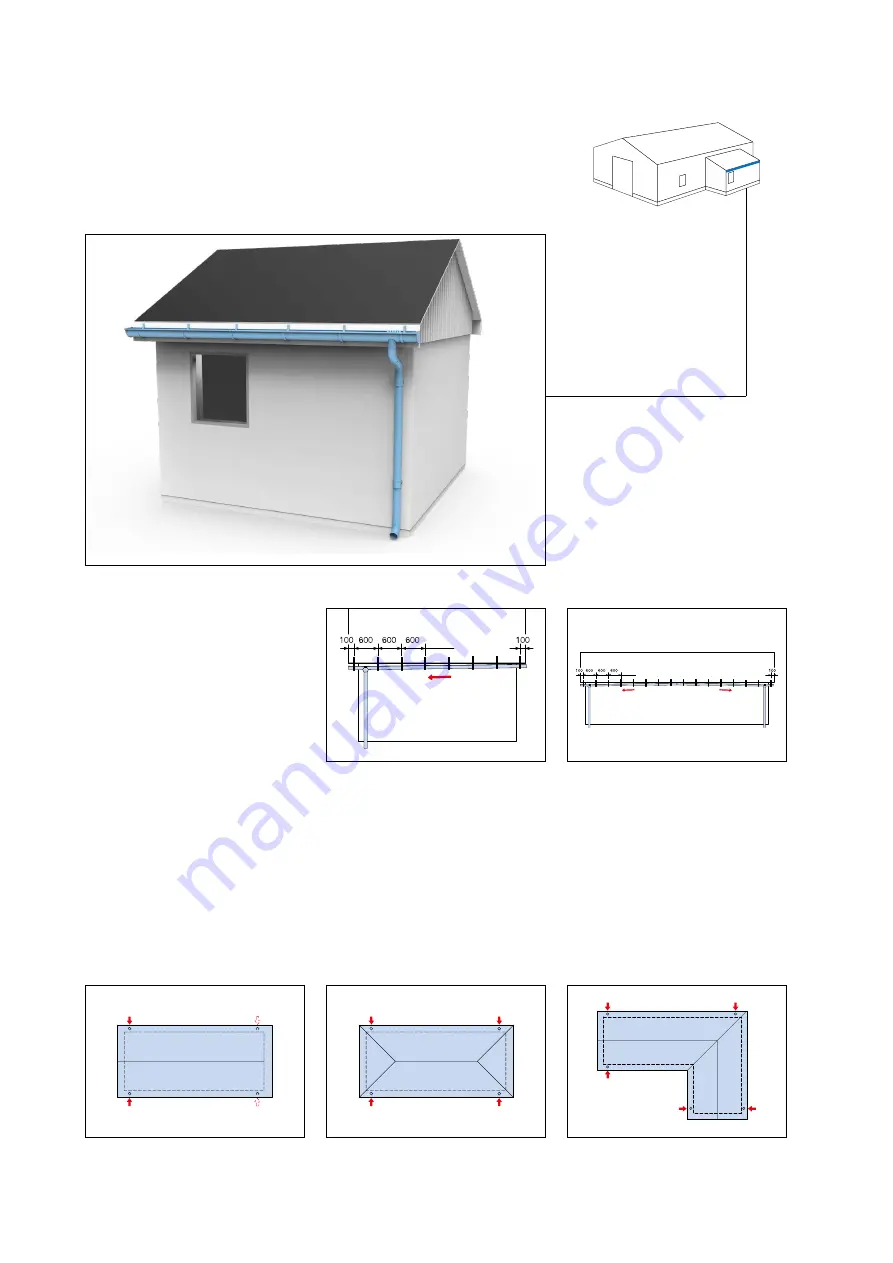
Number of brackets and drain pipes

The brackets should be mounted 
with c/c 600 mm. The end brackets 
are mounted 100 mm from the roof 
edge. The inclination of the gutter 
towards the down pipe should be at 
least 2,5 mm/m. Calculate how many 
brackets you need for each roof part 
(example 10 m/0,6 m +1 = 18 
brackets). Each drain pipe covers 
maximum 10 m gutter fall (length of 
the house). For a estethic reasons or 
if the gutter fall exceeds 10 m, place 
pipes on each corner of the house. 

Assembly instructions

Where to place the pipes

The pictures below show recomend-
ed placement of drainpipes for 
different houses.

Saddle roof. 1 or 2 per side.

Hipped roof

L-shaped roof

One downpipe for roof length less than 10 m

Two downpipes for roof length exceeding 10 m

Summary of Contents for Rainline BK 70

Page 1: ...lindab we simplify construction Lindab Rainline Assembly instructions quarterround roof drainage system LindabRoofDrainageSystem...

Page 2: ...and stable surface Non coated components must be unpacked and stored in a dry and ventilated place Cutting Cut the gutters and pipes with plate shears or a hacksaw on a firm underlay on the ground Ne...

Page 3: ...ter angle inner KVVI 135 Gutter angle inner KVVI 90 Branch pipe GR R Fold out shoe FUTK Drain shoe BUTK Self cleaning leaf trap SLS Bend BK 70 Bend BK70 Intermediate pipe MST Downpipe SR R Shoe UTK Dr...

Page 4: ...rt example 10 m 0 6 m 1 18 brackets Each drain pipe covers maximum 10 m gutter fall length of the house For a estethic reasons or if the gutter fall exceeds 10 m place pipes on each corner of the hous...

Page 5: ...marking Minimum radius 10 mm Mark out on the brackets for the gutter incline 2 5 mm m Number the brackets 1 is for Lowest bracket Last bracket is Highest bracket Mount brackets no 1 Lowest bracket an...

Page 6: ...rackets and mark out the needed length Use a hack saw to cut the gutter Stop end KVGV KVGH Use a rubber mallet to gently move the stop end into the correct position Remove the filings Use silicone as...

Page 7: ...the gutter Put seal between the gutter and the nozzle piece Fold the back of the gutter outlet all the way down For a correct hole the gutter outlet can be mounted temporarily and the hole can be mark...

Page 8: ...the brackets Push the KVSK against the second gutter until it covers the gap between the gutters Use selfsealing gutter joint KVSK Do not use any silicone Bend the back of the gutter against the fron...

Page 9: ...el the pipe holders with spirit level or plummet Fasten the pipe holder on the wall Use a hack saw to cut the intermediate pipe MST Remove sharp metal filings with a knife Intermediate pipelength at B...

Page 10: ...10 Assembly Roof Drainage System Close up assembly pipe holder SSVU It s easily done to dismount the holder Pipeholder SSVU with SST or SSC SST Cut of the legs for use of SSVU with SST and SSC or SSC...

Page 11: ...pipe Can be mounted in angle 50 80 Connect the drain shoe BUTK Connect the sliding pipe PRT Place the drain trap in the ground pipe You can also use a self cleaning leaf trap SLS Use BUTK to connect U...

Page 12: ...vailability and logistics We are also working on ways to reduce our impact on our environment and climate We do that by de veloping methods to produce our solutions using a minimum of energy and natur...

Reviews: