background image

IPower 2x6 


                                                           User Guide


Switching via the push buttons 
 

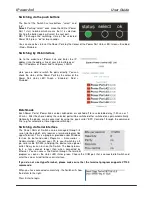
The  front  of  the  Switch  has  two  buttons,  “select”  and 
“ok”.  

Select: 

Pushing “select” once make the LED of Power 

Port  1  start  to  blink,  which  means  that  it  is  selected. 
Pushing the button again will select the next port.  

OK:

  To  change  the  switching  state  of  the  selected 

Power Port, press “ok” for two seconds. 
 
You can check the status of the Power Ports by the Colour of the Power Port status LED: Green = Enabled 
/ Red = Disabled. 


Switching by Web interface 
 

Go  to  the  website  of  IPower  2x6  and  Enter  the  IP 
address into the address line of your internet browser: 
http://”IP address of IPower 2x6”/ and press LOGIN 
 
 
Here  you  are  able  to  switch  the  ports  directly.  You  can 
check the status of the Power Ports by the colour of the 
Power  Port  status  LED:  Green  =  Enabled  /  Red  = 
Disabled. 


Batchmode 

Each Power Port of IPower 2x6 can be switched on or switched off for a selectable delay (1-30 sec. or 1-
30 min.). After the chosen delay the selected port will be switched off or switched on again automatically. 
Optionally  the  device  can  be  accessed  by  using  the  pearl  script  “EPC_Control.pl”  through  the  command 
line (e.g. for automatic or time-triggered switching). 
 

Switching via Serial Interface 

The  Power  Ports  of  Switch  can  be  managed  through  its 
serial interface which only  requires a terminal program like 
HyperTerminal. This is a program provided under Windows 
for  free  (to  be  found  under  Programs 

  Accessories 


Communication).  Connect  your  PC  to  your  Switch  by  a  9 
pin  serial  cable  (RS232)  and  plug  the  device  into  a  power 
outlet.  Now  you  can  turn  on  the  Switch.  The  boot  process 
lasts  a  few  seconds  longer  than  when  connected  by 
Ethernet.  You  can  access  the  Switch  through  the  terminal 
program as soon as the status LED shines green. Choose the COM port that is connected to Switch and 
enter the values listed for the serial interface. 
 

If  you  do  not  use  HyperTerminal,  please  make  sure  that  the  terminal  program  supports  VT100 
commands. 
 

When you have connected successfully, the Switch will show 
the details to the right. 
  
Press Enter to login. 


Summary of Contents for IPower Control 2x6

Page 1: ...LINDY ELECTRONICS LIMITED LINDY ELEKTRONIK GMBH FIRST EDITION August 2011 IPower Control 2x6 User Guide English LINDY No 32656 www lindy co uk...

Page 2: ......

Page 3: ...ia Ethernet Supports SNMP Dimensions W x D x H 483 x 150 x 43mm Package Contents LINDY IPower Control 2x6 12 x Extension cables IEC 320 C13 IEC 320 C14 2 x UK power cords IEC 320 C19 1 x CD containing...

Page 4: ...s required This tool is available for free on our website www LINDY com GBL_Conf exe enables you to install firmware updates and to reset the IPower 2x6 back to its factory settings see Firmware updat...

Page 5: ...Hostname Enter the host name of IPower 2x6 IPower 2x6 uses this name to connect with the DHCP server Using special signs may destabilize your network In this example we named the Switch EPC NET 2x6 IP...

Page 6: ...and deactivate the password request All changes need a restart of the firmware to be validated Configuration Messages Generate Temperature Messages You can select to have messages generated when the t...

Page 7: ...information of IPower 2x6 via SNMP SNMP Communities SNMP authenticates the requests from the named communities The public community has to be added to SNMP read requests and the private community to S...

Page 8: ...After the chosen delay the selected port will be switched off or switched on again automatically Optionally the device can be accessed by using the pearl script EPC_Control pl through the command lin...

Page 9: ...d by BOOTLDR appended to the device name in the program window of GBL_Conf exe and by the alternating red and green blinking status led When in Bootloader mode you are unable to make changes to the sw...

Page 10: ...The you will need to run the GBL_Conf exe program When you run Run GBL_Conf exe select the IPower 2x6 device which you would like to restore the settings on and click on the Program Deviceg Reset to F...

Page 11: ...correct e following measures Reorient or relocate the receiving antenna Increase the separation between the equipment and receiver Connect the equipment into an outlet on a circuit different from tha...

Reviews: