background image

26

DO1052DV

DE

3. 

Entfernen Sie die Schrauben und anschließend das obere Scharnier, dass die Tür in ihrer Position 
hält. Heben Sie die Tür hoch und legen Sie diese zur Vermeidung von Kratzern auf inen weichen 
Untergrund.

Reverse Door

Tool required:

 Philips screwdriver, Flat bladed screwdriver, Hexagonal spanner.

Ensure the unit is unplugged and empty.

To take the door off, it is necessary to tilt the unit backwards. You should rest the unit on something solid 

so that it will not slip during the door reversing process.

All parts removed must be saved to do the reinstallation of the door.

Do not lay the unit flat as this may damage the coolant system.

It

'

s


better


that


2


people


handle


the


unit


during


assembly

.

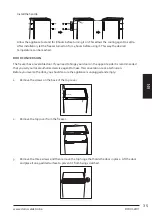
1. Remove two screws at rear side of top cover.

2. Remove top cover and thermostat knob, then place it aside.

3. Unscrew top hinge and then remove door and place it on a soft pad to

avoid scratch.

4. Unscrew bottom hinge. Then remove the adjustable feet from both

side.

7

unscrew

4. 

Entfernen Sie die unterste Schraube, den Scharnierbügel und den Stellfuß unten am Gerät.

Reverse Door

Tool required:

 Philips screwdriver, Flat bladed screwdriver, Hexagonal spanner.

Ensure the unit is unplugged and empty.

To take the door off, it is necessary to tilt the unit backwards. You should rest the unit on something solid 

so that it will not slip during the door reversing process.

All parts removed must be saved to do the reinstallation of the door.

Do not lay the unit flat as this may damage the coolant system.

It

'

s


better


that


2


people


handle


the


unit


during


assembly

.

1. Remove two screws at rear side of top cover.

2. Remove top cover and thermostat knob, then place it aside.

3. Unscrew top hinge and then remove door and place it on a soft pad to

avoid scratch.

4. Unscrew bottom hinge. Then remove the adjustable feet from both

side.

7

unscrew

5. 

Lösen Sie den Scharnierbolzen aus dem Scharnierbügel. Kehren Sie das Scharnier um und 
befestigen Sie den Scharnierbolzen wieder.

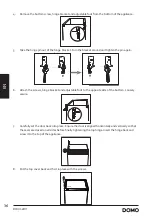
5. Unscrew and remove the bottom hinge pin, turn the bracket over and replace it.

6. Refit the bracket fitting the bottom hinge pin. Replace both adjustable

feet.

7. Place the door back on. Ensure the door is aligned horizontally and

vertically, so that the seals are closed on all sides before finally

tightening the top hinge.

8. Put the top cover and fix it with 2 screws on the back.

Unscrew

Screw

8

Reverse Door

9. Fix the thermostat knob.

screw

6. 

Befestigen Sie die Schrauben, den Scharnierbügel und den Stellfuß an der gegenüberliegenden 
Seite des Bodens. Schrauben Sie diese leicht an.

5. Unscrew and remove the bottom hinge pin, turn the bracket over and replace it.

6. Refit the bracket fitting the bottom hinge pin. Replace both adjustable

feet.

7. Place the door back on. Ensure the door is aligned horizontally and

vertically, so that the seals are closed on all sides before finally

tightening the top hinge.

8. Put the top cover and fix it with 2 screws on the back.

Unscrew

Screw

8

Reverse Door

9. Fix the thermostat knob.

screw

7. 

Setzen Sie die Tür vorsichtig ein. Achten Sie darauf, dass die Tür sowohl senkrecht als auch 
waagerecht ausgerichtet ist, sodass die Dichtungen an allen Seiten anliegen, bevor Sie das obere 
Scharnier vollständig festziehen. Setzen Sie das Scharnier wieder ein und schrauben Sie dieses an 
der Oberseite des Geräts fest.

Summary of Contents for Domo DO1052DV

Page 1: ...leiding Diepvriezer Mode d emploi Congélateur Gebrauchsanleitung Gefrierschrank Instruction booklet Freezer Manual de instrucciones Congelador Istruzioni per l uso Congelatore Návod k použití Mrazák Návod na použitie Mraznička ...

Page 2: ...manual for future reference Lea detenidamente todas las instrucciones Conserve este manual para futura referencia Leggere con attenzione le istruzioni conservarle per future consultazioni Před použitím si důkladně přečtěte tento manuál manuál si uschovejte i pro případ budoucího nahlédnutí Pred použitím si dôkladne prečítajte tento manuál manuál si uschovajte aj pre prípad budúceho nahliadnutie NL...

Page 3: ...in de winkel waar je het toestel hebt aangekocht De garantie op accessoires en onderdelen die onderhevig zijn aan slijtage bedraagt 6 maanden De garantie en verantwoordelijkheid aansprakelijkheid van de leverancier en fabrikant vervallen automatisch in de volgende gevallen Bij het niet naleven van de instructies in deze handleiding Bij verkeerde aansluiting vb te hoge elektrische spanning Bij verk...

Page 4: ... dit toestel nooit aan of in de buurt van een gasvuur of elektrisch vuur of op een plaats waar het in contact zou kunnen komen met een warm toestel Gebruik het toestel niet buiten Gebruik het toestel enkel voor het doel waarvoor het bestemd is Gebruik het toestel altijd op een stevig droog effen oppervlak Gebruik het toestel alleen voor huishoudelijk gebruik De fabrikant is niet verantwoordelijk v...

Page 5: ... dat zich aan de achterkant van het apparaat bevindt ONDERDELEN 1 Temperatuurregelaar 2 Laden 3 Stelvoetjes 4 Handvat VOOR HET EERSTE GEBRUIK Verwijder alle verpakkingsmateriaal zowel binnenin als aan de buitenkant Maak de buitenkant van het toestel schoon met een droge doek De binnenkant kan je reinigen met een zachte vochtige doek Vermijd direct zonlicht en warmte Zonlicht kan de buitenkant van ...

Page 6: ...to hinge Then remove the adjustable feet from both unscrew 2 Haal het bovendeksel van de diepvriezer af oor lips screwdriver Flat bladed screwdriver Hexagonal spanner s unplugged and empty off it is necessary to tilt the unit backwards You should rest the unit on something solid slip during the door reversing process d must be saved to do the reinstallation of the door it flat as this may damage t...

Page 7: ...arnierbeugel en het stelvoetje aan de andere kant van de bodem move the bottom hinge pin turn the bracket over and replace it fitting the bottom hinge pin Replace both adjustable ack on Ensure the door is aligned horizontally and t the seals are closed on all sides before finally p hinge r and fix it with 2 screws on the back Unscrew Screw oor at knob screw 7 Zet de deur voorzichtig op zijn plaats...

Page 8: ...laatsen of installeren van het apparaat om schade aan de koelelementen te vermijden In geval van een lek dat werd veroorzaakt door schade aan de koelelementen haal de diepvriezer weg van open vlammen of warmtebronnen en verlucht de kamer waar het apparaat zich in bevindt enkele minuten GEBRUIK TEMPERATUURREGELING Je kan de temperatuur van de vriezer instellen naar wens Er zijn drie verschillende s...

Page 9: ... appels peren en perziken hardgekookte eieren yoghurt zure melk zure room en mayonaise Diepvriesproducten bewaren Om te vermijden dat levensmiddelen hun smaak verliezen of uitdrogen steek ze in een luchtdichte verpakking 1 Plaats de levensmiddelen in de verpakking 2 Verwijder alle lucht 3 Dicht de verpakking af 4 Label de verpakking met de inhoud en datum van invriezen Gepaste verpakking plastic f...

Page 10: ...lijk in een koele ruimte 2 Haal de stekker uit het stopcontact 3 Om het ontdooiproces te versnellen plaats een pan met warm water op een staander in de diepvries 4 Veeg de condensatie weg met een doek of spons 5 Veeg het toestel droog 6 Steek de stekker in het stopcontact en stel de temperatuurregelaar op de gewenste positie in 7 Plaats de ingevroren levensmiddelen opnieuw in de diepvries VAKANTIE...

Page 11: ...sluit niet volledig Ontdooi het ijs op de dichting en vorm met de hand het rubber terug zodat de deur volledig sluit Ongewone geluiden Het toestel raakt een wand of een ander object Verplaats zachtjes het toestel MILIEURICHTLIJNEN Dit symbool op het product of op de verpakking wijst erop dat dit product niet als huishoudafval mag worden behandeld Het moet naar een plaats worden gebracht waar elekt...

Page 12: ...re brutale ou anormale Entretien insuffisant ou non conforme Réparation ou modification de l appareil par le consommateur ou un tiers non autorisé Utilisation d éléments ou d accessoires qui ne sont pas recommandés ou fournis par le fournisseur fabricant CONSIGNES DE SÉCURITÉ Les consignes de sécurité suivantes doivent être respectées lors de l utilisation de tout appareil électrique Lisez ces con...

Page 13: ... l extérieur Utilisez l appareil uniquement dans le but auquel il est destiné Utilisez toujours l appareil sur une surface solide sèche et plane Cet appareil ne convient qu à un usage domestique Le fabricant décline toute responsabilité pour des accidents qui découleraient d un mauvais usage de l appareil ou du non respect des instructions fournies dans ce manuel Toutes les réparations en dehors d...

Page 14: ...de l appareil PARTIES 1 Bouton de contrôle de température 2 Tiroirs de congélation 3 Pieds réglables 4 Poignée AVANT LA PREMIÈRE UTILISATION Ôtez tout le matériel d emballage tant à l intérieur qu à l extérieur Nettoyez l extérieur de l appareil à l aide d un chiffon sec Vous pouvez nettoyer l intérieur de l appareil à l aide d un chiffon doux et humide Évitez la lumière directe du soleil et la ch...

Page 15: ...unplugged and empty off it is necessary to tilt the unit backwards You should rest the unit on something solid slip during the door reversing process d must be saved to do the reinstallation of the door it flat as this may damage the coolant system 2 people handle the unit during assembly ews at rear side of top cover er and thermostat knob then place it aside ge and then remove door and place it ...

Page 16: ... Replace both adjustable feet 7 Place the door back on Ensure the door is aligned horizontally and vertically so that the seals are closed on all sides before finally tightening the top hinge 8 Put the top cover and fix it with 2 screws on the back Unscrew Screw Reverse Door 6 Fixez les vis le support de charnière et le pied réglable sur le côté opposé Sécurisez la fixation sans trop resserrer mov...

Page 17: ...t attendez au moins 10 minutes avant de le mettre en marche Votre congélateur utilise de l isobutane R600a comme réfrigérant Bien que le R600a soit un gaz écologique et naturel il est explosif Vous devez donc faire attention pendant le transport et l installation pour éviter que les éléments de réfrigération de l appareil ne soient endommagés En cas de fuite due à la détérioration des éléments de ...

Page 18: ...umes les fruits les herbes les oeufs sans coquilles les produits laitiers comme le fromage et le beurre les plats cuisinés et les restes tels que les soupes les ragoûts la viande cuite et le poisson les plats de pommes de terre les soufflés et les desserts Les aliments suivants ne sont pas adaptés à la congélation Les types de légumes qui sont généralement consommés crus comme la laitue ou les rad...

Page 19: ...6 Après le nettoyage reconnectez l appareil et réglez la température désirée 7 Replacez les aliments dans l appareil DÉGIVRAGE DU CONGÉLATEUR Une couche de givre dans le congélateur nuira à la réfrigération des aliments congelés et augmentera la consommation d énergie Retirez régulièrement la couche de givre Ne retirez pas le givre ou la glace avec un couteau ou un objet pointu Cela pourrait endom...

Page 20: ...dessous avant de prendre contact avec nôtre service après vente L appareil ne fonctionne pas L appareil ne reçoit pas de courant contrôlez si l alimentation de courant est en ordre Contrôlez si la fiche est bien enfoncée dans la prise de courant Contrôlez si la tension utilisée est correcte L appareil refroidit trop La température de l appareil est trop basse Réglez l appareil à une température pl...

Page 21: ... ce produit est éliminé correctement vous favorisez la prévention des conséquences négatives pour l environnement et la santé humaine qui sinon seraient le résulat d un traitement inapproprié des déchets de ce produit Pour obtenir plus de détails sur le recyclage de ce produit veuillez prendre contact avec le bureau municipal de votre région votre service d éliminiation des déchets ménagers ou le ...

Page 22: ...ie Garantie und dieVerantwortung Haftung des Lieferanten und Herstellers entfallen automatisch in den folgenden Fällen Bei Nichtbeachtung der Anweisungen in dieser Bedienungsanleitung Bei falschem Anschluss z B bei einer zu hohen Stromspannung Bei falscher grober oder abnormalerVerwendung Bei unzureichender oder falscherWartung Bei vomVerbraucher oder von nicht ermächtigten Dritten vorgenommenen R...

Page 23: ...ur aus der Steckdose Stellen Sie das Gerät nicht in der Nähe oder auf einer Gasflamme einer elektrischen Platte oder an einer Stelle ab auf der es in Kontakt mit einem Elektroofen oder einem anderen heißen Geräten kommen kann Benutzen Sie das Gerät nicht im Freien Benutzen Sie das Gerät ausschließlich für den Zweck für den es gedacht ist Stellen Sie das Gerät immer auf eine stabile flache und troc...

Page 24: ...btauen und reinigen Lassen Sie es trocknen und lassen Sie dieTür offen um zu vermeiden dass sich im Gerät Schimmel bildet WARNHINWEIS Gerät nie auf oder in die Nähe einer Gasflamme oder elektrischen Platte oder an einen Ort stellen an dem es mit einerWärmequelle in Kontakt kommen könnte An der Rückseite des Geräts befinden sich brennbare Materialien Achten Sie auf das Symbol Brandgefahr brennbares...

Page 25: ...s der Steckdose gezogen wurde und dass das Gerät leer ist 1 Entfernen Sie die Schrauben der oberen Abdeckung oor lips screwdriver Flat bladed screwdriver Hexagonal spanner s unplugged and empty off it is necessary to tilt the unit backwards You should rest the unit on something solid slip during the door reversing process d must be saved to do the reinstallation of the door it flat as this may dam...

Page 26: ...eplace both adjustable feet 7 Place the door back on Ensure the door is aligned horizontally and vertically so that the seals are closed on all sides before finally tightening the top hinge 8 Put the top cover and fix it with 2 screws on the back Unscrew Screw Reverse Door 6 Befestigen Sie die Schrauben den Scharnierbügel und den Stellfuß an der gegenüberliegenden Seite des Bodens Schrauben Sie di...

Page 27: ...erät mindestens 10 Minuten gerade stehen bevor Sie es erneut einschalten Ihr Gerät verwendet das Kühlmittel Isobutan R600a Obwohl R600a ein umweltfreundliches und natürliches Gas ist ist es explosiv Seien Sie deshalb während desTransports oder bei der Installation des Geräts sehr vorsichtig um Schäden an den Kühlelementen zu vermeiden Im Falle eines Lecks durch eine Beschädigung der Kühlelemente h...

Page 28: ...flügel Gemüse Obst Gewürze Eier ohne Schale Milchprodukte wie Käse und Butter Fertiggerichte und Reste von Gerichten wie Suppe Schmorgerichte gekochtes Fleisch und Fisch Kartoffelgerichte Soufflés und Desserts Die folgenden Lebensmittel eignen sich nicht zum Einfrieren Gemüse die allgemein roh verzehrt werden wie Salat Radieschen Eier mit Schale Trauben Äpfel Birnen und Pfirsiche hart gekochte Eie...

Page 29: ...emWasser und reiben Sie diese anschließend gründlich ab 6 Stecken Sie den Stecker nach der Reinigung in die Steckdose und stellen Sie denTemperaturregler erneut in der gewünschtenTemperatur ein 7 Legen Sie die Lebensmittel wieder in das Gerät ABTAUEN Eine Eisschicht im Gefrierschrank hat negative Auswirkungen auf die Kühlung der eingefrorenen Lebensmittel und führt zu einem höheren Stromverbrauch ...

Page 30: ... LÖSUNG Falls Sie ein Problem mit Ihrem Gefrierschrank haben kontrollieren Sie bitte die folgende Frageliste bevor Sie mit unserem Kundendienst Kontakt aufnehmen Gerät funktioniert nicht Das Gerät bekommt keinen Strom kontrollieren ob die Stromzufuhr in Ordnung ist Kontrollieren ob sich der Stecker in der Steckdose befindet Kontrollieren ob die richtige Spannung zurVerfügung steht Das Gerät kühlt ...

Page 31: ... werden muss Durch Ihren Beitrag zum korrekten Entsorgen dieses Produkts schützen Sie die Umwelt und die Gesundheit Ihrer Mitmenschen Umwelt und Gesundheit werden durch falsches Entsorgen gefährdet Weitere Informationen über das Recycling dieses Produkts erhalten Sie von Ihren Rathaus Ihrer Müllabfuhr oder dem Geschäft in dem Sie das Produkt gekauft haben DasVerpackungsmaterial ist wiederverwertba...

Page 32: ...lity of the supplier and manufacturer lapse automatically in the following cases If the instructions in this manual have not been followed In case of incorrect connection e g electrical voltage that is too high In case of incorrect rough or abnormal use In case of insufficient or incorrect maintenance In case of repairs or alterations to the device by the consumer or non authorised third parties I...

Page 33: ...iance outdoors Only use the appliance for its intended use Always use the appliance on a steady dry and level surface Only use the appliance for domestic use The manufacturer can not be held responsible for accidents that result from improper use of the appliance or not following the instructions described in this manual All repairs should be carried out by the manufacturer or its aftersales servi...

Page 34: ...cated on the back of the appliance PARTS 1 Temperature control knob 2 Freezer drawers 3 Levelling feet 4 Handle BEFORE THE FIRST USE Remove the exterior and interior packing wipe the outside thoroughly with a soft dry cloth and the inside with a wet lukewarm cloth Avoid direct sunlight and heat Direct sunlight may affect the acrylic coating Heat sources nearby will cause higher electricity consump...

Page 35: ...ove the adjustable feet from both unscrew 2 Remove the top cover from the freezer oor lips screwdriver Flat bladed screwdriver Hexagonal spanner s unplugged and empty off it is necessary to tilt the unit backwards You should rest the unit on something solid slip during the door reversing process d must be saved to do the reinstallation of the door it flat as this may damage the coolant system 2 pe...

Page 36: ... door is aligned horizontally and y so that the seals are closed on all sides before finally ng the top hinge op cover and fix it with 2 screws on the back Unscrew Screw 8 se Door hermostat knob screw 7 Carefully set the door back into place Ensure the door is aligned horizontally and vertically so that the seals are closed on all sides before finally tightening the top hinge Insert the hinge back...

Page 37: ...eing the warmest and MAX the coldest The running time and temperature are affected by where the freezer is located how often the door is opened and the temperature of the room the freezer is located in When you use the appliance for the first time or after defrosting adjust the control knob to the coldest setting for at least 2 hours before introducing food to be stored and then readjust to the mi...

Page 38: ...s Butter vegetables blanched eggs whole and yolks cooked crayfish minced meat raw pork raw 6 months Fruit dry or in syrup egg whites beef raw whole chicken lamb raw fruit cakes 12 months Never forget When you freeze fresh foods whit a use by best before best by date you must freeze them before the expiry of this date Check that the food was not already frozen Indeed frozen food that has thawed com...

Page 39: ... is off During power failures of longer duration take steps to protect your food by blacking dry ice on top of packages Frozen food should not be affected if the power failure lasts for less than 15 hours Do not refreeze frozen foods that have thawed completely The food may be dangerous to eat TROUBLE SHOOTING Frequently a problem is minor and a service call may not be necessary use this trouble s...

Page 40: ...By ensuring this product is disposed of correctly you will help prevent potential negative consequences for the environment and human health which could otherwise be caused by inappropriate waste handling of this product For more detailed information about recycling of this product please contact your local city office your household waste disposal service or the shop where you purchased the produ...

Page 41: ... todos los materiales de embalaje y etiquetas promocionales Asegúrese de que los niños no puedan jugar con el material de embalaje Este aparato es adecuado para su uso en el ámbito doméstico y entornos similares como Zona de cocina para el personal de tiendas oficinas y otros entornos profesionales similares Granjas Habitaciones de hoteles y moteles y otros entornos de carácter residencial Habitac...

Page 42: ...or inflamable Asegúrese de que el circuito de refrigeración no se daña por ejemplo durante el transporte o la instalación Asegúrese de que el cable no quede aplastado o dañado por la parte trasera de la unidad Esto puede causar sobrecalentamiento y en consecuencia se podría producir un incendio Asegúrese de tener acceso al enchufe del aparato No tire del cable Si la toma de corriente está suelta n...

Page 43: ...ar el congelador a la red eléctrica se debe comprobar que la tensión de la placa de especificaciones del aparato se corresponde con el voltaje de su hogar Otra tensión puede dañar el aparato El enchufe es la única forma de desconectar el aparato de la alimentación asegúrese de que es fácil acceder al mismo Asegúrese de que el aire pueda circular libremente alrededor del congelador Para superficies...

Page 44: ...e the unit during assembly ews at rear side of top cover er and thermostat knob then place it aside ge and then remove door and place it on a soft pad to hinge Then remove the adjustable feet from both 7 unscrew 3 Retire los tornillos y a continuación retire la bisagra superior que mantiene la puerta en su lugar Levante la puerta y colóquela sobre una superficie suave para evitar arañazos oor lips...

Page 45: ... tanto horizontal como verticalmente de manera que las juntas estén cerradas por todos los lados antes de unir completamente la bisagra superior Vuelva a colocar la bisagra y atornille en la parte superior del aparato move the bottom hinge pin turn the bracket over and replace it fitting the bottom hinge pin Replace both adjustable ack on Ensure the door is aligned horizontally and t the seals are...

Page 46: ...itúe el control durante un mínimo de 2 horas en la posición más fría antes de introducir los alimentos y a continuación seleccione la posición media CONGELACIÓNY CONSERVACIÓN DE ALIMENTOS EN EL CONGELADOR Utilice el congelador Para conservar alimentos congelados Para fabricar cubitos de hielo Para congelar alimentos Nota asegúrese de que la puerta del congelador esté siempre bien cerrada Compra de...

Page 47: ...ra de huevo carne de ternera cruda pollo entero carne de cordero cruda bizcochos de frutas 12 meses No olvidar Si congela alimentos frescos que tengan una fecha de caducidad deberá congelarlos antes de que se alcance esa fecha de caducidad Asegúrese de que los alimentos no se hayan congelado anteriormente Los alimentos congelados que se han descongelado por completo no pueden volver a congelarse U...

Page 48: ...e un apagón más largo debe adoptar otras medidas para conservar los alimentos por ejemplo colocar hielo seco sobre los alimentos Los alimentos congelados se mantienen en buenas condiciones si el fallo de alimentación no dura más de 15 horas No vuelva a congelar los alimentos que se hayan descongelado por completo Esos alimentos pueden perjudicar su salud PROBLEMASY SUS SOLUCIONES Cuando tenga un p...

Page 49: ...egura de que este producto se desecha correctamente usted ayudará a evitar posibles consecuencias negativas para las personas y el medio ambiente que serían causadospor un tratamiento de residuos inadecuado Para obtener información más detallada sobre el reciclaje de este producto póngase en contacto con su ayuntamiento o con la empresa o departamento responsable del servicio de recogida de basura...

Page 50: ...l prodotto togliere tutti gli imballi e gli eventuali adesivi promozionali Assicurarsi che i bambini non giochino con gli imballaggi Questo apparecchio è destinato unicamente all uso domestico e in ambienti analoghi quali angoli cottura riservati al personale nei negozi negli uffici e in altri ambienti professionali Fattorie Camere di alberghi motel e altre strutture ricettive residenziali Camere ...

Page 51: ...mabile Assicurarsi che il circuito di raffreddamento non subisca danneggiamenti per esempio durante il trasporto o l installazione Assicurarsi che la spina dietro all apparecchio non si pieghi e non subisca danni Ciò potrebbe causare surriscaldamento o incendio Assicurarsi di avere libero accesso alla spina dell apparecchio Non tirare il cavo Se la presa di corrente è staccata non inserirvi la spi...

Page 52: ...te elettrica controllare se la tensione riportata sulla targhetta dell apparecchio corrisponde a quella domestica Se la tensione è diversa l apparecchio potrebbe subire danni Togliere la spina è il solo modo per staccare l apparecchio dall alimentazione elettrica quindi è necessario che sia sempre facilmente raggiungibile Assicurarsi che vi sia una buona ventilazione intorno al congelatore In caso...

Page 53: ... handle the unit during assembly ews at rear side of top cover er and thermostat knob then place it aside ge and then remove door and place it on a soft pad to hinge Then remove the adjustable feet from both 7 unscrew 3 Togliere le viti e la cerniera superiore che tengono in sede lo sportello Sollevare lo sportello e appoggiarlo su una superficie morbida per evitare che si graffi oor lips screwdri...

Page 54: ... verticalmente in modo che le guarnizioni siano chiuse su tutti i lati prima di fissare completamente la cerniera superiore Rimettere in sede la cerniera e fissarla sulla parte superiore del congelatore move the bottom hinge pin turn the bracket over and replace it fitting the bottom hinge pin Replace both adjustable ack on Ensure the door is aligned horizontally and t the seals are closed on all ...

Page 55: ...re gli alimenti al suo interno impostare quindi la temperatura desiderata CONGELARE E CONSERVARE GLI ALIMENTI NEL CONGELATORE Utilizzare il congelatore per conservare alimenti surgelati per fare i cubetti di ghiaccio per congelare gli alimenti Nota assicurarsi che lo sportello del congelatore sia sempre perfettamente chiuso Aprire lo sportello del congelatore solo quando è necessario Acquistare pr...

Page 56: ...cruda 6 mesi Frutta secca o sciroppata albumi carne bovina cruda polli interi carne di agnello cruda torte alla frutta 12 mesi Da non dimenticare se si congelano alimenti freschi che indicano una data di scadenza minima è necessario che vengano congelati prima della scadenza di tale data Controllare che gli alimenti non siano già stati congelati in precedenza Gli alimenti congelati che sono stati ...

Page 57: ...parate entro una o due ore e non modificano la temperatura del congelatore In caso di interruzione della corrente elettrica è comunque necessario ridurre al minimo le aperture dello sportello Per interruzioni di maggiore durata è necessario proteggere il cibo per esempio con del ghiaccio secco Gli alimenti congelati rimangono intatti se la corrente non manca per più di 15 minuti Gli alimenti che s...

Page 58: ...Deve al contrario essere conferito al punto di raccolta predisposto per il riciclo delle apparecchiature elettriche ed elettroniche Facendo in modo che questo prodotto venga smaltito correttamente aiuterete a prevenire potenziali conseguenze negative per l ambiente e la salute dell uomo che potrebbero essere causate da uno smaltimento non corretto Per maggiori informazioni sul riciclo di questo pr...

Page 59: ...o plnění uplatňuje kupující u prodávajícího na adrese jeho provozovny v níž je přijetí reklamace možné s ohledem na sortiment prodávaného zboží případně i v sídle nebo místě podnikání Za okamžik uplatnění reklamace se považuje okamžik kdy prodávající obdržel od kupujícího reklamované zboží Reklamaci lze také uplatnit v servisním středisku na adrese DOMO elektro s r o Na Kobyle 783 345 06 Kdyně Čes...

Page 60: ...u Nikdy neumisťujte přístroj v blízkosti plynového nebo elektrického sporáku či trouby nebo do blízkosti jiného přístroje produkujícího teplo Nepoužívejte přístroj venku Používejte přístroj pouze k účelům ke kterým je určený Přístroj vždy používejte pouze na stabilním suchém a rovném místě Přístroj je určený pouze pro použití v domácnostech Výrobce nemůže ručit za škody a nehody způsobené nevhodný...

Page 61: ...divo které je velmi hořlavé a vznětlivé Věnujte pozornost symbolu Nebezpečí požáru hořlavé materiály který se nachází na zadní straně spotřebiče a dbejte bezpečnostních pokynů a bezpečnosti práce ČÁSTI 1 Nastavitelný termostat 2 Šuplíky přihrádky 3 Výškově nastavitelné nožičky 4 Rukojeť PŘED PRVNÍM POUŽITÍM Nejdříve odstraňte všechny obaly reklamní i ochranné folie Vnější prostory otřete jemným su...

Page 62: ... and place it on a soft pad to hinge Then remove the adjustable feet from both unscrew 2 Odejměte horní kryt mrazáku oor lips screwdriver Flat bladed screwdriver Hexagonal spanner s unplugged and empty off it is necessary to tilt the unit backwards You should rest the unit on something solid slip during the door reversing process d must be saved to do the reinstallation of the door it flat as this...

Page 63: ...e bottom hinge pin Replace both adjustable ack on Ensure the door is aligned horizontally and t the seals are closed on all sides before finally p hinge r and fix it with 2 screws on the back Unscrew Screw 8 oor at knob screw 7 Na spodní pant nasaďte zpět dveře Dveře musí být vodorovně aby jejich těsnění přiléhalo po celém obvodu Pokud dveře dobře těsní můžete usadit i horní pant a přišroubovat ho...

Page 64: ...ím jak často se otvírají dveře Pokud používáte mrazničku poprvé po odmražování nastavte termostat na 2 hodiny na maximální chlazení poté vložte potraviny a termostat si upravte na požadovanou hodnotu ZAMRAZOVÁNÍ A SKLADOVÁNÍ V MRAZÁKU Přístroj můžete využít uchovávat hluboce zamražené potraviny výroba kostek ledu zamražovat potraviny UPOZORNĚNÍ vždy se přesvědčte že jste důkladně zavřeli dveře Uch...

Page 65: ...načením datem spotřeby musí je zamrazit před tímto datem Zkontrolujte zda potraviny už nebyly jednou zamražené neboť každé jídlo se smí zamražovat pouze jednou ČIŠTĚNÍ A ÚDRŽBA ČIŠTĚNÍ 1 Nepoužívejte žádná drsná čistidla která mohou poškodit povrch přístroje 2 Nejdříve přístroj vypněte vypojte zástrčku z el sítě 3 Všechno jídlo z přístroje vyjměte a nechte někde v chladu 4 Mrazák vytírejte jemným ...

Page 66: ...mělo všechno zamražené jídlo vydržet a udržet si svoji kvalitu Pokud již nějaké potraviny kompletně rozmrzly nikdy je nezamražujte zpět ŘEŠENÍ MOŽNÝCH PROBLÉMŮ Stává se že nastane problém který lze snadno vyřešit i bez odborné pomoci Nejdříve zkontrolujte níže zda se nejedná právě o tento typ problému Přístroj nepracuje zkontrolujte přívod energie a zda nevypadl el proud zapojte zástrčku do zásuvk...

Page 67: ...ístech určených ke sběru a likvidaci elektrických a elektronických zařízení Dodržením tohoto doporučení chráníte životní prostředí a zdraví spoluobčanů Více informací o možnostech likvidace nebezpečného odpadu obdržíte na obecních nebo městských úřadech sběrných dvorech nebo v prodejně kde jste přístroj zakoupili Obalové materiály jsou recyklovatelné nakládejte s nimi podle předpisů pro životní pr...

Page 68: ... uplatňuje kupujúci u predávajúceho na adrese jeho prevádzky v ktorej je prijatie reklamácie možné s ohľadom na sortiment predávaného tovaru prípadne aj v sídle alebo mieste podnikania Za okamih uplatnenia reklamácie sa považuje okamih kedy predávajúci dostal od kupujúceho reklamovaný tovar Reklamáciu možno tiež uplatniť v servisnom stredisku na adrese DOMO elektro s r o Na Kobyle 783 345 06 Kdyně...

Page 69: ...stroj bežať bez dozoru Nikdy neumiestňujte prístroj v blízkosti plynového alebo elektrického sporáka či rúry alebo do blízkosti iného prístroja produkujúceho teplo Nepoužívajte prístroj vonku Používajte prístroj iba na účely ku ktorým je určený Prístroj vždy používajte iba na stabilnom suchom a rovnom mieste Prístroj je určený len na použitie v domácnostiach Výrobca nemôže ručiť za škody a nehody ...

Page 70: ...veľmi horľavé a zápalné Venujte pozornosť symbolu Nebezpečenstvo požiaru horľavé materiály ktorý sa nachádza na zadnej strane spotrebiča a dbajte bezpečnostných pokynov a bezpečnosti práce ČASTI 1 Nastaviteľný termostat 2 Šuplíky priehradky 3 Výškovo nastaviteľné nožičky 4 Rukoväť PRED PRVÝM POUŽITÍM Najskôr odstráňte všetky obaly reklamné aj ochranné fólie Vonkajšie priestory utrite jemnou suchou...

Page 71: ... place it on a soft pad to hinge Then remove the adjustable feet from both unscrew 2 Odstráňte horný kryt mrazničky oor lips screwdriver Flat bladed screwdriver Hexagonal spanner s unplugged and empty off it is necessary to tilt the unit backwards You should rest the unit on something solid slip during the door reversing process d must be saved to do the reinstallation of the door it flat as this ...

Page 72: ...inge pin Replace both adjustable ack on Ensure the door is aligned horizontally and t the seals are closed on all sides before finally p hinge r and fix it with 2 screws on the back Unscrew Screw oor at knob screw 7 Na spodnej pánt nasaďte späť dvere Dvere musia byť vodorovne aby ich tesnenie priliehalo po celom obvode Ak dvere dobre tesní môžete usadiť aj horný pánt a priskrutkovať ho move the bo...

Page 73: ...ľ používate chladničku prvýkrát po odmrazovanie nastavte termostat na 2 hodiny na maximálne chladenie potom vložte potraviny a termostat si upravte na požadovanú hodnotu ZAMRAZOVANIE A SKLADOVANIE V MRAZNIČKE Prístroj môžete využiť uchovávať hlboko zamrazené potraviny výroba kociek ľadu zamrazovať potraviny UPOZORNENIE vždy sa presvedčte že ste dôkladne zavreli dvere Uchovanie zmrazených potravín ...

Page 74: ...raviny s označením dátumom spotreby musí ich zamraziť pred týmto dátumom Skontrolujte či potraviny už neboli raz zamrazené lebo každé jedlo sa smie zamrazovať iba raz ČISTENIE A ÚDRŽBA ČISTENIE 1 Nepoužívajte žiadna drsná čistidlá ktoré môžu poškodiť povrch prístroja 2 Najskôr prístroj vypnite vypojte zástrčku z el siete 3 Všetko jedlo z prístroja vyberte a nechajte niekde v chlade 4 Mraznička vyt...

Page 75: ...ok kratší ako 15 hodín tak by malo všetko zamrazené jedlo vydržať a udržať si svoju kvalitu Ak už nejaké potraviny kompletne sa rozpustili nikdy ich nezmrazujte späť RIEŠENIE MOŽNÝCH PROBLÉMOV Stáva sa že nastane problém ktorý sa dá ľahko vyriešiť aj bez odbornej pomoci Najskôr skontrolujte nižšie či sa nejedná práve o tento typ problému Prístroj nepracuje skontrolujte prívod energie a či nevypado...

Page 76: ... na zber a likvidáciu elektrických a elektronických zariadení Dodržaním tohto odporúčania chránite životné prostredie a zdravie spoluobčanov Viac informácií o možnostiach likvidácie nebezpečného odpadu obdržíte na obecných alebo mestských úradoch zberných dvoroch alebo v predajni kde ste prístroj zakúpili Obalové materiály sú recyklovateľné nakladajte s nimi podľa predpisov pre životné prostredie ...

Page 77: ...77 DO1052DV www domo elektro be SK ...

Page 78: ...78 DO1052DV ...

Page 79: ...79 DO1052DV www domo elektro be ...

Page 80: ...essoires en onderdelen online via of scan hier COMMANDEZ d authentiques accessoires et pièces Domo en ligne sur ou scannez ici BESTELLEN SIE die Domo Original Zubehör und Ersatzteile online über oder hier scannen ORDER the original Domo accessories and parts online at or scan here webshop domo elektro be Webshop ...

Reviews: