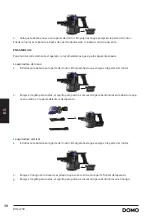
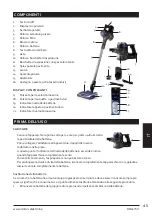
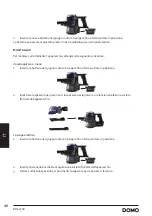
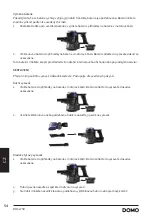
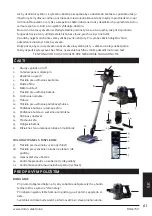
background image

48

DO227SV

IT

ACCESSORI

Sull’aspirapolvere portatile è possibile utilizzare i seguenti accessori, togliendo 
l’asta o fissandoli alla stessa:
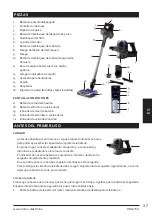
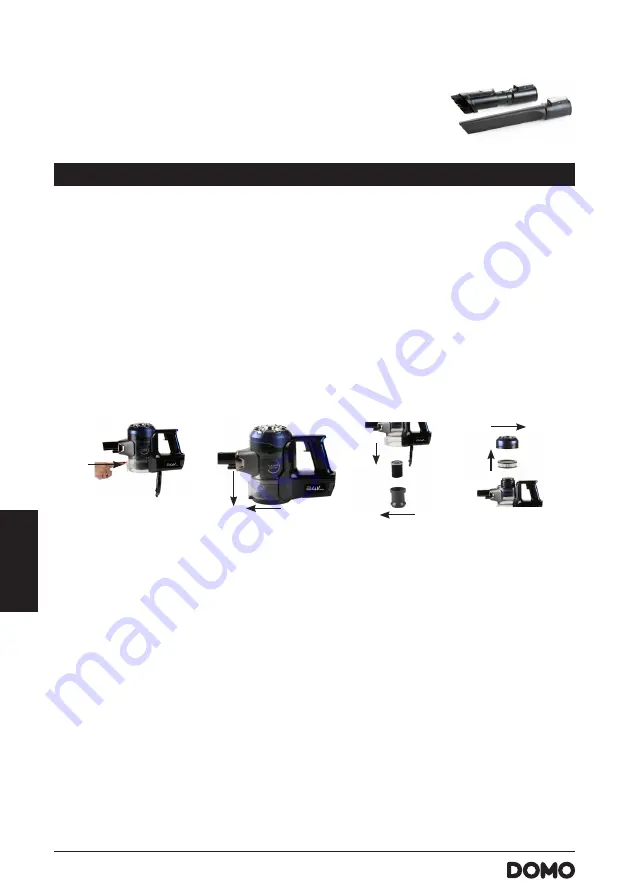
1. 

Spazzola per la polvere: per mobili, librerie, tende e superfici difficili da 
pulire.

2. 

Lancia: per tastiere, scale, angoli, ecc.

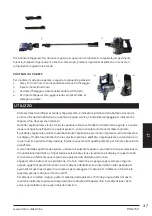
PULIZIA E MANUTENZIONE

PULIRE L’ASPIRAPOLVERE

Pulire l’apparecchio con un panno umido. Asciugarlo con cura. Non immergere mai il blocco motore in 
acqua.

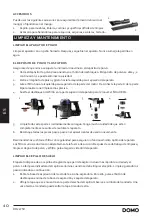
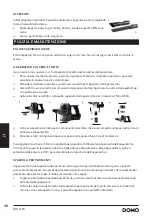
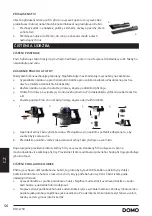
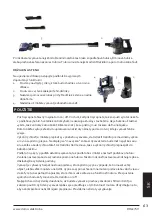
IL SERBATOIO POLVERE E I FILTRI

Assicurarsi di non superare mai l’indicazione di livello massimo del serbatoio polvere.
1. 

Per svuotare il serbatoio polvere, premere il pulsante di sblocco. Il serbatoio polvere si apre ed è 
possibile rimuovere lo sporco voluminoso.

2. 

Richiudere il serbatoio polvere e girarlo verso sinistra per sganciarlo dall’apparecchio.

3. 

Girare il filtro verso sinistra per rimuoverlo dal gruppo motore. Sganciare la parte A dalla parte B per 
una pulizia più accurata.

4. 

Svitare lo sblocco del filtro sulla parte superiore dell’apparecchio per rimuovere il filtro HEPA.

1

2

3

A

B

4

5. 

Pulire accuratamente tutti questi componenti. Accertarsi che siano completamente asciutti prima di 
riutilizzare l’apparecchio. 

6. 

Rimontare tutti i componenti passo per passo nell’apparecchio prima di riutilizzarlo.

Consigliamo di sostituire i filtri con regolarità per garantire l’ottimale funzionamento dell’apparecchio. 
I filtri sporchi causano la drastica riduzione della potenza di aspirazione. Dopo ogni utilizzo, pulire il 
serbatoio della polvere e i filtri per aumentare la durata di vita dell’apparecchio.

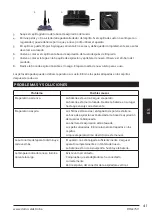
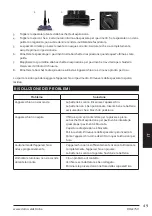
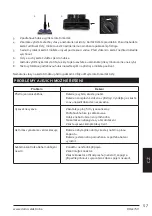
SPAZZOLA PER PAVIMENTI

L’apparecchio ha una spazzola da pavimento extra large che permette di assorbire sporco e polvere 
ancora più velocemente. La spia della spazzola del pavimento si accende per indicare che la spazzola del 
pavimento deve essere pulita. Pulirla procedendo come segue:
1. 

Togliere la bocchetta di aspirazione. Per farlo, premere il tasto di sblocco sulla bocchetta stessa ed 
estrarla dall’aspirapolvere.

2. 

Svitare la chiusura sul lato destro della spazzola per pavimenti per aprirla. Osservare il simbolo di 
chiusura. Una volta aperto il vano, è possibile sganciare lo sportellino tirandolo.

2

1

Summary of Contents for Domo DO227SV

Page 1: ... d emploi Aspirateur balai Gebrauchsanleitung Handstaubsauger Instruction booklet Stick vacuum cleaner Manual de instrucciones Aspirador escoba Istruzioni per l uso Scopa elettrica Návod k použití Tyčový vysavač 2v1 Návod na použitie Tyčový vysávač 2v1 ...

Page 2: ...a detenidamente todas las instrucciones Conserve este manual para futura referencia Leggere con attenzione le istruzioni conservarle per future consultazioni Před použitím si důkladně přečtěte tento manuál manuál si uschovejte i pro případ budoucího nahlédnutí Pred použitím si dôkladne prečítajte tento manuál manuál si uschovajte aj pre prípad budúceho nahliadnutie Required for R32 R290 Refrigeran...

Page 3: ...in de winkel waar je het toestel hebt aangekocht De garantie op accessoires en onderdelen die onderhevig zijn aan slijtage bedraagt 6 maanden De garantie en verantwoordelijkheid aansprakelijkheid van de leverancier en fabrikant vervallen automatisch in de volgende gevallen Bij het niet naleven van de instructies in deze handleiding Bij verkeerde aansluiting vb te hoge elektrische spanning Bij verk...

Page 4: ...pcontact te trekken Laat een werkend toestel niet zonder toezicht achter Zet dit toestel nooit op of in de buurt van een gasvuur of elektrisch vuur of op een plaats waar het in contact zou kunnen komen met een warm toestel Gebruik het toestel niet buiten Gebruik het toestel enkel voor het doel waarvoor het bestemd is Gebruik het toestel altijd op een stevig droog effen oppervlak Gebruik het toeste...

Page 5: ...ningen en bewegende onderdelen Gebruik het toestel nooit zonder filters De motor zal hierdoor beschadigd geraken en onbruikbaar worden BEWAAR DEZE INSTRUCTIES OM LATERTE RAADPLEGEN ONDERDELEN 1 Aan uitknop 2 Display met knoppen 3 Stofreservoir 4 Ontgrendelknop stofreservoir 5 Ontgrendeling filter 6 Motorgedeelte 7 Ontgrendelknop batterij 8 Ontgrendelknop steel 9 Steel 10 Ontgrendeling vloerzuigmon...

Page 6: ...g vervangen door onderstaande stappen te volgen 1 Verwijder de batterij uit het motorgedeelte via de ontgrendelknop voor de batterij 2 Schuif de nieuwe batterij in het motorgedeelte Duw totdat ze vastklikt in het motorgedeelte Deze batterij kan je kopen via onze webshop of dienst na verkoop MONTAGE Om het toestel correct te monteren volg je best de volgende stappen De handstofzuiger 1 Schuif de ba...

Page 7: ... knipperen om aan te geven dat het toestel moet worden opgeladen Wanneer je het toestel aanzet zal de roterende vloerborstel onderaan de vloerzuigmond beginnen te draaien Hierdoor zal het vuil in de opening gekeerd worden en zo opgezogen worden Het vuil zal zich in het stofreservoir verzamelen Je kan tijdens het stofzuigen kiezen voor de maximumsnelheid door op de knop voor maximumsnelheid te duwe...

Page 8: ...r links om los te maken van het toestel 3 Draai de filter naar links om te verwijderen van de motoreenheid Maak deel A los van deel B voor een meer nauwkeurige reiniging 4 Draai de ontgrendeling van de filter bovenaan het toestel los om de HEPA filter te verwijderen 1 2 3 A B 4 5 Reinig al deze onderdelen zorgvuldig met water Let hierbij wel goed op dat deze volledig droog zijn alvorens het toeste...

Page 9: ...loerzuigmond terug op de steel Het toestel is weer klaar voor gebruik Vastzittende haren kunnen het toestel of de vloer beschadigen Verwijder telkens de vastzittende haren uit de borstels PROBLEEM EN OPLOSSING Probleem Oplossing Het toestel start niet De batterij is leeg Laad het toestel op De batterij is niet goed geplaatst Schuif de batterij op zijn plaats tot deze vastklikt Het toestel zuigt ni...

Page 10: ... dit product niet als huishoudafval mag worden behandeld Het moet naar een plaats worden gebracht waar elektrische en elektronische apparatuur wordt gerecycleerd Als je ervoor zorgt dat dit product op de correcte manier wordt verwijderd voorkom je mogelijk voor mens en milieu negatieve gevolgen die zich zouden kunnen voordoen in geval van verkeerde afvalbehandeling Voor meer details in verband met...

Page 11: ...tion contraire brutale ou anormale Entretien insuffisant ou non conforme Réparation ou modification de l appareil par le consommateur ou un tiers non autorisé Utilisation d éléments ou d accessoires qui ne sont pas recommandés ou fournis par le fournisseur fabricant CONSIGNES DE SÉCURITÉ Les consignes de sécurité suivantes doivent être respectées lors de l utilisation de tout appareil électrique L...

Page 12: ...ct avec un appareil chaud N utilisez pas l appareil à l extérieur Utilisez l appareil uniquement dans le but auquel il est destiné Utilisez toujours l appareil sur une surface solide sèche et plane Cet appareil ne convient qu à un usage domestique Le fabricant décline toute responsabilité pour des accidents qui découleraient d un mauvais usage de l appareil ou du non respect des instructions fourn...

Page 13: ...filtres Cela causerait des dégâts au moteur et rendrait ce dernier inutilisable CONSERVEZ CES CONSIGNES POUR POUVOIR LES CONSULTER ULTÉRIEUREMENT PARTIES 1 Bouton marche arrêt 2 Affichage avec boutons 3 Réservoir de poussière 4 Bouton de déverrouillage du réservoir de poussière 5 Déverrouillage du filtre 6 Bloc moteur 7 Bouton de déverrouillage de la batterie 8 Bouton de déverrouillage du manche 9...

Page 14: ...apes mentionnées ci dessous 1 Retirez la batterie du bloc moteur via le bouton de déverrouillage de la batterie 2 Placez la nouvelle batterie dans le bloc moteur Poussez jusqu à ce que vous entendiez un clic Vous pouvez acheter cette batterie via notre webshop ou service après vente MONTAGE Suivez les étapes suivantes afin de monter correctement l appareil L aspirateur à main 1 Glissez la batterie...

Page 15: ...rgée le témoin lumineux commence à clignoter pour indiquer que l appareil doit être rechargé Lorsque vous allumez l appareil la brosse rotative pour sols située à la partie inférieure du suceur pour sols commencera à tourner Par ce mouvement la saleté sera envoyée dans l ouverture et aspirée de la sorte La saleté s accumulera dans le réservoir de poussière Lorsque vous passez l aspirateur vous pou...

Page 16: ...nt d enlever les saletés encombrantes 2 Fermez le réservoir de poussière et tournez le vers la gauche pour le détacher de l appareil 3 Tournez le filtre vers la gauche pour le retirer du bloc moteur Détachez la partie A de la partie B pour un nettoyage plus précis 4 Desserrez le déverrouillage du filtre en haut de l appareil pour retirer le filtre HEPA 1 2 3 A B 4 5 Nettoyez toutes ces pièces prof...

Page 17: ...es attention au symbole du petit cadenas 8 Glissez le suceur pour sols à nouveau sur le manche L appareil est à nouveau prêt à l emploi Des cheveux coincés dans les brosses peuvent endommager votre appareil ou votre sol Retirez donc toujours les cheveux des brosses PROBLÈMES ET SOLUTIONS Problème Solution L appareil ne démarre pas La batterie est déchargée Rechargez l appareil La batterie n a pas ...

Page 18: ... que ce produit ne peut être traité comme déchet ménager Il doit plutôt être remis au point de ramassage concerné se chargeant du recyclage du matériel électrique et électronique En vous assurant que ce produit est éliminé correctement vous favorisez la prévention des conséquences négatives pour l environnement et la santé humaine qui sinon seraient le résulat d un traitement inapproprié des déche...

Page 19: ... Monate Die Garantie und dieVerantwortung Haftung des Lieferanten und Herstellers entfallen automatisch in den folgenden Fällen Bei Nichtbeachtung der Anweisungen in dieser Bedienungsanleitung Bei falschem Anschluss z B bei einer zu hohen Stromspannung Bei falscher grober oder abnormalerVerwendung Bei unzureichender oder falscherWartung Bei vomVerbraucher oder von nicht ermächtigten Dritten vorgen...

Page 20: ...irekt am Stecker selber und nicht an der Kabelschnur aus der Steckdose Lassen Sie das im Betrieb befindliche Gerät nicht unbeaufsichtigt Stellen Sie das Gerät nicht in der Nähe oder auf einer Gasflamme einer elektrischen Platte oder an einer Stelle ab auf der es in Kontakt mit einem Elektroofen oder einem anderen heißen Geräten kommen kann Benutzen Sie das Gerät nicht im Freien Benutzen Sie das Ge...

Page 21: ...nte Entfernen Sie große und scharfe Gegenstände vom Boden um eine Beschädigung der Plastikteile der Bürsten und des Motors zu vermeiden Halten Sie locker sitzende Kleidung Finger und andere Körperteile fern von Öffnungen und beweglichenTeilen Benutzen Sie das Gerät niemals ohne Filter Der Motor wird dadurch beschädigt und unbrauchbar BEWAHREN SIE DIESE HINWEISE ZUM SPÄTEREN NACHSCHLAGEN AUF TEILE ...

Page 22: ...s die Batterie immer kürzer leistungsfähig ist und immer länger geladen werden muss bedeutet dies dass sie verbraucht ist Die Batterie kann ganz einfach über die folgenden Schritte ausgetauscht werden 1 Entfernen Sie die Batterie aus dem Motorteil über die Entriegelungstaste für die Batterie 2 Schieben Sie die neue Batterie in das Motorteil Schieben Sie solange bis sie im Motorteil einrastet Diese...

Page 23: ...cken Sie die beiliegenden Dübel in dieWand 3 Schrauben Sie dieWandbefestigung mit den beiliegenden Schrauben an derWand fest 4 Zur Aufbewahrung des Geräts hängen Sie es ganz einfach an dieWandbefestigung GEBRAUCH Betätigen Sie den An Ausschalter um das Gerät einzuschalten Die Batterieanzeige leuchtet auf um den Batteriestand anzuzeigen Wenn die Batterie fast leer ist blinkt die Anzeige um anzuzeig...

Page 24: ... Stufen Tastatur REINIGUNG UND WARTUNG REINIGUNG DES GERÄTS Reinigen Sie das Gerät mit einem feuchtenTuch Trocken Sie das Gerät anschließend gut ab Tauchen Sie das Gerät auf keinen Fall inWasser ein STAUBBEHÄLTER UND DIE FILTER Achten Sie darauf dass Sie die maximale Füllmenge des Staubbehälters nicht überschreiten 1 Öffnen Sie den Staubbehälter indem Sie auf denVerriegelungsknopf drücken Der Stau...

Page 25: ... Sorgen Sie dafür dass diese komplett trocken ist bevor sie erneut ins Gerät eingesetzt wird 6 Setzen Sie die Bodenbürste erneut in die Bodendüse ein wenn sie gereinigt wurde 7 Setzen Sie die Klappe der Bodendüse wieder auf und drehen Sie sie wieder fest Achten Sie auf das Schlosssymbol 8 Schieben Sie die Bodendüse auf den Stiel zurück Das Gerät ist jetzt einsatzbereit Festsitzende Haare können da...

Page 26: ...gieverbrauch bei Nulllast 0 08 W ENTSORGEN Dieses Symbol auf dem Produkt oder seinerVerpackung weist darauf hin dass dieses Produkt nicht als normaler Haushaltsabfall zu behandeln ist sondern an einem Sammelpunkt für das Recyling von elektrischen und elektronischen Geräten abgegeben werden muss Durch Ihren Beitrag zum korrekten Entsorgen dieses Produkts schützen Sie die Umwelt und die Gesundheit I...

Page 27: ...esponsibility of the supplier and manufacturer lapse automatically in the following cases If the instructions in this manual have not been followed In case of incorrect connection e g electrical voltage that is too high In case of incorrect rough or abnormal use In case of insufficient or incorrect maintenance In case of repairs or alterations to the device by the consumer or non authorised third ...

Page 28: ... intended use Always use the appliance on a steady dry and level surface Only use the appliance for domestic use The manufacturer can not be held responsible for accidents that result from improper use of the appliance or not following the instructions described in this manual All repairs should be carried out by the manufacturer or its aftersales service Never immerse the appliance the cord or th...

Page 29: ...8 Handle release button 9 Tube 10 Release button floor nozzle 11 Floor nozzle with rotating floor brush 12 Floor brush indicator light 13 Crevice vacuum cleaner 14 Dust brush 15 Adapter 16 Wall fixing screws and plugs included DISPLAY WITH BUTTONS 17 Button for maximum speed 18 Button for carpet or hard floors 19 Battery level indicator 20 Carpet or hard floor indicator 21 Maximum speed indicator ...

Page 30: ... service MONTAGE To set up the machine properly please follow the steps below The hand vacuum cleaner 1 Insert the batteries of the motor compartment Push until it clicks into place in the motor compartment 2 Click the floor brush dust brush or crevice tool securely into place in the opening on the front of the appliance The upright vacuum cleaner 1 Insert the batteries of the motor compartment Pu...

Page 31: ...ng by pressing the maximum speed button The display will show that the maximum speed is activated The vacuum cleaner now uses its highest suction power Press this button again to return to the standard speed Depending on the surface to be vacuumed use the button for carpet or hard floors to select the desired setting The selected setting is shown on the display This will allow dirt and dust to be ...

Page 32: ...ce before using it again We advise replacing the filters regularly to ensure an optimal operation of the machine Dirty filters will reduce the suction power drastically After every cleaning clean the dust reservoir and the filters to extend the life span of your machine THE FLOOR BRUSH The appliance has an extra large floor brush which allows dirt and dust to be collected even faster The indicator...

Page 33: ...are dirty the dust reservoir is full The floor nozzle is clogged the floor brush is blocked The nozzle opening is clogged Stuck hairs Remove the hairs stuck on the brushes Clean the machine as described in this manual The running time of the machine is shorter and shorter The machine is not sufficiently charged Charge the machine fully and try again The battery is broken or old Replace the battery...

Page 34: ...y ensuring this product is disposed of correctly you will help prevent potential negative consequences for the environment and human health which could otherwise be caused by inappropriate waste handling of this product For more detailed information about recycling of this product please contact your local city office your household waste disposal service or the shop where you purchased the produc...

Page 35: ...todos los materiales de embalaje y etiquetas promocionales Asegúrese de que los niños no puedan jugar con el material de embalaje Este aparato es adecuado para su uso en el ámbito doméstico y entornos similares como Zona de cocina para el personal de tiendas oficinas y otros entornos profesionales similares Granjas Habitaciones de hoteles y moteles y otros entornos de carácter residencial Habitaci...

Page 36: ...polvo y otras partículas finas Evite también la aspiración de objetos grandes La aspiradora se podría bloquear el motor se podría sobrecalentar o se podrían producir otros tipos de daños Asegúrese de que la entrada de aire o la boca de aspiración del suelo no queda bloqueada Asegúrese de que el cable no entra en contacto con líquidos Cargue siempre una batería nueva por completo Desconecte el ench...

Page 37: ...a ANTES DEL PRIMER USO CARGAR Antes de utilizarlo por primera vez cargue el aparato durante 24 horas para poder aprovechar la capacidad completa de la batería En primer lugar conecte el adaptador al aparato y a continuación introduzca el adaptador en la toma de corriente El indicador del nivel de batería se encenderá e indicará cuándo se ha cargado completamente el aparato No es posible poner en m...

Page 38: ...ería en la parte del motor Empújela hasta que encaje en la parte del motor 2 Encaje el cepillo para suelos el cepillo para polvo o el accesorio para hendiduras en la abertura que se encuentra en la parte delantera del aparato La aspiradora vertical 1 Introduzca la batería en la parte del motor Empújela hasta que encaje en la parte del motor 2 Encaje el mango en la boca de aspiración que se encuent...

Page 39: ...ación del suelo empezará a girar De esta forma la suciedad se empujará en la apertura y se aspirará La suciedad se acumulará en el depósito de polvo Mientras aspire puede escoger la velocidad máxima pulsando el botón de velocidad máxima En la pantalla el indicador muestra que se ha activado la velocidad máxima La aspiradora funciona ahora con la máxima potencia de aspiración Pulse de nuevo este bo...

Page 40: ...la parte superior del aparato para remover el filtro HEPA 1 2 3 A B 4 5 Limpie todas estas partes cuidadosamente con agua Tenga mucho cuidado de que estén completamente secas antes de reutilizar el aparato 6 Recoloque todas las piezas paso a paso en el aparato antes de usarlo nuevamente Recomendamos sustituir el filtro con regularidad para asegurar un funcionamiento óptimo del aparato Los filtros ...

Page 41: ... pelos atrapados en los cepillos después de cada uso PROBLEMASY SOLUCIONES Problema Posibles causas El aparato no arranca La batería está vacía Cargue el aparato La batería está mal colocada Deslice la batería en su lugar hasta que encaje correctamente El aparato no aspira Los filtros están sucios el depósito de polvo está lleno La boca de aspiración está atascada la boca de aspiración del suelo e...

Page 42: ... producto no puede ser tratado como residuo doméstico Se debe llevar a un lugar en el que se reciclan equipos eléctricos y electrónicos Si se asegura de que este producto se desecha correctamente usted ayudará a evitar posibles consecuencias negativas para las personas y el medio ambiente que serían causadospor un tratamiento de residuos inadecuado Para obtener información más detallada sobre el r...

Page 43: ... imballi e gli eventuali adesivi promozionali Assicurarsi che i bambini non giochino con gli imballaggi Questo apparecchio è destinato unicamente all uso domestico e in ambienti analoghi quali angoli cottura riservati al personale nei negozi negli uffici e in altri ambienti professionali Fattorie Camere di alberghi motel e altre strutture ricettive residenziali Camere per vacanze o ambienti analog...

Page 44: ...olvere per aspirare cemento o polvere simile e altre piccole particelle Evitare anche di aspirare oggetti di grandi dimensioni L aspirapolvere si potrebbe bloccare il motore potrebbe surriscaldarsi oppure si potrebbero verificare altri danni Accertarsi che la presa d aria o la bocchetta di aspirazione non siano ostruite Assicurarsi che l apparecchio non venga a contatto con liquidi Caricare sempre...

Page 45: ...la prima volta per 24 ore per poter usufruire della capacità totale della batteria Prima collegare l adattatore all apparecchio dopodiché inserire l adattatore nella presa A questo punto l indicatore del livello della batteria si accende e indica quando l apparecchio è completamente carico Durante il caricamento l aspirapolvere non può essere acceso Per prolungare la durata di vita della batteria ...

Page 46: ... mano 1 Inserire la batteria nel gruppo motore Spingere fino a farla scattare in posizione 2 Incastrare la spazzola per pavimenti la spazzola per la polvere o la lancia nella fessura sul lato frontale dell apparecchio La scopa elettrica 1 Inserire la batteria nel gruppo motore Spingere fino a farla scattare in posizione 2 Inserire l asta nella bocchetta di aspirazione sul lato frontale dell appare...

Page 47: ...el serbatoio polvere È possibile scegliere la velocità massima durante l aspirazione premendo il pulsante velocità massima Sul display l indicatore indicherà che la velocità massima è abilitata L aspirapolvere ora funziona con la sua massima potenza di aspirazione Premere nuovamente questo pulsante per tornare alla velocità predefinita A seconda della superficie da aspirare utilizzare il pulsante ...

Page 48: ...recchio per rimuovere il filtro HEPA 1 2 3 A B 4 5 Pulire accuratamente tutti questi componenti Accertarsi che siano completamente asciutti prima di riutilizzare l apparecchio 6 Rimontare tutti i componenti passo per passo nell apparecchio prima di riutilizzarlo Consigliamo di sostituire i filtri con regolarità per garantire l ottimale funzionamento dell apparecchio I filtri sporchi causano la dra...

Page 49: ...mento Rimuovere dalla spazzola lo sporco residuo RISOLUZIONE DEI PROBLEMI Problema Soluzione L apparecchio non si accende La batteria è scarica Ricaricare l apparecchio La batteria non è ben posizionata Inserire bene la batteria assicurandosi che si blocchi in posizione L apparecchio non aspira Il filtro è sporco il contenitore per la polvere è pieno La bocchetta di aspirazione per pavimenti è int...

Page 50: ...e trattato come rifiuto domestico Deve al contrario essere conferito al punto di raccolta predisposto per il riciclo delle apparecchiature elettriche ed elettroniche Facendo in modo che questo prodotto venga smaltito correttamente aiuterete a prevenire potenziali conseguenze negative per l ambiente e la salute dell uomo che potrebbero essere causate da uno smaltimento non corretto Per maggiori inf...

Page 51: ...áruční doba 24 měsíců Záruční doba počíná běžet od převzetí věci kupujícím Práva z vadného plnění uplatňuje kupující u prodávajícího na adrese jeho provozovny v níž je přijetí reklamace možné s ohledem na sortiment prodávaného zboží případně i v sídle nebo místě podnikání Za okamžik uplatnění reklamace se považuje okamžik kdy prodávající obdržel od kupujícího reklamované zboží Reklamaci lze také u...

Page 52: ...ru Nikdy neumisťujte spotřebič do blízkosti plynového sporáku elektrického sporáku nebo do míst kde by mohl přijít do styku s teplými spotřebičemi Nepoužívejte spotřebič venku Spotřebič používejte pouze pro zamýšlené použití Vždy používejte spotřebič na stabilním suchém a rovném povrchu Používejte spotřebič pouze pro domácí použití Výrobce nemůže být zodpovědný za nehody které vyplývají z nesprávn...

Page 53: ...filtru 6 Motorová část 7 Tlačítko pro uvolnění baterie 8 Uvolnění rukojeti 9 Trubice 10 Tlačítko pro uvolnění podlahové hubice 11 Podlahová hubice s rotačním kartáčem 12 Podlahová hubice se světelnou kontrolkou 13 Štěrbinový nástavec 14 Prachový kartáč 15 Dobíjecí baterie 16 Držák na zeď včetně šroubků a hmoždiněk OVLÁDACÍ PANEL S DISPLEJEM 17 Tlačítko pro maximální výkon rychlost 18 Tlačítko pro ...

Page 54: ...řednictvím našeho internetového obchodu nebo poprodejního servisu SESTAVENÍ Před prvním použitím vysavač důkladně sestavte Postupujte dle uvedených pokynů Ruční vysavač 1 Vložte baterie do přihrádky na baterie v motorové části Baterii zatlačte do vysavače dokud se nezacvakne 2 Vezměte štěrbinovou nebo podlahovou hubici a nasaďte ji pevně na vysavač Klasický tyčový vysavač 1 Vložte baterie do přihr...

Page 55: ...ysaje Výkon rychlost si můžete přepínat i v průběhu vysávání stačí stisknout tlačítko pro maximální výkon a rovnou se přístroj přepne Na displeji se max výkon zobrazí Vysavač tedy bude mít nejvyšší sací sílu a kartáč se bude rychle otáčet Pokud tlačítko stisknete znovu tak se výkon rychlost přepne zpět do běžného režimu Podle toho jaký typ podlah aktuálně vysáváte tak dle toho si můžete nastavit p...

Page 56: ...části A a B 4 Povolte pojistku filtru v horní části přístroje abyste odejmuli filtr HEPA 1 2 3 A B 4 5 Opatrně všechny části vyčistěte vodou Před opětovným použitím spotřebiče dbejte na to aby součásti byly zcela suché 6 Před dalším použitím vraťte krok po kroku všechny části přístroje na své místo Doporučujeme pravidelně měnit všechny filtry ve vysavači Zanešený filtr snižuje sací výkon a mnohoná...

Page 57: ...můžou přístroj poškodit Vždy udržujte rotační kartáč čistý PROBLÉMY A JEJICH MOŽNÉ ŘEŠENÍ Problém Řešení Přístroj se nerozeběhne Baterie je vybitá zkuste ji nabít Baterie není správně vložena v přístroji Vyndejte ji a zkuste znovu nasadit dokud se nezacvakne Vysavač nevysává Zásobník je plný filtry jsou zanesený Podlahová hubice je zablokovaná Hubice nebo trubice není průchodná Na kartáč se nabalu...

Page 58: ...ymbol na přístroji či na jeho obalu znamená že s tímto výrobkem není možno nakládat jako s běžným domovním odpadem nýbrž musí být odevzdán na místech určených ke sběru a likvidaci elektrických a elektronických zařízení Dodržením tohoto doporučení chráníte životní prostředí a zdraví spoluobčanů Více informací o možnostech likvidace nebezpečného odpadu obdržíte na obecních nebo městských úřadech sbě...

Page 59: ...ná doba 24 mesiacov Záručná doba začína plynúť od prevzatia veci kupujúcim Práva z chybného plnenia uplatňuje kupujúci u predávajúceho na adrese jeho prevádzky v ktorej je prijatie reklamácie možné s ohľadom na sortiment predávaného tovaru prípadne aj v sídle alebo mieste podnikania Za okamih uplatnenia reklamácie sa považuje okamih kedy predávajúci dostal od kupujúceho reklamovaný tovar Reklamáci...

Page 60: ... zástrčku Nikdy neodpájajte spotrebič ťahom za vodič Nenechávajte spotrebič v prevádzke bez dozoru Nikdy neumiestňujte spotrebič do blízkosti plynového sporáka elektrického sporáka alebo do miest kde by mohol prísť do styku s teplými spotrebičmi Nepoužívajte spotrebič vonku Spotrebič používajte len pre zamýšľané použitie Vždy používajte spotrebič na stabilnom suchom a rovnom povrchu Používajte spo...

Page 61: ...SI USCHOVAJTE PRE NESKORŠIE NAHLIADNUTIE ČASTI 1 Hlavný vypínač on off 2 Ovládací panel s displejom 3 Zásobník na prach 4 Tlačidlo pre uvoľnenie zásobníka 5 Poistka filtra 6 Motorová časť 7 Tlačidlo pre uvoľnenie batérie 8 Uvoľnenie rukoväte 9 Trubice 10 Tlačidlo pre uvoľnenie podlahovej hubice 11 Podlahová hubica s rotačnou kefou 12 Podlahová hubica so svetelnou kontrolkou 13 Štrbinový nástavec 1...

Page 62: ...zatlačte do vysávača kým sa nezacvakne Túto batériu si môžete kúpiť prostredníctvom nášho internetového obchodu alebo popredajného servisu ZOSTAVENIE Pred prvým použitím vysávač dôkladne zostavte Postupujte podľa uvedených pokynov Ručný vysávač 1 Vložte batérie do priehradky na batérie v motorovej časti Batériu zatlačte do vysávača kým sa nezacvakne 2 Vezmite štrbinovou alebo podlahovú hubicu a na...

Page 63: ...ahšie vysaje Výkon rýchlosť si môžete prepínať aj v priebehu vysávania stačí stlačiť tlačidlo pre maximálny výkon a rovno sa prístroj prepne Na displeji sa max výkon zobrazí Vysávač teda bude mať najvyššiu saciu silu a kefa sa bude rýchlo otáčať Ak tlačidlo stlačíte znova tak sa výkon rýchlosť prepne späť do bežného režimu Podľa toho aký typ podláh aktuálne vysávate tak podľa toho si môžete nastav...

Page 64: ...estoru Pre dôkladnejšie vyčistenie rozoberte časti A a B 4 Povoľte poistku filtra v hornej časti prístroja aby ste odobrali filter HEPA 1 2 3 A B 4 5 Opatrne všetky časti vyčistite vodou Pred opätovným použitím spotrebiča dbajte na to aby súčasti boli úplne suché 6 Pred ďalším použitím vráťte krok po kroku všetky časti prístroja na svoje miesto Odporúčame pravidelne meniť všetky filtre vo vysávači...

Page 65: ...roj poškodiť Vždy udržujte rotačná kefa čistý PROBLÉMY A ICH MOŽNÉ RIEŠENIA Problém Oplossing Prístroj sa nerozbehne Batéria je vybitá skúste ju nabiť Batéria nie je správne vložená v prístroji Vyberte ju a skúste znova nasadiť kým sa nezacvakne Vysávač nevysáva Zásobník je plný filtre sú zanesený Podlahová hubica je zablokovaná Hubice alebo trubica nie je priechodná Na kefa sa nabaľujú vlasy a br...

Page 66: ...E Symbol na prístroji alebo na jeho obale znamená že s týmto výrobkom nie je možné nakladať ako s domovým odpadom ale musí byť odovzdaný na miestach určených na zber a likvidáciu elektrických a elektronických zariadení Dodržaním tohto odporúčania chránite životné prostredie a zdravie spoluobčanov Viac informácií o možnostiach likvidácie nebezpečného odpadu obdržíte na obecných alebo mestských úrad...

Page 67: ...67 DO227SV www domo elektro be SK ...

Page 68: ...essoires en onderdelen online via of scan hier COMMANDEZ d authentiques accessoires et pièces Domo en ligne sur ou scannez ici BESTELLEN SIE die Domo Original Zubehör und Ersatzteile online über oder hier scannen ORDER the original Domo accessories and parts online at or scan here webshop domo elektro be Webshop ...

Reviews: