background image

30

DO7054S

EN

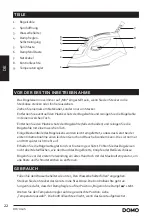
PARTS

1.  Sole of iron
2.  Spray opening
3.  Water reservoir
4.  Steam reg self-

cleaning

5.  Spray button
6.  Steam boost button
7.  Cord
8.  Indication light
9.  Temperature button

BEFORE THE FIRST USE

 · The iron must always be at “Min” if you put the plug in or take it out of the outlet. 
 · Never pull on the cord but on the plug itself.
 · Remove the plastic protection from the sole of the iron (if present) and clean the sole of 

the iron with a soft cloth.

 · Remove the plastic protection from the sole of the iron (if present) and clean the sole of 

the iron with a soft cloth.

 · Some parts of the iron have been greased lightly, so the device may emit a slight odour and 

some smoke with initial use. This is normal and will not happen after initial use.

 · Keep the sole of the iron smooth and be careful for scratches. Do not slide with the sole of 

the iron over metal surfaces, such as the edge of the ironing board, buttons or zippers.

 · Before using for the first time, iron an old towel at the maximum temperature to remove 

all residues of the manufacturing process. 

USE

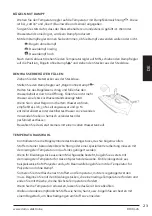
 · Fill the water reservoir as indicated in “Filling the water reservoir”.
 · Put the plug of the device in the outlet, the indicator light will light up.
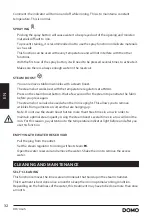
 · Make sure that the steam regulator is set to the no steam   position. 
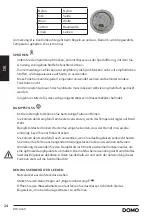
 · Turn the temperature regulator to the desired position: see “Temperature selection”. The 

indicator light will turn off when the appliance has reached the selected temperature.

IRONING WITH STEAM

 · Turn the temperature regulator to a temperature that includes steam 

. This is for 

“cotton” and “linen”. 

 · Make sure that the water reservoir is always at least ¼ full. If the water level is too low, 

steam will not be produced.


STEAM IRON


INSTRUCTION  MANUAL


MODEL: ETA-67 


  Read instruction manual carefully before using the appliance


IMPORTANT SAFEGARDS 

Before using the electrical appliance, the following basic precautions should always be 

followed including the following: 

1. Read all instructions and save it for future reference. 

2. Before using check that the voltage of wall outlet corresponds to the one shown on the rating 

plate. 

3. Burns may occur from touching hot metal parts, hot water, or steam. Use caution when you 

turn a steam iron upside down as there may be hot water in water tank. 

4. If any part is damaged it must be replaced by the manufacturer or  an  authorized service 

agent or a qualified technician in order to avoid a hazard. 

5. Don’t operate any appliance with a damaged cord or plug or after the appliance malfunctions, 

or is dropped or damaged in any manner, Return the appliance to the nearest authorized service 

facility for examination, repair or electrical or mechanical adjustment. 

6.Do not let cord hang over edge of table or hot surface. 

1

2

3

4

5

6

7

9

8

Summary of Contents for DOMO DO7054S

Page 1: ...toomstrijkijzer Mode d emploi Fer à repasser à vapeur Gebrauchsanleitung Dampfbügeleisen Instruction booklet Steam iron Manual de instrucciones Plancha de vapor Návod k použití Napařovac žehlička Návod na použitie Naprovacia žehlička ...

Page 2: ...instructions carefully save this instruction manual for future reference Lea detenidamente todas las instrucciones Conserve este manual para futura referencia Před použitím si důkladně přečtěte tento manuál manuál si uschovejte i pro případ budoucího nahlédnutí Pred použitím si dôkladne prečítajte tento manuál manuál si uschovajte aj pre prípad budúceho nahliadnutie NL Nederlands 3 FR Français 11 ...

Page 3: ...en of gerepareerd worden De garantieperiode van 2 jaar zal op dit moment niet terug beginnen maar loopt verder tot 2 jaar na de aankoop van het toestel De garantie wordt verleend op basis van het kassaticket Indien je apparaat defect is binnen de garantietermijn van 2 jaar dan mag je het toestel samen met het originele kassaticket binnenbrengen in de winkel waar je het toestel hebt aangekocht De g...

Page 4: ...et toestel en de voedingskabel uit het bereik van kinderen jonger dan 16 jaar Het toestel moet afgesloten worden van het elektriciteitsnet als het niet gebruikt wordt bij reparatie en wanneer onderdelen vervangen worden Laat het toestel eerst afkoelen vooraleer onderdelen te vervangen en vooraleer het toestel te reinigen Als de voedingskabel beschadigd is moet hij vervangen worden door de fabrikan...

Page 5: ...meegeleverd worden bij het strijkijzer Dompel het toestel de voedingskabel of de stekker nooit onder in water of een andere vloeistof Dit om elektrische schokken of brandwonden te voorkomen Gebruik dit toestel niet met natte handen Rol de voedingskabel volledig af om oververhitting van de kabel te voorkomen Laat de voedingskabel niet in contact komen met warme oppervlakken Sluit de voedingskabel p...

Page 6: ...eek de stekker in het stopcontact het indicatielampje zal aangaan Zorg ervoor dat de stoomregelaar op strijken zonder stoom staat Draai de temperatuurknop tot de gewenste positie zie temperatuurkeuze Het indicatielampje zal uitgaan als het toestel opgewarmd is INSTRUCTION MANUAL MODEL ETA 67 Read instruction manual carefully before using the appliance IMPORTANT SAFEGARDS Before using the electrica...

Page 7: ...rden Als jouw kledingstuk uit meerdere weefsels bestaat strijk dan steeds met de laagste temperatuur die overeenkomt met het aanwezige weefsel Een kledingstuk van bv polyester en katoen strijk je op de temperatuur voor polyester zonder stoom Sorteer het wasgoed op type stof en temperatuur waarop het moet gestreken worden Het strijkijzer warmt sneller op dan het afkoelt Begin dus met de kledingstuk...

Page 8: ...r zit STOOMSTOOT Door middel van een stoomstoot kan je hardnekkige kreuken verwijderen Je kan de stoomstoot best gebruiken met de temperatuurknop op MAX Druk op de stoomstootknop Wacht enkele seconden voordat de stoom door het weefsel dringt voordat je nogmaals drukt Je kan de stoomstoot ook gebruiken als je het strijkijzer verticaal houdt Zo kan je kreuken verwijderen uit hangende kledingstukken ...

Page 9: ...l boven de gootsteen 6 Schuif de stoomregelaar naar zelfreiniging CALC CLEAN Houd deze ingedrukt Stoom en kokend water zullen uit de gaatjes van de strijkzool komen waardoor de kalk en de mineralen mee naar buiten spoelen 7 Beweeg het strijkijzer zachtjes heen en weer totdat het waterreservoir leeg is 8 Laat de stoomregelaar los als je klaar bent met reinigen 9 Zet het strijkijzer in verticale pos...

Page 10: ...duct op de correcte manier wordt verwijderd voorkom je mogelijk voor mens en milieu negatieve gevolgen die zich zouden kunnen voordoen in geval van verkeerde afvalbehandeling Voor meer details in verband met het recycleren van dit product neem je best contact op met de gemeentelijke instanties het bedrijf of de dienst belast met de verwijdering van huishoudafval of de winkel waar je het product he...

Page 11: ...de fonctionnement matériel ou de fabrication Si un tel problème survient l appareil sera remplacé ou réparé La période de garantie de 2 ans ne reprend pas à zéro mais se poursuit jusqu à 2 ans à compter de la date d achat de l appareil La garantie est accordée sur la base du ticket de caisse Pour les accessoires et les éléments d usure une garantie de 6 mois s applique La garantie et la responsabi...

Page 12: ...pas jouer avec cet appareil L entretien et le nettoyage de l appareil ne peuvent pas être effectués par des enfants sauf s ils sont âgés de plus de 16 ans et sous la surveillance d un adulte Gardez l appareil et le cordon électrique hors de portée des enfants Débranchez l appareil lorsqu il n est pas utilisé ainsi qu avant d installer ou d enlever des pièces et avant de nettoyer l appareil Mettez ...

Page 13: ... normes et standards locaux N utilisez que les accessoires livrés avec le fer à repasser N immergez jamais l appareil le cordon d alimentation ou la fiche dans l eau ou tout autre liquide Ceci afin d éviter des chocs électriques ou un incendie N utilisez pas l appareil si vous avez les mains mouillées Déroulez complètement le cordon d alimentation pour éviter toute surchauffe Ne laissez pas le cor...

Page 14: ...ner tous les résidus et grains de poussière UTILISATION Remplissez le réservoir comme décrit au point Remplissage du réservoir Branchez l appareil Le voyant lumineux s allume Veillez à ce que le régulateur de vapeur soit sur Repassage sans vapeur Réglez la molette de température sur la position souhaitée voir Choix de la température Le témoin lumineux s éteint lorsque l appareil atteint la bonne t...

Page 15: ...nt être repassés sur l envers à la température minimale Si votre vêtement se compose de différents tissus repassez en fonction du tissu qui exige la température la plus basse Un vêtement comportant par exemple 60 de polyester et 40 de coton se repasse à la température convenant au polyester et sans vapeur Triez votre lessive en fonction du type de tissu à repasser et de la température de repassage...

Page 16: ...EUR Grâce au jet de vapeur vous pouvez faire disparaître les plis récalcitrants Il est recommandé d utiliser le jet de vapeur avec la molette de température positionnée sur MAX Pressez le bouton de commande du jet de vapeur Attendez quelques secondes que la vapeur pénètre dans le tissu avant de presser à nouveau le bouton Vous pouvez également faire appel à cette fonction pour le repassage à la ve...

Page 17: ... évier 6 Mettez le régulateur de vapeur sur la position autonettoyage CALC CLEAN Maintenez le enfoncé La vapeur et l eau bouillante s échapperont par les orifices dans la semelle entraînant le calcaire et les minéraux 7 Imprimez au fer à repasser un mouvement doux de va et vient jusqu à ce que le réservoir à eau soit vide 8 Lâchez le régulateur de vapeur lorsque vous avez terminé de nettoyer le fe...

Page 18: ... est éliminé correctement vous favorisez la prévention des conséquences négatives pour l environnement et la santé humaine qui sinon seraient le résulat d un traitement inapproprié des déchets de ce produit Pour obtenir plus de détails sur le recyclage de ce produit veuillez prendre contact avec le bureau municipal de votre région votre service d éliminiation des déchets ménagers ou le magasin où ...

Page 19: ...ionsfehler zurückzuführen sind Wenn derartige Mängel auftreten wird das Gerät wenn nötig ausgetauscht oder repariert Die Garantiezeit von 2 Jahren beginnt in diesem Moment nicht erneut sondern sie läuft bis 2 Jahre nach dem Kaufdatum weiter Die Garantie wird auf der Grundlage des Kassenbons gewährt Die Garantie auf Accessoires undVerschleißteile beträgt 6 Monate Die Garantie und dieVerantwortung H...

Page 20: ...sind Kinder dürfen nicht mit dem Gerät spielen DieWartung und Reinigung des Geräts darf nicht durch Kinder ausgeführt werden außer diese sind älter als 16 Jahre und werden von einem Erwachsenen beaufsichtigt Das Gerät und das Netzkabel sind außerhalb der Reichweite von Kindern zu bewahren Netzstecker ziehen wenn das Gerät nicht in Gebrauch ist bevorTeile montiert oder abmontiert werden und vor der...

Page 21: ...tzkabel muss stets an eine Steckdose angeschlossen werden die gemäß den örtlichen Standards und Normen isoliert und geerdet wurde Verwenden Sie nur das mit dem Bügeleisen mitgelieferte Zubehör Tauchen Sie das Gerät das Kabel oder den Stecker auf keinen Fall inWasser oder andere Flüssigkeiten Dies könnte andernfalls zu Stromschlägen und Brandgefahr führen Verwenden Sie das Gerät nicht mit nassen Hä...

Page 22: ...serbehälter füllen angegeben Stecken Sie den Stecker des Geräts in die Steckdose Die Kontrollleuchte geht an Sorgen Sie dafür dass der Dampfregler auf der Position Bügeln ohne Dampf steht Drehen Sie denTemperaturregler auf die gewünschte Position siehe Temperaturauswahl Die Kontrollleuchte erlischt wenn das Gerät aufgeheizt ist INSTRUCTION MANUAL MODEL ETA 67 Read instruction manual carefully befo...

Page 23: ...r speziellenVerarbeitung müssen mit der niedrigstenTemperatur und auf Links gebügelt werden Wenn Ihr Kleidungsstück aus einem Mischgewebe besteht bügeln Sie es stets mit der niedrigstenTemperatur für das entsprechende Gewebe Ein Kleidungsstück aus beispielsweise 60 Polyester und 40 Baumwolle bügeln Sie mit derTemperatur für Polyester und ohne Dampf Sortieren Sie IhreWäsche nach Stoffart undTempera...

Page 24: ...S Mit dem Dampfstoß können Sie hartnäckige Falten entfernen Sie können den Dampfstoß am besten verwenden wenn derTemperaturregler auf MAX steht Dampfstoßtaste drücken Warten Sie einige Sekunden dass der Dampf ins Gewebe eindringt bevor Sie nochmals drücken Sie können den Dampfstoß auch verwenden wenn Sie das Bügeleisen senkrecht halten So können Sie Falten aus hängenden Kleidungsstücken oder aus G...

Page 25: ...hbecken 6 Schieben Sie den Dampfregler auf Selbstreinigung CALC CLEAN Halten Sie ihn gedrückt Dampf und kochendesWasser treten aus dem Löchern der Bügelsohle aus Dadurch werden Kalk und Mineralien herausgespült 7 Bewegen Sie das Bügeleisen vorsichtig hin und her bis derWasserbehälter leer ist 8 Lassen Sie den Dampfregler los wenn die Reinigung beendet ist 9 Stellen Sie das Bügeleisen aufrecht ab u...

Page 26: ...s Durch Ihren Beitrag zum korrekten Entsorgen dieses Produkts schützen Sie die Umwelt und die Gesundheit Ihrer Mitmenschen Umwelt und Gesundheit werden durch falsches Entsorgen gefährdet Weitere Informationen über das Recycling dieses Produkts erhalten Sie von Ihren Rathaus Ihrer Müllabfuhr oder dem Geschäft in dem Sie das Produkt gekauft haben DasVerpackungsmaterial ist wiederverwertbar Entsorgen...

Page 27: ...ong use not following the instructions or repairs executed by a third party The guarantee is issued with the original till receipt All parts which are subject to wear are excluded from the warranty If your device breaks down within the 2 year warranty period you can return the device together with your receipt to the shop where you purchased it The guarantee on accessories and components that are ...

Page 28: ... they are older than 8 and supervised Keep the appliance and its cord out of reach of children younger than 16 years The appliance must be disconnected from its power source when not in use during service and when replacing parts Allow to cool before putting on or taking off parts and before cleaning the appliance If the supply cord is damaged it must be replaced by the manufacturer its service ag...

Page 29: ...nce with all local standards and requirements Only use the utensils delivered with the appliance To protect against electrical shock or burns do not immerse unit cord or plug in water or other liquid Do not operate the appliance with wet hands Unwrap the cord completely to prevent overheating of the cord Do not let the power supply cord touch hot surfaces Only fill the water reservoir with no othe...

Page 30: ...eam position Turn the temperature regulator to the desired position see Temperature selection The indicator light will turn off when the appliance has reached the selected temperature IRONING WITH STEAM Turn the temperature regulator to a temperature that includes steam This is for cotton and linen Make sure that the water reservoir is always at least full If the water level is too low steam will ...

Page 31: ...perature An item of clothing of e g 60 polyester and 40 cotton should be ironed at the temperature indicated for polyester without steam Sort your laundry by type of fabric and temperature at which it must be ironed Begin with the items of clothing for low temperatures and end with the laundry for the highest temperature If you turn the temperature down give the appliance time to cool off Wools an...

Page 32: ...nd for the steam to penetrate the fabric before you press again The steam shot can also be used when the iron is upright This allows you to remove wrinkles from garments or curtain that are hanging up Note Do not use the steam boost button more than three times in a row in order to maintain optimal steam quality Using the steam boost several times in a row will cool the iron For this reason pay at...

Page 33: ...he iron rinsing the lime scale and minerals out 7 Move the iron gently back and forth until the water tank is empty 8 Release the steam regulator button when you are finished cleaning 9 Place the iron in a vertical position and allow it to cool completely 10 Dry the sole with a cold damp cloth Note Make sure you do not come into contact with the hot water CLEANING THE IRON Remove the plug from the...

Page 34: ...y ensuring this product is disposed of correctly you will help prevent potential negative consequences for the environment and human health which could otherwise be caused by inappropriate waste handling of this product For more detailed information about recycling of this product please contact your local city office your household waste disposal service or the shop where you purchased the produc...

Page 35: ... compra La garantía se concede sobre la base del recibo de caja La garantía de los accesorios y componentes sujetos a desgaste es de 6 meses La garantía y la responsabilidad imputabilidad del proveedor y el fabricante expiran automáticamente en los siguientes casos Cuando no se cumplan las instrucciones que aparecen en este manual En el caso de una conexión inadecuada por ejemplo a una tensión elé...

Page 36: ...o más y estén supervisados por un adulto Mantenga el aparato fuera del alcance de los niños Saque el enchufe de la toma de corriente cuando no use el aparato antes de montar o desmontar piezas y antes de limpiarlo Ponga primero todos los botones en posición de apagado y desconecte el cable de alimentación de la toma de corriente No tire nunca del cable de alimentación para sacar el enchufe de la t...

Page 37: ...an con la plancha Nunca sumerja el aparato el cable de alimentación o el enchufe en agua o en cualquier otro líquido Esto evitará choques eléctricos o incendios No utilice el aparato con las manos mojadas Desenrolle el cable de alimentación completamente para evitar el sobrecalentamiento del mismo No deje que el cable de alimentación toque superficies calientes Solo debe introducir el cable de ali...

Page 38: ...escribe en Llenar el depósito de agua Conecte el aparato a la toma de corriente la luz indicadora se encenderá Asegúrese de que control de vapor está situado en la posición para planchar sin vapor Gire el botón de temperatura hasta la posición deseada véase Selección de temperatura La luz indicadora se apagará en cuanto el aparato se haya calentado STEAM IRON INSTRUCTION MANUAL MODEL ETA 67 Read i...

Page 39: ...a la temperatura más baja y con la prenda del revés Si la prenda se compone de varios tejidos planche a la temperatura más baja la que se corresponda con el tejido presente Una prenda con un 60 de poliéster y un 40 de algodón se debe planchar a la temperatura adecuada para poliéster sin vapor Clasifique la ropa según el tipo de tejido y la temperatura a la cual se debe planchar Comience con las pr...

Page 40: ...OR DE VAPOR Puede eliminar las arrugas rebeldes con un golpe de vapor Le recomendamos que use el impulsor de vapor con el botón de temperatura en MAX Presione el botón impulsor de vapor Espere unos segundos hasta que el vapor penetre en el tejido antes de presionar el botón de nuevo También puede utilizar el impulsor de vapor si mantiene la plancha vertical Esto le permite eliminar las arrugas de ...

Page 41: ... la plancha en posición horizontal sobre el fregadero 6 Deslice el control de vapor hasta autolimpieza CALC CLEAN Manténgalo pulsado Saldrá vapor y agua hirviendo de los orificios de la suela de la plancha eliminando así la cal y los minerales 7 Mueva la plancha suavemente hacia atrás y hacia adelante hasta que el depósito de agua esté vacío 8 Cuando haya terminado la limpieza suelte el control de...

Page 42: ...ted ayudará a evitar posibles consecuencias negativas para las personas y el medio ambiente que serían causadospor un tratamiento de residuos inadecuado Para obtener información más detallada sobre el reciclaje de este producto póngase en contacto con su ayuntamiento o con la empresa o departamento responsable del servicio de recogida de basura doméstica o con la tienda donde adquirió el producto ...

Page 43: ... mechanické poškození b nesprávné používání v rozporu s návodem k použití 1 záruka zaniká při použití spotřebiče jinak než v domácnosti při provádění opravy nebo změny na spotřebiči osobou jinou než pověřenou naším servisem Na tento spotřebič poskytujeme záruku na nedostatky které jsou označeny jako výrobní chyby nebo chyby materiálu Záruční doba začíná dnem prodeje a je uznána po předložení potvr...

Page 44: ...řístroj nepoužívejte Kabel musí být okamžitě opraven v odborném servise nebo proškolenou osobou POZOR Aby se předešlo rizikům úrazu poškození nesmí být přístroj používán se žádnou externí součástí např časovač vypínač přepínač Nikdy nenechávejte zapnutý přístroj bez dozoru Při doplňování vody vždy žehličku odpojte z el sítě Žehličku stavte jen na rovné a stabilní místo tak aby nemohla spadnout Pod...

Page 45: ... To však brzy zmizí a vše bude nadále v pořádku Žehlící plochu udržujte čistou a zabraňte jejímu poškrábání Nežehlete s ní přes kovové části jako je zip nebo knoflíky Před prvním použití doporučujeme žehličku nastavit na maximum a přežehlit starý ručník Tak se žehlička absolutně vyčistí od případných nečistot z výrobního procesu Před rozebíráním či skladováním vždy nechte žehličku důkladně vychlad...

Page 46: ...ntinuální slabé napařování Nepřetržité silné napařování Po použití otočte regulátor teploty na MIN přesuňte spínač páry do polohy žehlení bez páry a vytáhněte zástrčku ze zásuvky DOPLNĚNÍ VODY DO ZÁSOBNÍKU Vypojte přístroj z el sítě Spínač páry přepněte do polohy bez páry Přes nálevku naplňte zásobník do maximálního objemu k rysce MAX Pokud je ve vašem okolí příliš tvrdá voda doporučujeme používat...

Page 47: ...rozprašuje z přední části žehličky Abyste zabránili zbarvení látky tak nedoporučujeme funkci rozprašování používat na jemných materiálech jako je hedvábí Tuto funkci můžete používat kdykoli nikdy ničemu nebrání Při prvním použití je potřeba tlačítko zmáčknout několikrát za sebou tak aby se rozprašovač natlakoval a funkce se aktivovala Naplňte zásobník vody na maximální objem a udržujte ho stále pl...

Page 48: ...ad umyvadlo a držte ji nad ním ve vodorovné poloze Tlačítko páry přepněte do pozice CALC CLEAN Ze žehlící plochy bude odkapávat vařící voda i pára tím se odstraní vodní kámen i případné nečistoty 7 Žehličkou zlehka hýbejte ze strany na stranu aby se vyprázdnila všechna voda ze zásobníku 8 Po dokončení čištění opět tlačítko samočištění uvolněte 9 Odstavte žehličku do svislé polohy a nechte ji vychl...

Page 49: ...ístech určených ke sběru a likvidaci elektrických a elektronických zařízení Dodržením tohoto doporučení chráníte životní prostředí a zdraví spoluobčanů Více informací o možnostech likvidace nebezpečného odpadu obdržíte na obecních nebo městských úřadech sběrných dvorech nebo v prodejně kde jste přístroj zakoupili Obalové materiály jsou recyklovatelné nakládejte s nimi podle předpisů pro životní pr...

Page 50: ...škodenie b nesprávne používanie v rozpore s návodom na použitie 1 záruka zaniká Pri použití spotrebiča inak ako v domácnosti Pri vykonávaní opravy alebo zmeny na spotrebiči osobou inou ako poverenou naším servisom Na tento spotrebič poskytujeme záruku na nedostatky ktoré sú označené ako výrobné chyby alebo chyby materiálu Záručná doba začína dňom predaja a je uznaná po predložení potvrdeného tohot...

Page 51: ...e vychladnúť Pokiaľ je prívodný kábel poškodený prístroj nepoužívajte Kábel musí byť okamžite opravený v odbornom servise alebo preškolenou osobou POZOR Aby sa predišlo riziku úrazu poškodenie nesmie byť prístroj používaný sa žiadnu externú súčasťou napr Časovač vypínač prepínač Nikdy nenechávajte zapnutý prístroj bez dozoru Pri dopĺňaní vody vždy žehličku odpojte z el siete Žehličku stavajte len ...

Page 52: ... je možné že sa pri prvom použití maziva vypáli a ľahko zadymí To však čoskoro zmizne a všetko bude naďalej v poriadku Žehliacu plochu udržujte čistú a zabráňte poškrabaniu Nežehlite s ňou cez kovové časti ako je zips alebo gombíky Pred prvým použitím odporúčame žehličku nastaviť na maximum a prežehliť starý uterák Tak sa žehlička absolútne vyčistí od prípadných nečistôt z výrobného procesu STEAM ...

Page 53: ...e je v zásobníku dostatok vody aspoň Pokiaľ nebude voda v zásobníku tak sa nebude tvoriť para Regulátor pary umožňuje buď použiť páru Žehlenie bez pary Kontinuálne slabé naparovanie Nepretržité silné naparovanie Po použití otočte regulátor teploty na MIN presuňte spínač pary do polohy žehlenie bez pary a vytiahnite zástrčku zo zásuvky DOPLNENIE VODY DO ZÁSOBNÍKA Vypojte prístroj z el siete Spínač ...

Page 54: ...sa počas žehlenia zapína a vypína to práve keď zopínať termostat a udržiava konštantnú teplotu To je normálne ROZPRAŠOVANIE ZVLHČENIE Stlačením tlačidla rozprašovača môžete začať látku kropiť voda sa rozprašuje z prednej časti žehličky Aby ste zabránili sfarbenie látky tak neodporúčame funkciu rozprašovania používať na jemných materiáloch ako je hodváb Túto funkciu môžete používať kedykoľvek nikdy...

Page 55: ... 3 Zapojte do el siete 4 Nastavte na maximálnu teplotu a počkajte až sa nahreje 5 Žehličku vypnite a vypojte z el siete 6 Preneste ju nad umývadlo a držte ju nad ním vo vodorovnej polohe 7 Tlačidlo pary prepnite do pozície CALC CLEAN Zo žehliacej plochy bude odkvapkávať vriaca voda i para tým sa odstráni vodný kameň aj prípadné nečistoty 8 Žehličkou zľahka hýbte zo strany na stranu aby sa vyprázdn...

Page 56: ...ný na miestach určených na zber a likvidáciu elektrických a elektronických zariadení Dodržaním tohto odporúčania chránite životné prostredie a zdravie spoluobčanov Viac informácií o možnostiach likvidácie nebezpečného odpadu obdržíte na obecných alebo mestských úradoch zberných dvoroch alebo v predajni kde ste prístroj zakúpili Obalové materiály sú recyklovateľné nakladajte s nimi podľa predpisov ...

Page 57: ...57 DO7054S www domo elektro be SK ...

Page 58: ...cessoires en onderdelen online via of scan hier COMMANDEZ d authentiques accessoires et pièces Domo en ligne sur ou scannez ici BESTELLEN SIE die Domo Original Zubehör und Ersatzteile online über oder hier scannen ORDER the original Domo accessories and parts online at or scan here webshop domo elektro be Webshop ...

Reviews: