16
DO7293S
FR
AVANT LA PREMIÈRE UTILISATION
· Insérez deux piles AAA dans la télécommande.
· Réglez l’horloge (voir « Utilisation/ Utilisation sans télécommande/Plan: horloge »).
· Avant la première utilisation, chargez l’aspirateur robot pendant 5 heures. (voir « Utilisation/
Chargement »).
· Installez les brosses latérales sur l’aspirateur. Appuyez jusqu’à la perception d’un déclic. Assurez-vous
que le L (gauche) et le R (droite) de la brosse et de l’appareil soient bien placés en regard.
INSTALLATION DE LA STATION DE CHARGE
1.
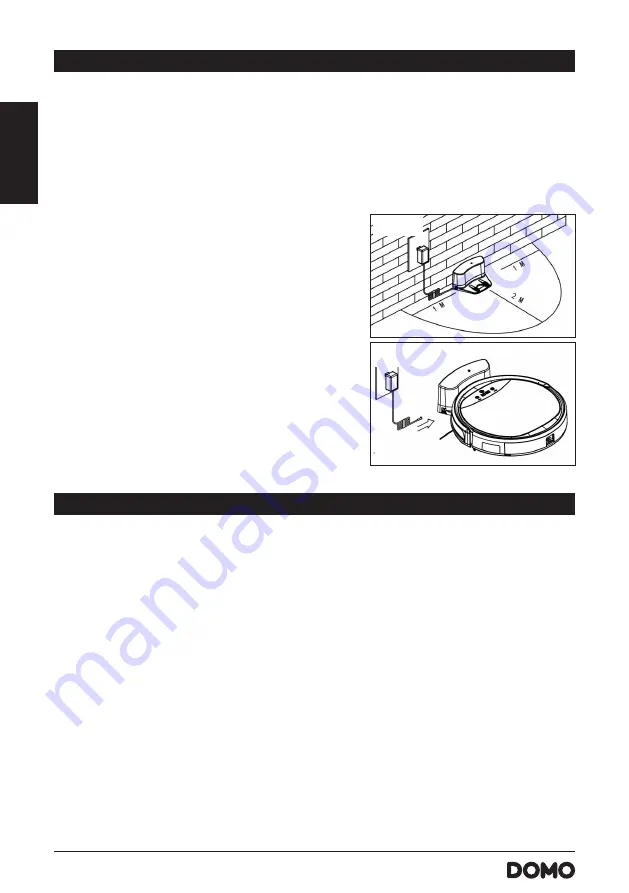
Placez la station de charge sur une surface plane et dure,
par exemple un carrelage, un parquet ou un tapis à poils
courts, ou encore contre un mur ou une armoire.
2.
Assurez-vous de laisser un espace libre d’au moins 1 m
à gauche et à droite de la station de charge. Prévoyez
également un espace libre de 2 m devant la station
de charge (Fig. 1). À défaut, il se peut que l’aspirateur
ne retrouve pas la station de charge lorsqu’il doit se
recharger.
3.
Prenez l’adaptateur, branchez la fiche secteur dans une
prise de courant, et raccordez la fiche DC à la station de
charge (Fig. 2).
IMPORTANT : ne laissez jamais de câbles devant ou à côté de la
station de charge ; ceux-ci pourraient se coincer dans les roues
ou les brosses de l’aspirateur.
UTILISATION
Pour utiliser ou charger l’appareil, allumez-le à l’aide du bouton marche/arrêt situé sur le côté.
VEILLE/VEILLE PROLONGÉE/ARRÊT
Veille
L’appareil est en mode veille lorsqu’il est au repos et que le bouton marche/arrêt est allumé. Il est donc
prêt à être utilisé immédiatement.
Veille prolongée
Lorsque l’appareil est en veille prolongée, vous devez l’activer avant de l’utiliser. Pour ce faire, appuyez sur
la touche marche/arrêt située sur l’écran tactile ou sur le bouton ON/OFF de la télécommande.
L’appareil passe automatiquement en mode veille prolongée après 15 minutes en mode veille. Vous
pouvez également activer le mode veille prolongée en maintenant la touche marche/arrêt de l’écran
tactile enfoncée pendant 3 secondes.
Arrêt
Pour éteindre complètement l’appareil en mode veille, appuyez sur le bouton marche/arrêt situé sur le
côté.
En mode veille prolongée, l’appareil s’éteint automatiquement après 15 minutes, sauf si vous avez
programmé la minuterie.
10
Product Operation
Battery Charging
1. Charging Station Placement
A. Place charging station against the wall,
and remove obstacles about 1m on either
sides and 2m in front of the station. Please
remove obstacles as show in the right figure.
B. If robot is power off, switch on the robot first before charging.
2.
Charge the robot in either way as shown below:
A. Plug one end of the adapter into the robot and the other end into the power socket as shown
in Fig a.
B. Press the “HOME” button on the remote control or robot to operate the robot looking for the
charging docking automatically as shown in Fig b.
Fig a
Fig b
Note:
a. When robot is in charging, the LED panel will gradually show “1111” from left to right.
b. When charging is over, the LED panel will show “FULL”.
c. In standby status, the robot will
when the battery level is low.
d. In working status, the robot will look for the charging dock automatically when the battery
level is low.
In Order to Extend Battery’s Life
a. Please charge the robot for up to 5 hours during the first charging.
b. Charge the robot as soon as possible when battery capacity is low.
c. The robot will return to the charging dock automatically when cleaning is finished or battery
capacity is low.
d. When you do not use the robot for some time, please fully charge the battery first, then
switch off the robot and keep it in a cool but dry place.
e. If the robot has been put aside over 3 months, please charge the robot for 5 hours first
before using it for cleaning.
show
Fig. 1
10
Product Operation
Battery Charging
1. Charging Station Placement
A. Place charging station against the wall,
and remove obstacles about 1m on either
sides and 2m in front of the station. Please
remove obstacles as show in the right figure.
B. If robot is power off, switch on the robot first before charging.
2.
Charge the robot in either way as shown below:
A. Plug one end of the adapter into the robot and the other end into the power socket as shown
in Fig a.
B. Press the “HOME” button on the remote control or robot to operate the robot looking for the
charging docking automatically as shown in Fig b.
Fig a
Fig b
Note:
a. When robot is in charging, the LED panel will gradually show “1111” from left to right.
b. When charging is over, the LED panel will show “FULL”.
c. In standby status, the robot will
when the battery level is low.
d. In working status, the robot will look for the charging dock automatically when the battery
level is low.
In Order to Extend Battery’s Life
a. Please charge the robot for up to 5 hours during the first charging.
b. Charge the robot as soon as possible when battery capacity is low.
c. The robot will return to the charging dock automatically when cleaning is finished or battery
capacity is low.
d. When you do not use the robot for some time, please fully charge the battery first, then
switch off the robot and keep it in a cool but dry place.
e. If the robot has been put aside over 3 months, please charge the robot for 5 hours first
before using it for cleaning.
show
Fig. 2


