59
DO7293S
www.domo-elektro.be
IT
4.
MAX: massima aspirazione
Premere il pulsante MAX per aspirare con la massima aspirazione. L’aspirapolvere inizierà
automaticamente la pulizia; la velocità di spostamento è lenta, ma la potenza di aspirazione è massima
per una pulizia accurata.
5.
Freccette
È possibile spostare l’aspirapolvere robot con le frecce sul telecomando per determinare la posizione di
partenza.
SISTEMA ANTI-CADUTA
· L’aspirapolvere robot è dotato di un rilevamento anticaduta. Il dispositivo rileva una scala o un
avvallamento evitando la caduta.
· Tuttavia, è sempre consigliabile fare attenzione e tenere l’aspirapolvere lontano dalle scale il più
possibile.
RICARICA
Accendere l’interruttore on/off per la ricarica.
Ricaricare con una stazione di ricarica
· Se la batteria dell’aspirapolvere è scarica durante l’aspirazione, il dispositivo cercherà
automaticamente la stazione di ricarica per la ricarica.
· Se l’aspirapolvere è in modalità standby e la batteria è scarica, sul display viene visualizzato [ I I ].
Quindi ricaricare il dispositivo.
· Si può anche scegliere di ricaricare il dispositivo in precedenza premendo il tasto HOME sul
telecomando.
· Durante la ricarica:
· Il display mostra 1111 lampeggiante: il dispositivo si sta ricaricando
· Il display mostra FULL: il dispositivo è completamente carico
· Il display mostra Erro: l’interruttore on/off deve essere acceso per ricaricare
Ricarica senza una stazione di ricarica
Prendere l’adattatore, collegare il cavo di alimentazione e collegare l’ingresso CC al dispositivo.
· Durante la ricarica:
· Il display mostra 1111 lampeggiante: il dispositivo si sta ricaricando
· Il display mostra FULL: il dispositivo è completamente carico
· Il display mostra Erro: l’interruttore on/off deve essere acceso per ricaricare
10
Product Operation
Battery Charging
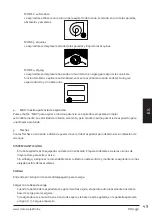
1. Charging Station Placement
A. Place charging station against the wall,
and remove obstacles about 1m on either
sides and 2m in front of the station. Please
remove obstacles as show in the right figure.
B. If robot is power off, switch on the robot first before charging.
2.
Charge the robot in either way as shown below:
A. Plug one end of the adapter into the robot and the other end into the power socket as shown
in Fig a.
B. Press the “HOME” button on the remote control or robot to operate the robot looking for the
charging docking automatically as shown in Fig b.
Fig a
Fig b
Note:
a. When robot is in charging, the LED panel will gradually show “1111” from left to right.
b. When charging is over, the LED panel will show “FULL”.
c. In standby status, the robot will
when the battery level is low.
d. In working status, the robot will look for the charging dock automatically when the battery
level is low.
In Order to Extend Battery’s Life
a. Please charge the robot for up to 5 hours during the first charging.
b. Charge the robot as soon as possible when battery capacity is low.
c. The robot will return to the charging dock automatically when cleaning is finished or battery
capacity is low.
d. When you do not use the robot for some time, please fully charge the battery first, then
switch off the robot and keep it in a cool but dry place.
e. If the robot has been put aside over 3 months, please charge the robot for 5 hours first
before using it for cleaning.
show


