66
DO7293S
CZ
PŘED PRVNÍM POUŽITÍM
· Do ovladače vložte dvě baterie AAA.
· Nastavení času (více v „nastavení/nastavení bez ovladače/ harmonogram: čas)
· Před prvním použitím nechte přístroj plně nabít, alespoň 5 hodin. (viz „použití/Nabíjení“)
· Do vysavače nasaďte čistící kartáče. Kartáč stačí pouze nasadit a dotlačit dokud neuslyšíte zacvaknutí.
Jsou označeny písmeny L (levý) a P (pravý), dejte pozor abyste je nasadili na správnou stranu.
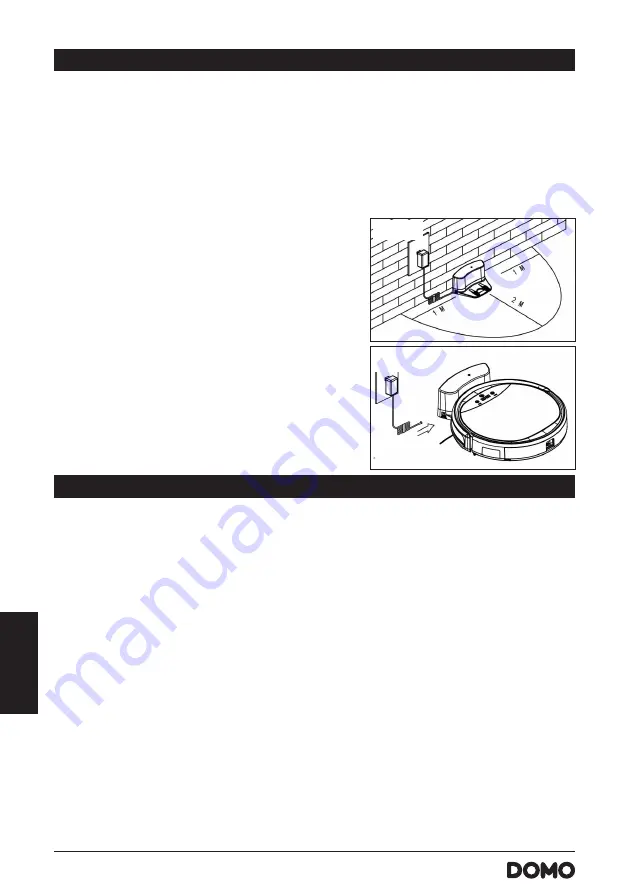
PŘÍPRAVA DOBÍJECÍ STANICE
1.
Dobíjecí stanici položte na rovné stabilní místo na podlaze
(např: dlaždice, lino, parkety atd ) lehce opřete o zeď nebo
nábytek.
2.
Okolo stanice musí zůstat alespoň 1 metr volného místa
z levé i pravé strany. Z přední strany musí být dostatek
volného místa (alespoň 2 metry – obrázek 1) Pokud tomu
tak není, tak není možné aby vysavač dobíjecí stanici
našel.
3.
Dobíjecí adaptér zapojte do zásuvky a jeho konektor
zapojte do dobíjecí stanice (obrázek 2).
UPOZORNĚNÍ: kabel adaptéru nikdy nesmí být obtočen kolem
dobíjecí stanice, ani nijak ležet před ní. V takovém případě by se
kabel namotal do čistících kartáčů vysavače.
POUŽITÍ
Před použitím nebo nabíjením musíte vysavač zapnout hlavním vypínačem na boku.
POHOTOVOSTNÍ / REŽIM SPÁNKU / VYPNUTO
Pohotovostní režim
Vysavač je v pohotovostním režimu, když je v klidu a zapnutý hlavní vypínač na přístroji. Vysavač je takto
připraven k okamžitému použití.
Režim spánku
Pokud je vysavač v režimu spánku, musíte jej před spuštěním nejdříve aktivovat. To se provádí stisknutím
tlačítka on/off na dotykovém displeji nebo tlačítkem on/off na dálkovém ovladači.
Do režimu spánku se automaticky přepne po 15 minutách pohotovostního režimu. Režim spánku můžete
také zapnout stisknutím a přidržením dotykového on/off tlačítka na 3 sekundy.
Režim vypnuto
Vysavač můžete zcela vypnout vypínačem na boku zařízení, zatímco je v pohotovostním režimu.
Pokud nebyl nastaven žádný časovač, tak po uplynutí 15 minut v režimu spánku se přístroj vypne.
POUŽITÍ BEZ DÁLKOVÉHO OVLADAČE
· Pro automatické vysávání stačí stisknout tlačítko on/off. Vysavač si navrhne svoji vlastní cestu tak, aby
vysál celou oblast i podél stěn, překážek či schodů.
10
Product Operation
Battery Charging
1. Charging Station Placement
A. Place charging station against the wall,
and remove obstacles about 1m on either
sides and 2m in front of the station. Please
remove obstacles as show in the right figure.
B. If robot is power off, switch on the robot first before charging.
2.
Charge the robot in either way as shown below:
A. Plug one end of the adapter into the robot and the other end into the power socket as shown
in Fig a.
B. Press the “HOME” button on the remote control or robot to operate the robot looking for the
charging docking automatically as shown in Fig b.
Fig a
Fig b
Note:
a. When robot is in charging, the LED panel will gradually show “1111” from left to right.
b. When charging is over, the LED panel will show “FULL”.
c. In standby status, the robot will
when the battery level is low.
d. In working status, the robot will look for the charging dock automatically when the battery
level is low.
In Order to Extend Battery’s Life
a. Please charge the robot for up to 5 hours during the first charging.
b. Charge the robot as soon as possible when battery capacity is low.
c. The robot will return to the charging dock automatically when cleaning is finished or battery
capacity is low.
d. When you do not use the robot for some time, please fully charge the battery first, then
switch off the robot and keep it in a cool but dry place.
e. If the robot has been put aside over 3 months, please charge the robot for 5 hours first
before using it for cleaning.
show
Fig. 1
10
Product Operation
Battery Charging
1. Charging Station Placement
A. Place charging station against the wall,
and remove obstacles about 1m on either
sides and 2m in front of the station. Please
remove obstacles as show in the right figure.
B. If robot is power off, switch on the robot first before charging.
2.
Charge the robot in either way as shown below:
A. Plug one end of the adapter into the robot and the other end into the power socket as shown
in Fig a.
B. Press the “HOME” button on the remote control or robot to operate the robot looking for the
charging docking automatically as shown in Fig b.
Fig a
Fig b
Note:
a. When robot is in charging, the LED panel will gradually show “1111” from left to right.
b. When charging is over, the LED panel will show “FULL”.
c. In standby status, the robot will
when the battery level is low.
d. In working status, the robot will look for the charging dock automatically when the battery
level is low.
In Order to Extend Battery’s Life
a. Please charge the robot for up to 5 hours during the first charging.
b. Charge the robot as soon as possible when battery capacity is low.
c. The robot will return to the charging dock automatically when cleaning is finished or battery
capacity is low.
d. When you do not use the robot for some time, please fully charge the battery first, then
switch off the robot and keep it in a cool but dry place.
e. If the robot has been put aside over 3 months, please charge the robot for 5 hours first
before using it for cleaning.
show
Fig. 2


