17
DO9248J
www.domo-elektro.be
FR
7
juice,
jam strainer is used for making ketchup only
while frozen dish strainer is used for
making frozen dish. Select the appropriate strainer based on your demand.
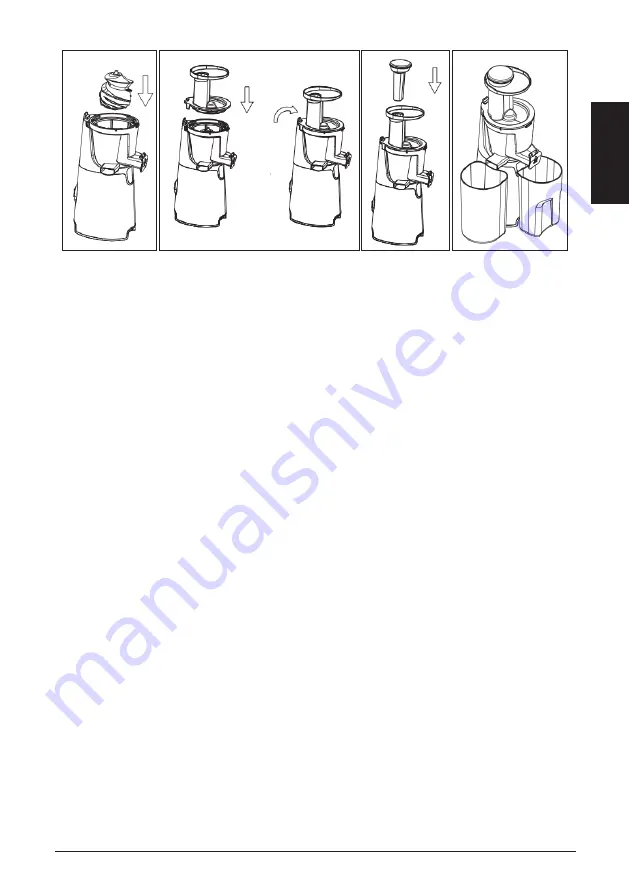
3. Assemble the jar lid on the jar correctly. Firstly, put the jar lid downwards and then
make the symbol “ ” on the jar lid align with the symbol “
” on the jar and then rotate
the jar lid clockwise until the symbol “ ” on the jar lid aligns with the symbol “ ”on the
jar (See Fig.4).
After it, press the fastener inwards to lock the jar lid well in position. The
jar lid shall be assembled well in position properly otherwise the appliance will not operate.
Finally, put the food pusher into the jar lid.
Fig.3
Fig.4
6
7
juice,
jam strainer is used for making ketchup only
while frozen dish strainer is used for
making frozen dish. Select the appropriate strainer based on your demand.
3. Assemble the jar lid on the jar correctly. Firstly, put the jar lid downwards and then
make the symbol “ ” on the jar lid align with the symbol “
” on the jar and then rotate
the jar lid clockwise until the symbol “ ” on the jar lid aligns with the symbol “ ”on the
jar (See Fig.4).
After it, press the fastener inwards to lock the jar lid well in position. The
jar lid shall be assembled well in position properly otherwise the appliance will not operate.
Finally, put the food pusher into the jar lid.
Fig.3
Fig.4
7
7
juice,
jam strainer is used for making ketchup only
while frozen dish strainer is used for
making frozen dish. Select the appropriate strainer based on your demand.
3. Assemble the jar lid on the jar correctly. Firstly, put the jar lid downwards and then
make the symbol “ ” on the jar lid align with the symbol “
” on the jar and then rotate
the jar lid clockwise until the symbol “ ” on the jar lid aligns with the symbol “ ”on the
jar (See Fig.4).
After it, press the fastener inwards to lock the jar lid well in position. The
jar lid shall be assembled well in position properly otherwise the appliance will not operate.
Finally, put the food pusher into the jar lid.
Fig.3
Fig.4
8
8
4. Place your juice container below the juice outlet and residue
container below the residue outlet (see Fig.5). Until now, the
Juicer is ready for operating.
Note:
When need to remove the whole appliance, please grasp
the motor unit instead of the jar lid to remove it to avoid
accident.
USING YOUR JUICER
1. Before attaching the power cord into the outlet, make sure the
power switch is in the “
O
” position, the power switch has three settings: “
I
” indicates
“ON”, press the power switch to “
I
” position to activate the motor and start making juice;
“
O
” indicates “OFF” position, press the power switch to “
O
” position to turn off the
machine; “
R
” means reverse rotation, which is only used when something is stuck and you
need to unclog.
2. Make sure the juice container and the residue container are placed in position.
3. Cut fruits and vegetables into smaller pieces. For example, the carrots shall be cut into
thin slices with size of 15mm×15mm before being put into the machine.
NOTE:
A) Please remove any hard seeds before juicing.
B) It is forbidden to process coconuts, sugarcane or similar hard foodstuffs, since this
may damage the motor.
C
)
)
)
)
It is not recommended to process hard fruit or vegetable rich in fiber and starch.
D) The peel and pits should be removed from oranges, lemons, grapefruits and melons.
4. Drop the prepared fruits or vegetables into the jar lid at an even speed and then let the
Fig.5
9
PRÉPARATION DES FRUITS ET/OU LÉGUMES
· Nettoyez les fruits et légumes et coupez-les en morceaux. Par exemple, les carottes doivent être
découpées en tranches minces d’environ 15 mm x 15 mm avant d’être insérées dans la machine.
· Enlevez les graines ou noyaux durs avant le pressage, pour éviter d’endommager la vis de pressage.
Les noyaux de pêche, de prune, de mangue et d’abricot ne doivent pas être insérés dans le couvercle
du bol pour éviter tout dysfonctionnement ou risques potentiels.
· Les aliments avec une peau épaisse ou dure doivent être épluchés avant d’être insérés dans
l’extracteur à vitesse lente et pressés. Les épluchures et pépins d’oranges, citrons, pamplemousses et
melons doivent être enlevés avant utilisation de l’appareil.
· Il est interdit d’utiliser des noix de coco avec peau, des tiges de canne à sucre complètes ou des
aliments durs semblables, car cela pourrait endommager le moteur.
· Les aliments à fibres dures doivent être découpés en tranches de 3 à 5 cm de longueur et de 1,5 à 2 cm
d’épaisseur.
· Pour les légumes à feuilles et les aliments avec des fibres longues et dures (par ex. le céleri, l’herbe
de céleri sauvage et le chou etc.) coupez les tiges en tranches de 3 à 5 cm de longueur et roulez les
feuilles.
· Les aliments congelés peuvent être utilisés après décongélation. Ne jamais introduire d’aliments
congelés ou de glaçons dans l’extracteur de jus à vitesse lente.
· Ne pressez jamais d’aliments avec de l’huile végétale ou de l’huile animale en quantité dans cet
extracteur de jus à vitesse lente pour éviter de la dégradation et d’endommager la vis.
· N’insérez jamais de canne à sucre, de noix de coco, de kudzu ou céréales (par ex. des haricots, du riz,
etc.) avant d’être trempés dans de l’eau dans l’extracteur de jus à vitesse lente.
· Ne mettez jamais trop d’aliments à la fois dans l’appareil. Les aliments à faible teneur en eau et à fibres
dures doivent être coupés en tranches avant d’être introduits dans l’entonnoir.
· Il n’est pas recommandé d’utiliser des fruits durs ou des légumes riches en fibres et en amidon.
UTILISATION
L’interrupteur marche/arrêt a 3 positions :
· Marche : I
· Arrêt : O
· Sens giratoire inverse : R
1.
Assurez-vous que l’appareil est bien éteint (O) et placez la fiche dans la prise de courant.
2.
Placez les 2 verres doseurs sous les 2 becs verseurs.


