19
DO9248J
www.domo-elektro.be
FR
9
fruits or vegetables drop into the grinding head automatically. Do not load food too fast and
do not load too much food at a time.
Note:
Use the food pusher to remove the blockage if the jar lid is blocked by the materials.
5. Connect the appliance to the power source, and then press the power switch to
the“ON”position, the appliance starts to work. After a few minutes, the juice flow out.
Caution: Do not turn the power switch from "I" to "R" or from "R" to "I" directly at
any time during operation. If required, firstly press the power switch to “O” position and
make the appliance stop running completely and then turn the power switch from "I" to
"R" or from "R" to "I" .
Caution: Do not operate the unit before feeding food to avoid damaging the grinding
assembly (include grinding head and strainer).
Caution
:
Do not put your fingers or other foreign objects into the feeding opening while
it is in operation.
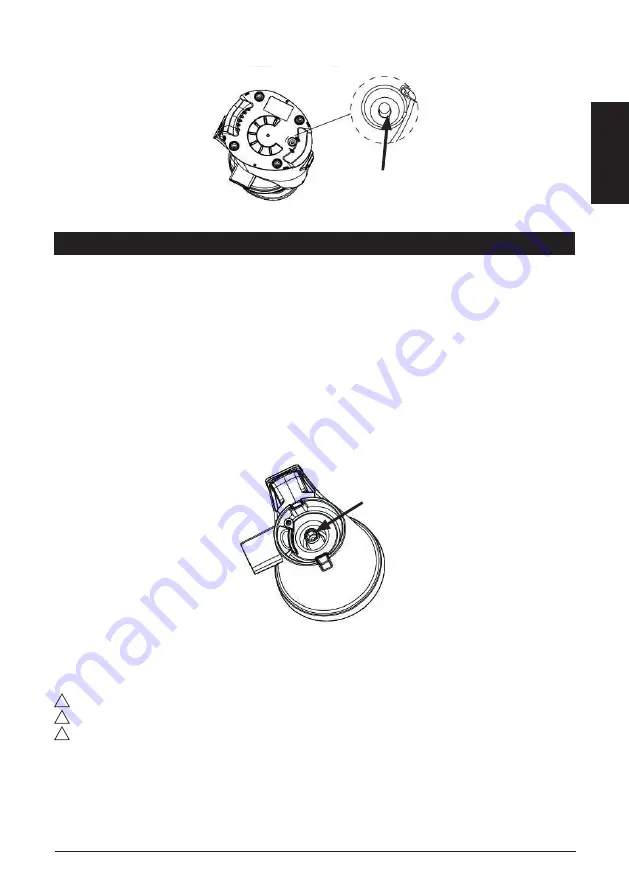
6. During operation, if the machine is stuck and
not operable, please firstly press the power
switch to “
O
” position and then press the reset
switch which is equipped at the bottom of
appliance (see Fig.6). After it, press and hold the power switch to the “
R
” position for few
seconds then try operating again. When reverse function cannot work, turn off the machine
and reassemble following the instructions given. After reassembly please try turning on the
machine.
7. When the juice container is full (the max capacity is 400ml) or the food has been
finished extracting, turn the power switch to the “
O
” position and empty the juice container
and residue container before continuing extracting.
Fig.6
NETTOYAGE ET ENTRETIEN
1.
Afin de faciliter le démontage et le nettoyage, activez l’extracteur de jus à vitesse lente sans charge
pendant environ 30 secondes après avoir retiré la pulpe. Si le couvercle du bol ne peut pas être
détaché facilement, veuillez suivre et répéter l’opération suivante deux ou trois fois : rotation inverse
(R) — arrêt (O) — marche (I) ; en même temps, maintenez et tournez le couvercle du bol pour le
détacher. Après avoir fini d’extraire le jus, versez de l’eau dans la goulotte pour la nettoyer afin que le
couvercle soit plus facile à détacher.
2.
Avant de nettoyer l’appareil, débranchez-le et laissez-le refroidir totalement.
3.
Enlevez le poussoir, puis poussez la fixation vers l’extérieur afin de détacher le couvercle du bol.
4.
Dévissez le couvercle du bol et démontez les autres pièces en ordre inverse du montage.
5.
S’il est difficile d’enlever la vis de pressage, mettez le bol sur la surface de travail et maintenez la vis
de pressage d’une main, puis poussez sur l’axe de la vis en bas du bol de l’autre main jusqu’à ce que la
vis de pressage se détache.
11
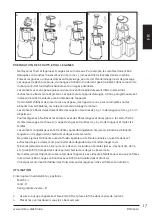
4. Detach the strainer and grinding head from the
jar. If it is difficult to detach the grinding head,
put the jar on the working table and hold the
grinding head with a hand, then push the axis of
grinding head (see Fig.7) at the jar bottom with
another hand to push the grinding head out of the jar.
5. Empty the residue container, and then clean the jar lid, grinding head, strainer, jar and
residue container under running water. When cleaning the strainer, only need to brush the
concave surface of the strainer under running water with the small cleaning brush for
several times, and then the whole strainer can be cleaned well.
Caution: Strainer is sharp, so handle carefully during cleaning
Caution: Do not use metal sponge to clean, it will damage the machine.
6. If you need to clean the residue outlet thoroughly, you shall firstly pull the buffer plate
out of the residue outlet and then clean it completely with the small cleaning brush.
7. Wipe the outside of motor unit with damp cloth. Never immerse the motor unit in water.
8. Dry all parts and assemble all parts well and then store the appliance in a dry place. The
juice container can be stored in the residue container.
Fig.7
Fig.7
6.
Videz les verres doseurs et nettoyez ensuite le couvercle, le poussoir, le tamis, le bol, la vis de
pressage et les verres doseurs à l’eau courante. Nettoyez le tamis avec la brosse de nettoyage.
7.
Si un nettoyage approfondi de la sortie de pulpe est nécessaire, tirez la plaque d’arrêt de la sortie de
pulpe et nettoyez la sortie de pulpe complètement avec la petite brosse de nettoyage.
!
Attention : N’utilisez pas d’éponge métallique, cela endommagerait l’appareil.
!
Soyez prudent en nettoyant le tamis. Le tamis a des bords tranchants.
!
Ne mettez aucune pièce au lave-vaisselle. Les hautes températures peuvent endommager les pièces.
8.
Frottez l’extérieur du bloc moteur avec un chiffon humide. N’immergez jamais le bloc moteur dans
l’eau!
9.
Séchez bien toutes les pièces, remontez l’appareil et gardez-le en un endroit sec.
Conseil : Rincez immédiatement toutes les pièces après usage.


