60
DO9248J
CZ
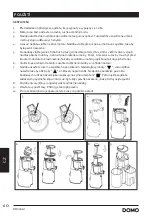
POUŽITÍ
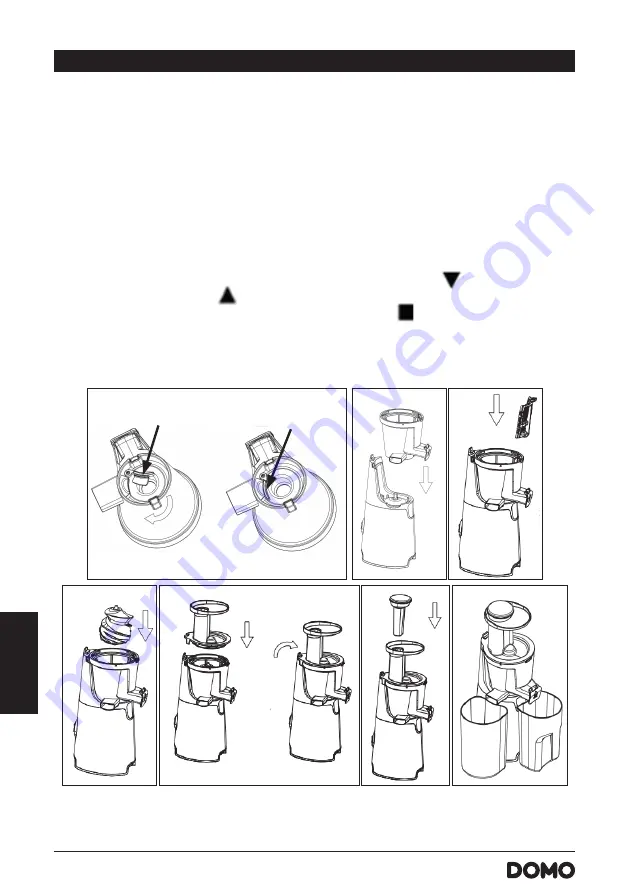
SESTAVENÍ
1.
Před skládáním přístroje se ujistěte, že je vypnutý a vypojený z el. sítě.
2.
Motorovou část postavte na rovné, suché a stabilní místo.
3.
Nádobu otočte dnem vzhůru kde uvidíte malou gumovou část. Tuto destičku zasuňte na určené
místo výstupu odšťavených zbytků.
4.
Lisovací nádobu vložte na blok motoru. Nádobu vložte přesně na osu motoru a zajistěte, tak aby
byla pevně nasazená.
5.
Do nádoby vložte jedno z filtračních sítek (jemné sítko je čistý džus, sítko s většími otvory slouží
na džus obsahem dužiny, nebo síto na mražené suroviny. Pozor, zmrazené suroviny musí být před
lisováním dostatečně rozmrazené, tak aby se vidličkou mohlo propíchnout až do jejich středu).
6.
Vložte šnek a lehkým tlačením zasuňte do těsnění nádoby a na hřídel motoru.
7.
Nádobu uzavřete víkem a zajistěte ho pootočením. Následujte symboly “
”, víko nejdříve
nasaďte tak aby obě šipky “
” směřovaly naproti sobě. Následně pootáčejte po směru
hodinových ručiček dokud šipka neukazuje na symbol zamčení “
”. Potom ještě zajistěte
zatlačením pojistného klipu. Víko musí být vždy správně nasazeno, jinak přístroj nejde spustit.
8.
Pod oba otvory (šťávy i odpadu) vložte odměrné nádoby.
9.
Otevřete výpusť šťávy. Přístroj je takto připraven.
10. Pro rozebírání přístroje opakujte tyto kroky v opačném pořadí.
3
6
4) Do not put overmuch materials in the juicer each time, therefore, the materials
with less moisture and hard fibre shall be put into the jar lid after being cut into
slices.
5) Do not put overmuch materials in the juicer each time, therefore, the materials
with less moisture and hard fibre shall be put into the jar lid after being cut into
slices.
6) Assemble the buffer plate well in position
The buffer plate shall be assembled well in the residue outlet after finish cleaning each
time.
ASSEMBLE YOUR SLOW JUICER
1. Put the jar downwards and make sure that the residue outlet shall be placed well in
position. The jar shall be assembled well in position properly otherwise the appliance will
not operate. Besides, before operating, please check the buffer plate and make sure that it
must be assembled well in the residue outlet (See Fig.2).
2. Then select the strainer based on your demand and then put it into the jar. There are
three strainers including juice strainer, jam strainer and frozen dish strainer for your
selection. After it, put the grinding head into the jar and ensure the grinding head is covered
well into the axis of the motor unit (see Fig.3).
NOTE:
The three strainers including juice strainer, jam strainer and frozen dish strainer
can not be exchanged with each other when operate. Juice strainer is used for extracting
Fig.2
4
6
4) Do not put overmuch materials in the juicer each time, therefore, the materials
with less moisture and hard fibre shall be put into the jar lid after being cut into
slices.
5) Do not put overmuch materials in the juicer each time, therefore, the materials
with less moisture and hard fibre shall be put into the jar lid after being cut into
slices.
6) Assemble the buffer plate well in position
The buffer plate shall be assembled well in the residue outlet after finish cleaning each
time.
ASSEMBLE YOUR SLOW JUICER
1. Put the jar downwards and make sure that the residue outlet shall be placed well in
position. The jar shall be assembled well in position properly otherwise the appliance will
not operate. Besides, before operating, please check the buffer plate and make sure that it
must be assembled well in the residue outlet (See Fig.2).
2. Then select the strainer based on your demand and then put it into the jar. There are
three strainers including juice strainer, jam strainer and frozen dish strainer for your
selection. After it, put the grinding head into the jar and ensure the grinding head is covered
well into the axis of the motor unit (see Fig.3).
NOTE:
The three strainers including juice strainer, jam strainer and frozen dish strainer
can not be exchanged with each other when operate. Juice strainer is used for extracting
Fig.2
7
juice,
jam strainer is used for making ketchup only
while frozen dish strainer is used for
making frozen dish. Select the appropriate strainer based on your demand.
3. Assemble the jar lid on the jar correctly. Firstly, put the jar lid downwards and then
make the symbol “ ” on the jar lid align with the symbol “
” on the jar and then rotate
the jar lid clockwise until the symbol “ ” on the jar lid aligns with the symbol “ ”on the
jar (See Fig.4).
After it, press the fastener inwards to lock the jar lid well in position. The
jar lid shall be assembled well in position properly otherwise the appliance will not operate.
Finally, put the food pusher into the jar lid.
Fig.3
Fig.4
5
7
juice,
jam strainer is used for making ketchup only
while frozen dish strainer is used for
making frozen dish. Select the appropriate strainer based on your demand.
3. Assemble the jar lid on the jar correctly. Firstly, put the jar lid downwards and then
make the symbol “ ” on the jar lid align with the symbol “
” on the jar and then rotate
the jar lid clockwise until the symbol “ ” on the jar lid aligns with the symbol “ ”on the
jar (See Fig.4).
After it, press the fastener inwards to lock the jar lid well in position. The
jar lid shall be assembled well in position properly otherwise the appliance will not operate.
Finally, put the food pusher into the jar lid.
Fig.3
Fig.4
6
7
juice,
jam strainer is used for making ketchup only
while frozen dish strainer is used for
making frozen dish. Select the appropriate strainer based on your demand.
3. Assemble the jar lid on the jar correctly. Firstly, put the jar lid downwards and then
make the symbol “ ” on the jar lid align with the symbol “
” on the jar and then rotate
the jar lid clockwise until the symbol “ ” on the jar lid aligns with the symbol “ ”on the
jar (See Fig.4).
After it, press the fastener inwards to lock the jar lid well in position. The
jar lid shall be assembled well in position properly otherwise the appliance will not operate.
Finally, put the food pusher into the jar lid.
Fig.3
Fig.4
7
7
juice,
jam strainer is used for making ketchup only
while frozen dish strainer is used for
making frozen dish. Select the appropriate strainer based on your demand.
3. Assemble the jar lid on the jar correctly. Firstly, put the jar lid downwards and then
make the symbol “ ” on the jar lid align with the symbol “
” on the jar and then rotate
the jar lid clockwise until the symbol “ ” on the jar lid aligns with the symbol “ ”on the
jar (See Fig.4).
After it, press the fastener inwards to lock the jar lid well in position. The
jar lid shall be assembled well in position properly otherwise the appliance will not operate.
Finally, put the food pusher into the jar lid.
Fig.3
Fig.4
8
8
4. Place your juice container below the juice outlet and residue
container below the residue outlet (see Fig.5). Until now, the
Juicer is ready for operating.
Note:
When need to remove the whole appliance, please grasp
the motor unit instead of the jar lid to remove it to avoid
accident.
USING YOUR JUICER
1. Before attaching the power cord into the outlet, make sure the
power switch is in the “
O
” position, the power switch has three settings: “
I
” indicates
“ON”, press the power switch to “
I
” position to activate the motor and start making juice;
“
O
” indicates “OFF” position, press the power switch to “
O
” position to turn off the
machine; “
R
” means reverse rotation, which is only used when something is stuck and you
need to unclog.
2. Make sure the juice container and the residue container are placed in position.
3. Cut fruits and vegetables into smaller pieces. For example, the carrots shall be cut into
thin slices with size of 15mm×15mm before being put into the machine.
NOTE:
A) Please remove any hard seeds before juicing.
B) It is forbidden to process coconuts, sugarcane or similar hard foodstuffs, since this
may damage the motor.
C
)
)
)
)
It is not recommended to process hard fruit or vegetable rich in fiber and starch.
D) The peel and pits should be removed from oranges, lemons, grapefruits and melons.
4. Drop the prepared fruits or vegetables into the jar lid at an even speed and then let the
Fig.5
9


